Android系统中有四种默认的对话框:警告对话框AlertDialog、进度对话框ProgressDialog、日期选择对话框DatePickerDialog以及时间选择对话框TimePickerDialog。除此之外,我们自定义自已的dialog。
一. 警告对话框(AlertDialog)
Android系统中最常用的对话框是AlertDialog,它是一个提示窗口,需要用户作出选择的。一般会有几个按钮、标题信息、提示信息等。
在程序中创建AlertDialog的步骤:
1.获得AlertDialog的静态内部类Builder对象,由该类来创建对话框,Builder所提供的方法如下:
setTitle():给对话框设置title.
setIcon():给对话框设置图标。
setMessage():设置对话框的提示信息
setItems():设置对话框要显示的一个list,一般用于要显示几个命令时
setSingleChoiceItems():设置对话框显示一个单选的List
setMultiChoiceItems():用来设置对话框显示一系列的复选框。
setPositiveButton():给对话框添加”Yes”按钮。
setNegativeButton():给对话框添加”No”按钮。
2.调用Builder的create( )方法
3.调用AlertDialog的show( )方法显示对话框
下面是一个提示信息对话框的实例:
AlertDialogActivity.java
- package com.android.dialog.activity;
- import android.app.Activity;
- import android.app.AlertDialog;
- import android.content.DialogInterface;
- import android.os.Bundle;
- import android.view.View;
- import android.view.View.OnClickListener;
- import android.widget.Button;
- import android.widget.TextView;
- publicclass AlertDialogActivity extends Activity {
- private TextView tv;
- private Button btn;
- @Override
- publicvoid onCreate(Bundle savedInstanceState) {
- super.onCreate(savedInstanceState);
- setContentView(R.layout.main);
- tv = (TextView)findViewById(R.id.TextView_1);
- btn = (Button)findViewById(R.id.Button_1);
- //实例化AlertDialog.Builder对象
- final AlertDialog.Builder builder = new AlertDialog.Builder(this);
- btn.setOnClickListener(new OnClickListener() {
- publicvoid onClick(View v) {
- //设置提示信息,确定按钮
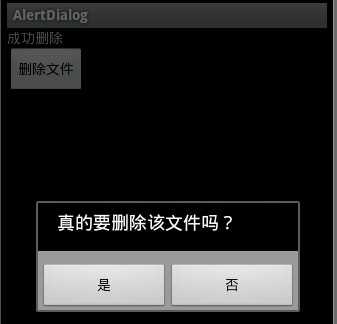
- builder.setMessage("真的要删除该文件吗?").setPositiveButton("是", new DialogInterface.OnClickListener() {
- publicvoid onClick(DialogInterface dialog, int which) {
- tv.setText("成功删除");
- }
- //设置取消按钮
- }).setNegativeButton("否", new DialogInterface.OnClickListener() {
- publicvoid onClick(DialogInterface dialog, int which) {
- tv.setText("取消删除");
- }
- });
- //创建对话框
- AlertDialog ad = builder.create();
- //显示对话框
- ad.show();
- }
- }
- );
- }
- }
main.xml
- <?xml version="1.0" encoding="utf-8"?>
- <LinearLayoutxmlns:android="http://schemas.android.com/apk/res/android"
- android:orientation="vertical"
- android:layout_width="fill_parent"
- android:layout_height="fill_parent"
- >
- <TextView
- android:id="@+id/TextView_1"
- android:layout_width="wrap_content"
- android:layout_height="wrap_content"
- android:text="测试AlertDialog"
- />
- <Button
- android:id="@+id/Button_1"
- android:layout_width="wrap_content"
- android:layout_height="wrap_content"
- android:text="删除文件"
- />
- </LinearLayout>
效果图:
二.进度对话框(ProgressDialog)
在程序中创建ProgressDialog的步骤:
1.覆盖Activity的onCreateDialog( )方法,并在其中创建对话框
2.调用Activity的showDialog( )方法,显示进度对话框
下面是一个提示进度对话框的实例:
ProgressDialogActivity.java
- package com.android.progress.activity;
-
- import android.app.Activity;
- import android.app.Dialog;
- import android.app.ProgressDialog;
- import android.content.DialogInterface;
- import android.os.Bundle;
- import android.view.View;
- import android.view.View.OnClickListener;
- import android.widget.Button;
-
- public class ProgressDialogActivity extends Activity {
- private Button btn;
- @Override
- public void onCreate(Bundle savedInstanceState) {
- super.onCreate(savedInstanceState);
- setContentView(R.layout.main);
- btn = (Button)findViewById(R.id.Button_1);
- btn.setOnClickListener(new OnClickListener() {
- public void onClick(View v) {
- //调用Activity的showDialog()方法,显示进度对话框
- showDialog(0);
- }
- });
- }
-
- @Override
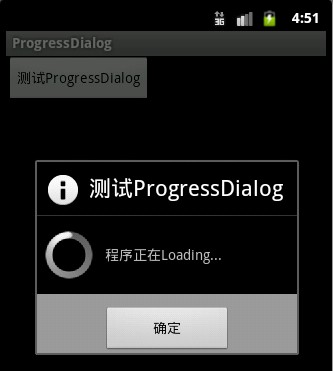
- protected Dialog onCreateDialog(int id) {
- //对进度对话框进行实例化
- ProgressDialog dialog = new ProgressDialog(this);
- //设置显示的标题
- dialog.setTitle("测试ProgressDialog");
- dialog.setIndeterminate(true);
- dialog.setMessage("程序正在Loading...");
- dialog.setCancelable(true);
-
- dialog.setButton(Dialog.BUTTON_POSITIVE, "确定",
- new DialogInterface.OnClickListener() {
- @Override
- public void onClick(DialogInterface dialog, int which) {
- dialog.cancel();
- }
- }
- );
-
- return dialog;
- }
- }
main.xml
- <?xml version="1.0" encoding="utf-8"?>
- <LinearLayout xmlns:android="http://schemas.android.com/apk/res/android"
- android:orientation="vertical"
- android:layout_width="fill_parent"
- android:layout_height="fill_parent"
- >
- <Button
- android:id="@+id/Button_1"
- android:layout_width="wrap_content"
- android:layout_height="wrap_content"
- android:text="测试ProgressDialog"
- />
- </LinearLayout>
效果图:
三.日期,时间选择对话框(DatePickerDialog、TimePickerDialog)
在程序中创建日期,时间选择对话框的步骤:
1.覆盖Activity的onCreateDialog( )方法,并在其中创建对话框
2.分别在OnDateSetListener的onDateSet( )方法和OnTimeSetListener( )的onTimeSet( )事件方法中更改日期,时间
3.调用Activity的showDialog( )方法,显示进度对话框
MainActivity.java
- package com.android.datatime.activity;
-
- import java.util.Calendar;
- import android.app.Activity;
- import android.app.DatePickerDialog;
- import android.app.Dialog;
- import android.app.TimePickerDialog;
- import android.app.DatePickerDialog.OnDateSetListener;
- import android.app.TimePickerDialog.OnTimeSetListener;
- import android.os.Bundle;
- import android.view.View;
- import android.view.View.OnClickListener;
- import android.widget.Button;
- import android.widget.DatePicker;
- import android.widget.TextView;
- import android.widget.TimePicker;
-
- public class MainActivity extends Activity {
- private Button btn1,btn2;
- private TextView tv_1,tv_2;
- private Calendar c;//获得日历实例
- private int m_year,m_month,m_day;
- private int m_hour,m_minute;
-
-
- public void onCreate(Bundle savedInstanceState) {
- super.onCreate(savedInstanceState);
- setContentView(R.layout.main);
- btn1 = (Button)findViewById(R.id.Button_1);
- btn2 = (Button)findViewById(R.id.Button_2);
-
- c = Calendar.getInstance();
-
- m_year = c.get(Calendar.YEAR);
- m_month = c.get(Calendar.MONTH);
- m_day = c.get(Calendar.DAY_OF_MONTH);
-
- m_hour = c.get(Calendar.HOUR);
- m_minute = c.get(Calendar.MINUTE);
-
- tv_1 = (TextView)findViewById(R.id.TextView_1);
-
- tv_1.setText(m_year+":"+(m_month+1)+":"+m_day);//设置TextView里的内容为日期
-
- tv_2 = (TextView)findViewById(R.id.TextView_2);
- tv_2.setText(m_hour+":"+m_minute);//设置TextView里的内容为时间
-
- btn1.setOnClickListener(new OnClickListener() {
- public void onClick(View v) {
- showDialog(0);//显示日期对话框
- }
- });
-
- btn2.setOnClickListener(new OnClickListener() {
- public void onClick(View v) {
- showDialog(1);//显示时间对话框
- }
- });
- }
- //调用Activity的showDialog( )方法显示进对话框
- protected Dialog onCreateDialog(int id) {
- if(id==0)
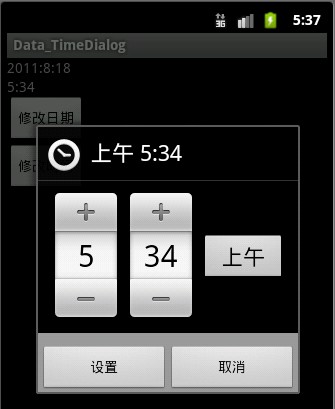
- return new DatePickerDialog(this,l1,m_year, m_month, m_day);
-
- else
- return new TimePickerDialog(this, l2, m_hour, m_minute, false);
- }
- //设置日期监听器
- private OnDateSetListener l1 = new OnDateSetListener() {
- public void onDateSet(DatePicker view, int year, int monthOfYear,
- int dayOfMonth) {
- m_year = year;
- m_month = monthOfYear;
- m_day = dayOfMonth;
- tv_1.setText(m_year+":"+(m_month+1)+":"+m_day);//为TextView设置文本内容,重新显示日期
- }
- };
- //设置时间监听器
- private OnTimeSetListener l2 = new OnTimeSetListener() {
- public void onTimeSet(TimePicker view, int hourOfDay, int minute) {
- m_hour = hourOfDay;
- m_minute = minute;
- tv_2.setText(m_hour+":"+m_minute);//为TextView设置文本内容,重新显示时间
- }
- };
- }
main.xml
- <?xml version="1.0" encoding="utf-8"?>
- <LinearLayout xmlns:android="http://schemas.android.com/apk/res/android"
- android:orientation="vertical"
- android:layout_width="fill_parent"
- android:layout_height="fill_parent"
- >
- <TextView
- android:text=""
- android:id="@+id/TextView_1"
- android:layout_width="wrap_content"
- android:layout_height="wrap_content"
- />
- <TextView
- android:text=""
- android:id="@+id/TextView_2"
- android:layout_width="wrap_content"
- android:layout_height="wrap_content"
- />
- <Button
- android:text="修改日期"
- android:id="@+id/Button_1"
- android:layout_width="wrap_content"
- android:layout_height="wrap_content"
- />
- <Button
- android:text="修改时间"
- android:id="@+id/Button_2"
- android:layout_width="wrap_content"
- android:layout_height="wrap_content"
- />
- </LinearLayout>
效果图:
注意:
1)更改AlertDialog窗口大小的方法:
AlertDialog dialog = new AlertDialog.Builder(this).create();
dialog.show();
WindowManager.LayoutParams params = dialog.getWindow().getAttributes();
params.width = 200;
params.height = 200 ;
dialog.getWindow().setAttributes(params);
2)去除边框
AlertDialog.setView(view,0,0,0,0);
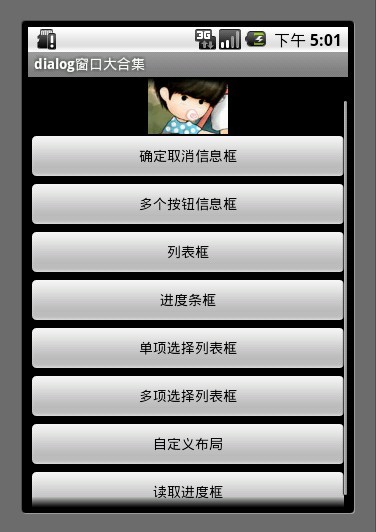
Android中的各类对话框实例:
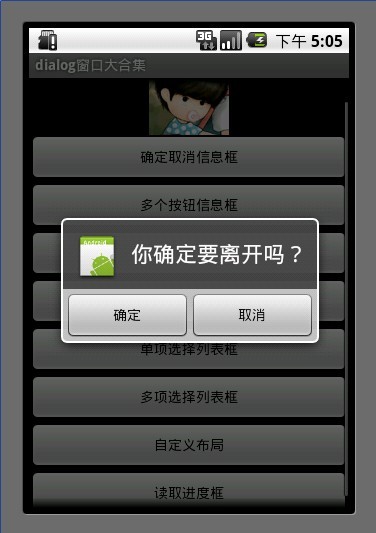
1.确定取消对话框
对话框中有2个按钮 通过调用 setPositiveButton 方法 和 setNegativeButton 方法 可以设置按钮的显示内容以及按钮的监听事件。
我们使用AlerDialog 创建对话框
-
AlertDialog.Builder builder = new AlertDialog.Builder(MainDialog.this);
使用builder设置对话框的title button icon 等等
-
builder.setIcon(R.drawable.icon);
-
builder.setTitle("你确定要离开吗?");
-
builder.setPositiveButton("确定", new DialogInterface.OnClickListener() {
-
public void onClick(DialogInterface dialog, int whichButton) {
-
-
showDialog("你选择了确定");
-
}
-
});
-
builder.setNegativeButton("取消", new DialogInterface.OnClickListener() {
-
public void onClick(DialogInterface dialog, int whichButton) {
-
-
showDialog("你选择了取消");
-
}
-
});
-
builder.create().show();
这个dialog用于现实onClick后监听的内容信息
-
private void showDialog(String str) {
-
w AlertDialog.Builder(MainDialog.this)
-
.setMessage(str)
-
.show();
-
}
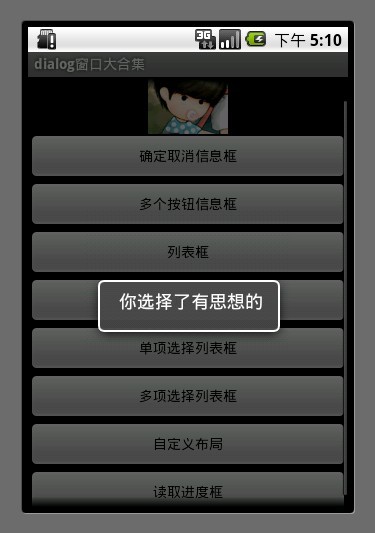
2.多个按钮信息框
-
AlertDialog.Builder builder = new AlertDialog.Builder(MainDialog.this);
-
builder.setIcon(R.drawable.icon);
-
builder.setTitle("投票");
-
builder.setMessage("您认为什么样的内容能吸引您?");
-
builder.setPositiveButton("有趣味的", new DialogInterface.OnClickListener() {
-
public void onClick(DialogInterface dialog, int whichButton) {
-
showDialog("你选择了有趣味的");
-
}
-
});
-
builder.setNeutralButton("有思想的", new DialogInterface.OnClickListener() {
-
public void onClick(DialogInterface dialog, int whichButton) {
-
showDialog("你选择了有思想的");
-
}
-
});
-
builder.setNegativeButton("主题强的", new DialogInterface.OnClickListener() {
-
public void onClick(DialogInterface dialog, int whichButton) {
-
showDialog("你选择了主题强的");
-
}
-
});
-
builder.create().show();
3.列表框
这个数组用于列表选择
-
final String[] mItems = {"item0","item1","itme2","item3","itme4","item5","item6"};
-
AlertDialog.Builder builder = new AlertDialog.Builder(MainDialog.this);
-
builder.setTitle("列表选择框");
-
builder.setItems(mItems, new DialogInterface.OnClickListener() {
-
public void onClick(DialogInterface dialog, int which) {
-
-
showDialog("你选择的id为" + which + " , " + mItems[which]);
-
}
-
});
-
builder.create().show();
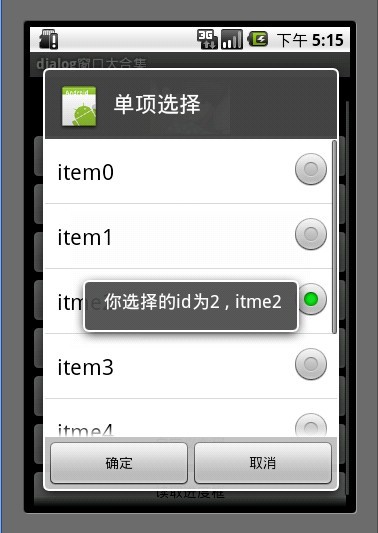
4.单项选择列表框
mSingleChoice 用于记录单选中的ID
-
int mSingleChoiceID = -1;
-
AlertDialog.Builder builder = new AlertDialog.Builder(MainDialog.this);
-
-
mSingleChoiceID = -1;
-
builder.setIcon(R.drawable.icon);
-
builder.setTitle("单项选择");
-
builder.setSingleChoiceItems(mItems, 0, new DialogInterface.OnClickListener() {
-
public void onClick(DialogInterface dialog, int whichButton) {
-
mSingleChoiceID = whichButton;
-
showDialog("你选择的id为" + whichButton + " , " + mItems[whichButton]);
-
}
-
});
-
builder.setPositiveButton("确定", new DialogInterface.OnClickListener() {
-
public void onClick(DialogInterface dialog, int whichButton) {
-
if(mSingleChoiceID > 0) {
-
showDialog("你选择的是" + mSingleChoiceID);
-
}
-
}
-
});
-
builder.setNegativeButton("取消", new DialogInterface.OnClickListener() {
-
public void onClick(DialogInterface dialog, int whichButton) {
-
-
}
-
});
-
builder.create().show();
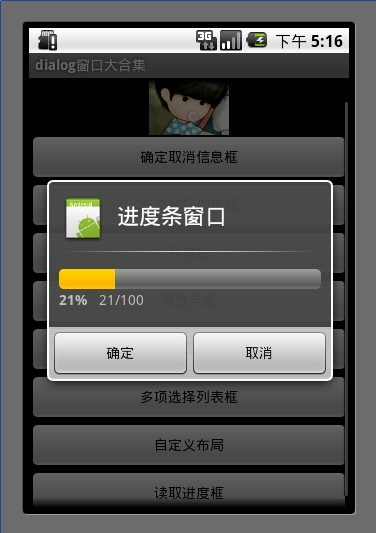
5.进度条框
点击进度条框按钮后 开启一个线程计算读取的进度 假设读取结束为 100
Progress在小于100的时候一直在线程中做循环++ 只到读取结束后,停止线程。
-
mProgressDialog = new ProgressDialog(MainDialog.this);
-
mProgressDialog.setIcon(R.drawable.icon);
-
mProgressDialog.setTitle("进度条窗口");
-
mProgressDialog.setProgressStyle(ProgressDialog.STYLE_HORIZONTAL);
-
mProgressDialog.setMax(MAX_PROGRESS);
-
mProgressDialog.setButton("确定", new DialogInterface.OnClickListener() {
-
public void onClick(DialogInterface dialog, int whichButton) {
-
-
}
-
});
-
mProgressDialog.setButton2("取消", new DialogInterface.OnClickListener() {
-
public void onClick(DialogInterface dialog, int whichButton) {
-
-
}
-
});
-
mProgressDialog.show();
-
new Thread(this).start();
-
-
ic void run() {
-
int Progress = 0;
-
while(Progress < MAX_PROGRESS) {
-
try {
-
Thread.sleep(100);
-
Progress++;
-
mProgressDialog.incrementProgressBy(1);
-
} catch (InterruptedException e) {
-
-
e.printStackTrace();
-
}
-
-
}
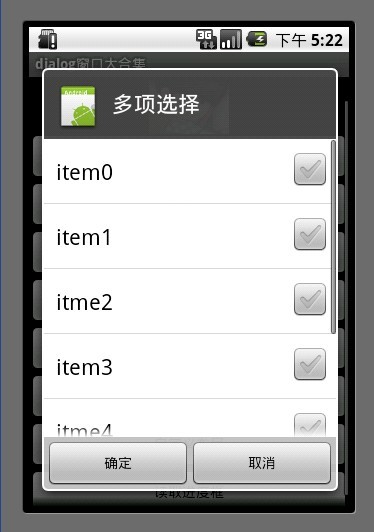
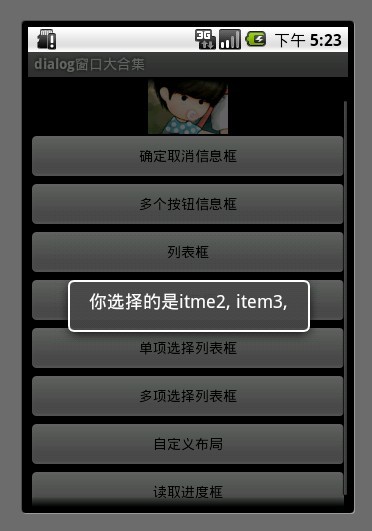
6.多项选择列表框
MultiChoiceID
用于记录多选选中的id号 存在ArrayList中
选中后 add 进ArrayList
取消选中后 remove 出ArrayList。
-
ArrayList <Integer>MultiChoiceID = new ArrayList <Integer>();
-
AlertDialog.Builder builder = new AlertDialog.Builder(MainDialog.this);
-
-
MultiChoiceID.clear();
-
builder.setIcon(R.drawable.icon);
-
builder.setTitle("多项选择");
-
builder.setMultiChoiceItems(mItems,
-
new boolean[]{false, false, false, false, false, false, false},
-
new DialogInterface.OnMultiChoiceClickListener() {
-
public void onClick(DialogInterface dialog, int whichButton,
-
boolean isChecked) {
-
if(isChecked) {
-
MultiChoiceID.add(whichButton);
-
showDialog("你选择的id为" + whichButton + " , " + mItems[whichButton]);
-
}else {
-
MultiChoiceID.remove(whichButton);
-
}
-
-
}
-
});
-
builder.setPositiveButton("确定", new DialogInterface.OnClickListener() {
-
public void onClick(DialogInterface dialog, int whichButton) {
-
String str = "";
-
int size = MultiChoiceID.size();
-
for (int i = 0 ;i < size; i++) {
-
str+= mItems[MultiChoiceID.get(i)] + ", ";
-
}
-
showDialog("你选择的是" + str);
-
}
-
});
-
builder.setNegativeButton("取消", new DialogInterface.OnClickListener() {
-
public void onClick(DialogInterface dialog, int whichButton) {
-
-
}
-
});
-
builder.create().show();
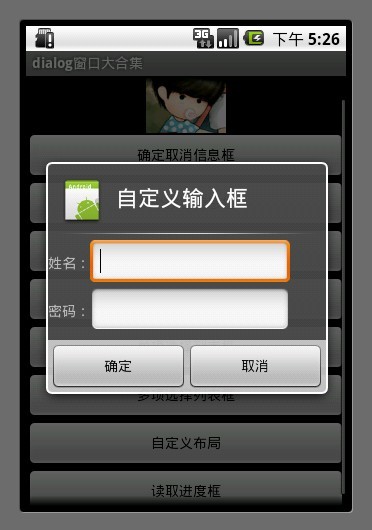
7.自定义布局
讲到自定义布局我就得多说一说了,为什么要多说一说呢?
其实自定义布局在Android的开发中非常重要 因为它能让开发者做出自己五彩缤纷的Activity 而不用去使用系统枯燥的界面。
自定义dialog有什么好处?
比如我们在开发过长当中 要通过介绍系统发送的一个广播弹出一个dialog . 但是dialog必需是基于activity才能呈现出来 如果没有activity 的话 程序就会崩溃。所以我们可以写一个自定义的 dialog 把它定义成一个activity
这样我们收到一条打开dialog的广播后 直接启动这个 activity 程序正常运行~~
这就是自定义dialog的好处。
注明:下面这个例子只是写了自定义dialog 没有把它单独的写在一个activity中 如果须要的话 可以自己改一下。
-
AlertDialog.Builder builder = new AlertDialog.Builder(MainDialog.this);
-
LayoutInflater factory = LayoutInflater.from(this);
-
final View textEntryView = factory.inflate(R.layout.test, null);
-
builder.setIcon(R.drawable.icon);
-
builder.setTitle("自定义输入框");
-
builder.setView(textEntryView);
-
builder.setPositiveButton("确定", new DialogInterface.OnClickListener() {
-
public void onClick(DialogInterface dialog, int whichButton) {
-
-
EditText userName = (EditText) textEntryView.findViewById(R.id.etUserName);
-
EditText password = (EditText) textEntryView.findViewById(R.id.etPassWord);
-
showDialog("姓名 :" + userName.getText().toString() + "密码:" + password.getText().toString() );
-
}
-
});
-
builder.setNegativeButton("取消", new DialogInterface.OnClickListener() {
-
public void onClick(DialogInterface dialog, int whichButton) {
-
-
}
-
});
-
builder.create().show();
-
<span style="color:#000000;"><?xml version="1.0" encoding="utf-8"?>
-
<RelativeLayout xmlns:android="http://schemas.android.com/apk/res/android"
-
android:layout_height="wrap_content"
-
android:layout_width="wrap_content"
-
android:orientation="horizontal"
-
android:id="@+id/dialog">
-
<LinearLayout
-
android:layout_height="wrap_content"
-
android:layout_width="wrap_content"
-
android:orientation="horizontal"
-
android:id="@+id/dialogname">
-
-
<TextView android:layout_height="wrap_content"
-
android:layout_width="wrap_content"
-
android:id="@+id/tvUserName"
-
android:text="姓名:" />
-
<EditText android:layout_height="wrap_content"
-
android:layout_width="wrap_content"
-
android:id="@+id/etUserName"
-
android:minWidth="200dip"/>
-
</LinearLayout>
-
<LinearLayout
-
android:layout_height="wrap_content"
-
android:layout_width="wrap_content"
-
android:orientation="horizontal"
-
android:id="@+id/dialognum"
-
android:layout_below="@+id/dialogname"
-
>
-
<TextView android:layout_height="wrap_content"
-
android:layout_width="wrap_content"
-
android:id="@+id/tvPassWord"
-
android:text="密码:" />
-
<EditText android:layout_height="wrap_content"
-
android:layout_width="wrap_content"
-
android:id="@+id/etPassWord"
-
android:minWidth="200dip"/>
-
</LinearLayout>
-
</RelativeLayout></span>
8.读取进度框
显示一个正在转圈的进度条loading
-
mProgressDialog = new ProgressDialog(this);
-
mProgressDialog.setTitle("读取ing");
-
mProgressDialog.setMessage("正在读取中请稍候");
-
mProgressDialog.setIndeterminate(true);
-
mProgressDialog.setCancelable(true);
-
mProgressDialog.show();
1.确定取消对话框
对话框中有2个按钮 通过调用 setPositiveButton 方法 和 setNegativeButton 方法 可以设置按钮的显示内容以及按钮的监听事件。
我们使用AlerDialog 创建对话框
-
AlertDialog.Builder builder = new AlertDialog.Builder(MainDialog.this);
使用builder设置对话框的title button icon 等等
-
builder.setIcon(R.drawable.icon);
-
builder.setTitle("你确定要离开吗?");
-
builder.setPositiveButton("确定", new DialogInterface.OnClickListener() {
-
public void onClick(DialogInterface dialog, int whichButton) {
-
-
showDialog("你选择了确定");
-
}
-
});
-
builder.setNegativeButton("取消", new DialogInterface.OnClickListener() {
-
public void onClick(DialogInterface dialog, int whichButton) {
-
-
showDialog("你选择了取消");
-
}
-
});
-
builder.create().show();
这个dialog用于现实onClick后监听的内容信息
-
private void showDialog(String str) {
-
w AlertDialog.Builder(MainDialog.this)
-
.setMessage(str)
-
.show();
-
}
2.多个按钮信息框
-
AlertDialog.Builder builder = new AlertDialog.Builder(MainDialog.this);
-
builder.setIcon(R.drawable.icon);
-
builder.setTitle("投票");
-
builder.setMessage("您认为什么样的内容能吸引您?");
-
builder.setPositiveButton("有趣味的", new DialogInterface.OnClickListener() {
-
public void onClick(DialogInterface dialog, int whichButton) {
-
showDialog("你选择了有趣味的");
-
}
-
});
-
builder.setNeutralButton("有思想的", new DialogInterface.OnClickListener() {
-
public void onClick(DialogInterface dialog, int whichButton) {
-
showDialog("你选择了有思想的");
-
}
-
});
-
builder.setNegativeButton("主题强的", new DialogInterface.OnClickListener() {
-
public void onClick(DialogInterface dialog, int whichButton) {
-
showDialog("你选择了主题强的");
-
}
-
});
-
builder.create().show();
3.列表框
这个数组用于列表选择
-
final String[] mItems = {"item0","item1","itme2","item3","itme4","item5","item6"};
-
AlertDialog.Builder builder = new AlertDialog.Builder(MainDialog.this);
-
builder.setTitle("列表选择框");
-
builder.setItems(mItems, new DialogInterface.OnClickListener() {
-
public void onClick(DialogInterface dialog, int which) {
-
-
showDialog("你选择的id为" + which + " , " + mItems[which]);
-
}
-
});
-
builder.create().show();
4.单项选择列表框
mSingleChoice 用于记录单选中的ID
-
int mSingleChoiceID = -1;
-
AlertDialog.Builder builder = new AlertDialog.Builder(MainDialog.this);
-
-
mSingleChoiceID = -1;
-
builder.setIcon(R.drawable.icon);
-
builder.setTitle("单项选择");
-
builder.setSingleChoiceItems(mItems, 0, new DialogInterface.OnClickListener() {
-
public void onClick(DialogInterface dialog, int whichButton) {
-
mSingleChoiceID = whichButton;
-
showDialog("你选择的id为" + whichButton + " , " + mItems[whichButton]);
-
}
-
});
-
builder.setPositiveButton("确定", new DialogInterface.OnClickListener() {
-
public void onClick(DialogInterface dialog, int whichButton) {
-
if(mSingleChoiceID > 0) {
-
showDialog("你选择的是" + mSingleChoiceID);
-
}
-
}
-
});
-
builder.setNegativeButton("取消", new DialogInterface.OnClickListener() {
-
public void onClick(DialogInterface dialog, int whichButton) {
-
-
}
-
});
-
builder.create().show();
5.进度条框
点击进度条框按钮后 开启一个线程计算读取的进度 假设读取结束为 100
Progress在小于100的时候一直在线程中做循环++ 只到读取结束后,停止线程。
-
mProgressDialog = new ProgressDialog(MainDialog.this);
-
mProgressDialog.setIcon(R.drawable.icon);
-
mProgressDialog.setTitle("进度条窗口");
-
mProgressDialog.setProgressStyle(ProgressDialog.STYLE_HORIZONTAL);
-
mProgressDialog.setMax(MAX_PROGRESS);
-
mProgressDialog.setButton("确定", new DialogInterface.OnClickListener() {
-
public void onClick(DialogInterface dialog, int whichButton) {
-
-
}
-
});
-
mProgressDialog.setButton2("取消", new DialogInterface.OnClickListener() {
-
public void onClick(DialogInterface dialog, int whichButton) {
-
-
}
-
});
-
mProgressDialog.show();
-
new Thread(this).start();
-
-
ic void run() {
-
int Progress = 0;
-
while(Progress < MAX_PROGRESS) {
-
try {
-
Thread.sleep(100);
-
Progress++;
-
mProgressDialog.incrementProgressBy(1);
-
} catch (InterruptedException e) {
-
-
e.printStackTrace();
-
}
-
-
}
6.多项选择列表框
MultiChoiceID
用于记录多选选中的id号 存在ArrayList中
选中后 add 进ArrayList
取消选中后 remove 出ArrayList。
-
ArrayList <Integer>MultiChoiceID = new ArrayList <Integer>();
-
AlertDialog.Builder builder = new AlertDialog.Builder(MainDialog.this);
-
-
MultiChoiceID.clear();
-
builder.setIcon(R.drawable.icon);
-
builder.setTitle("多项选择");
-
builder.setMultiChoiceItems(mItems,
-
new boolean[]{false, false, false, false, false, false, false},
-
new DialogInterface.OnMultiChoiceClickListener() {
-
public void onClick(DialogInterface dialog, int whichButton,
-
boolean isChecked) {
-
if(isChecked) {
-
MultiChoiceID.add(whichButton);
-
showDialog("你选择的id为" + whichButton + " , " + mItems[whichButton]);
-
}else {
-
MultiChoiceID.remove(whichButton);
-
}
-
-
}
-
});
-
builder.setPositiveButton("确定", new DialogInterface.OnClickListener() {
-
public void onClick(DialogInterface dialog, int whichButton) {
-
String str = "";
-
int size = MultiChoiceID.size();
-
for (int i = 0 ;i < size; i++) {
-
str+= mItems[MultiChoiceID.get(i)] + ", ";
-
}
-
showDialog("你选择的是" + str);
-
}
-
});
-
builder.setNegativeButton("取消", new DialogInterface.OnClickListener() {
-
public void onClick(DialogInterface dialog, int whichButton) {
-
-
}
-
});
-
builder.create().show();
7.自定义布局
讲到自定义布局我就得多说一说了,为什么要多说一说呢?
其实自定义布局在Android的开发中非常重要 因为它能让开发者做出自己五彩缤纷的Activity 而不用去使用系统枯燥的界面。
自定义dialog有什么好处?
比如我们在开发过长当中 要通过介绍系统发送的一个广播弹出一个dialog . 但是dialog必需是基于activity才能呈现出来 如果没有activity 的话 程序就会崩溃。所以我们可以写一个自定义的 dialog 把它定义成一个activity
这样我们收到一条打开dialog的广播后 直接启动这个 activity 程序正常运行~~
这就是自定义dialog的好处。
注明:下面这个例子只是写了自定义dialog 没有把它单独的写在一个activity中 如果须要的话 可以自己改一下。
-
AlertDialog.Builder builder = new AlertDialog.Builder(MainDialog.this);
-
LayoutInflater factory = LayoutInflater.from(this);
-
final View textEntryView = factory.inflate(R.layout.test, null);
-
builder.setIcon(R.drawable.icon);
-
builder.setTitle("自定义输入框");
-
builder.setView(textEntryView);
-
builder.setPositiveButton("确定", new DialogInterface.OnClickListener() {
-
public void onClick(DialogInterface dialog, int whichButton) {
-
-
EditText userName = (EditText) textEntryView.findViewById(R.id.etUserName);
-
EditText password = (EditText) textEntryView.findViewById(R.id.etPassWord);
-
showDialog("姓名 :" + userName.getText().toString() + "密码:" + password.getText().toString() );
-
}
-
});
-
builder.setNegativeButton("取消", new DialogInterface.OnClickListener() {
-
public void onClick(DialogInterface dialog, int whichButton) {
-
-
}
-
});
-
builder.create().show();
-
<span style="color:#000000;"><?xml version="1.0" encoding="utf-8"?>
-
<RelativeLayout xmlns:android="http://schemas.android.com/apk/res/android"
-
android:layout_height="wrap_content"
-
android:layout_width="wrap_content"
-
android:orientation="horizontal"
-
android:id="@+id/dialog">
-
<LinearLayout
-
android:layout_height="wrap_content"
-
android:layout_width="wrap_content"
-
android:orientation="horizontal"
-
android:id="@+id/dialogname">
-
-
<TextView android:layout_height="wrap_content"
-
android:layout_width="wrap_content"
-
android:id="@+id/tvUserName"
-
android:text="姓名:" />
-
<EditText android:layout_height="wrap_content"
-
android:layout_width="wrap_content"
-
android:id="@+id/etUserName"
-
android:minWidth="200dip"/>
-
</LinearLayout>
-
<LinearLayout
-
android:layout_height="wrap_content"
-
android:layout_width="wrap_content"
-
android:orientation="horizontal"
-
android:id="@+id/dialognum"
-
android:layout_below="@+id/dialogname"
-
>
-
<TextView android:layout_height="wrap_content"
-
android:layout_width="wrap_content"
-
android:id="@+id/tvPassWord"
-
android:text="密码:" />
-
<EditText android:layout_height="wrap_content"
-
android:layout_width="wrap_content"
-
android:id="@+id/etPassWord"
-
android:minWidth="200dip"/>
-
</LinearLayout>
-
</RelativeLayout></span>
8.读取进度框
显示一个正在转圈的进度条loading
-
mProgressDialog = new ProgressDialog(this);
-
mProgressDialog.setTitle("读取ing");
-
mProgressDialog.setMessage("正在读取中请稍候");
-
mProgressDialog.setIndeterminate(true);
-
mProgressDialog.setCancelable(true);
-
mProgressDialog.show();
Android学习开发之对话框详解与实例,布布扣,bubuko.com
Android学习开发之对话框详解与实例
原文:http://blog.csdn.net/he90227/article/details/24365287