1、Adapter适配器实现ListView
2、dialog对话框控件
3、有返回结果的activity的跳转
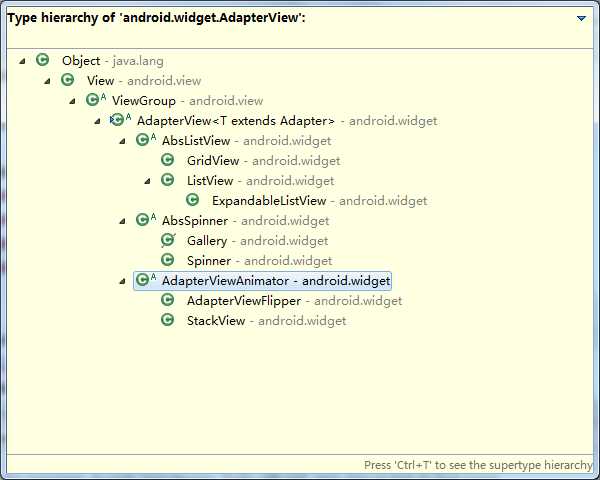
这里所说的listView就是从AdapterView中继承而来。
ListView可以在xml中通过设置android:entries:"@array/***",来获取数据。而项目中一般是通过adapter适配器来给listView中注入数据的。
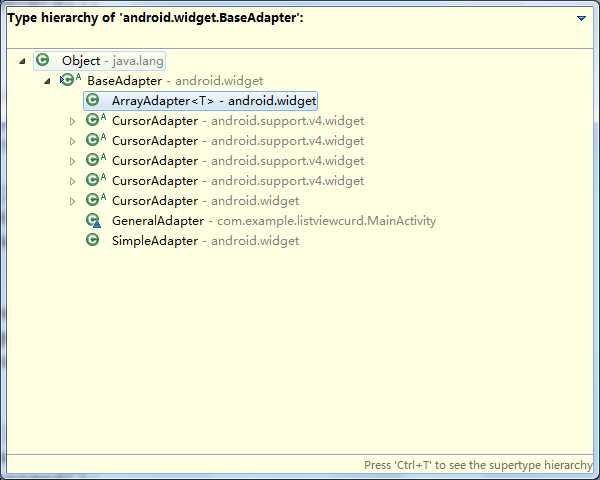
AdapterView通过Adapter(适配器类)向AdapterView的子类视图填充数据。其中BaseAdapter是所有适配器的基类。
这个项目使用的是自定义的Adapter--generalAdapter。
BaseAdapter的继承图
AdapterView的继承图(右上角带A的是抽象类)
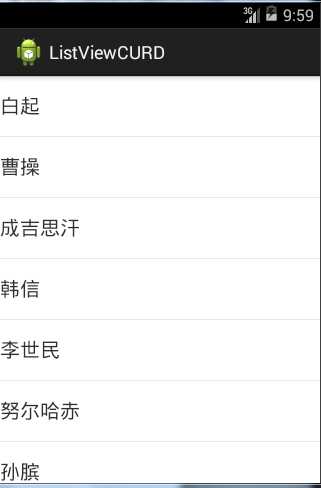
整个过程完成后的页面布局:
在activity_main.xml中简历一个ListView:
 1 <RelativeLayout xmlns:android="http://schemas.android.com/apk/res/android"
 2     xmlns:tools="http://schemas.android.com/tools"
 3     android:layout_width="match_parent"
 4     android:layout_height="match_parent"
 5      >
 6
 7     <ListView
 8         android:id="@+id/lvGeneral"
 9         android:layout_width="match_parent"
10         android:layout_height="match_parent"
11         android:text="@string/hello_world" />
12
13 </RelativeLayout>
下面是MainActivity.java代码:
package com.example.listviewcurd;

import java.util.ArrayList;
import java.util.List;

import com.example.entity.GeneralBean;

import android.os.Bundle;
import android.os.Handler;
import android.app.Activity;
import android.app.AlertDialog;
import android.content.DialogInterface;
import android.content.Intent;
import android.content.DialogInterface.OnClickListener;
import android.util.Log;
import android.view.Menu;
import android.view.View;
import android.view.ViewGroup;
import android.widget.AdapterView;
import android.widget.AdapterView.OnItemLongClickListener;
import android.widget.BaseAdapter;
import android.widget.ListView;
import android.widget.TextView;

public class MainActivity extends Activity {
	private static final int ACTION_DETAILS = 0;
	private static final int ACTION_ADD = 1;
	private static final int ACTION_DELETE = 2;
	private static final int ACTION_UPDATE = 3;


	ListView mlvGeneral;
	List<GeneralBean> mGenerals;
	GeneralAdapter mAdapter;
	int mPosition;

	@Override
	protected void onCreate(Bundle savedInstanceState) {
		super.onCreate(savedInstanceState);
		setContentView(R.layout.activity_main);
		initData();
		initView();
		setListener();
	}

	private void setListener() {
		mlvGeneral.setOnItemLongClickListener(new OnItemLongClickListener() {

			@Override
			public boolean onItemLongClick(AdapterView<?> parent, View view,
					final int position, long id) {
				AlertDialog.Builder builder = new AlertDialog.Builder(MainActivity.this);
				builder.setTitle("选择一下操作")
				.setItems(new String[]{"查看详情","添加数据","删除数据","修改数据"}, new OnClickListener() {

					@Override
					public void onClick(DialogInterface dialog, int which) {
						switch (which) {
						case ACTION_DETAILS:
							showDetails(position);
							break;
						case ACTION_ADD:

							break;
						case ACTION_DELETE:
							mAdapter.remove(position);
							break;
						case ACTION_UPDATE:
							//启动修改的activity,并把当前操作对象传递过去
							Intent intent = new Intent(MainActivity.this,UpdateActivity.class);
							intent.putExtra("general", mGenerals.get(position));
							mPosition = position;
							startActivityForResult(intent, ACTION_UPDATE);//需要返回结果 在onActivityResult中接收返回的结果
							break;

						default:
							break;
						}
					}

					private void showDetails(int position) {
						GeneralBean general = mGenerals.get(position);
						AlertDialog.Builder builder = new AlertDialog.Builder(MainActivity.this);
						builder.setTitle(general.getName())
						.setMessage(general.getDetails())
						.setPositiveButton("返回", null);
						AlertDialog dialog = builder.create();
						dialog.show();
					}
				});
				AlertDialog dialog = builder.create();
				dialog.show();
				return true;
			}
		});
	}

	private void initView() {
		mlvGeneral = (ListView) this.findViewById(R.id.lvGeneral);
		mAdapter = new GeneralAdapter(mGenerals, this);
		mlvGeneral.setAdapter(mAdapter);
	}

	private void initData() {
		String[] names = getResources().getStringArray(R.array.general);
		String[] details = getResources().getStringArray(R.array.details);
		mGenerals = new ArrayList<GeneralBean>();
		for(int i=0;i<names.length;i++){
			GeneralBean general = new GeneralBean(names[i], details[i]);
			mGenerals.add(general);
		}
	}

	class GeneralAdapter extends BaseAdapter {
		List<GeneralBean> generals;
		MainActivity context;

		public void remove(int position){
			generals.remove(position);
			notifyDataSetChanged();//通知数据集改变,会重新调用getView
		}

		public void add(GeneralBean general){
			mGenerals.add(general);
			notifyDataSetChanged();
		}

		public void update(int position,GeneralBean general){
			mGenerals.set(position, general);
			notifyDataSetChanged();
		}

		public GeneralAdapter(List<GeneralBean> generals, MainActivity context) {
			super();
			this.generals = generals;
			this.context = context;
		}

		@Override
		public int getCount() {
			return generals.size();
		}

		@Override
		public Object getItem(int arg0) {
			return null;
		}

		@Override
		public long getItemId(int arg0) {
			return 0;
		}

		@Override
		public View getView(int position, View contentView, ViewGroup parent) {
			ViewHolder holder = null;
			if (contentView == null) {
				contentView = View
						.inflate(context, R.layout.item_general, null);
				holder = new ViewHolder();
				holder.tvName = (TextView) contentView.findViewById(R.id.tvName);
				contentView.setTag(holder);
			}else{
				holder = (ViewHolder) contentView.getTag();
			}
			GeneralBean general = generals.get(position);
			holder.tvName.setText(general.getName());
//			Log.i("main","postion="+position);
			return contentView;
		}

		class ViewHolder {
			TextView tvName;
		}

	}
	@Override
	protected void onActivityResult(int requestCode, int resultCode, Intent data) {
		super.onActivityResult(requestCode, resultCode, data);
		if(resultCode!=RESULT_OK){
			return;
		}
		switch (requestCode) {
		case ACTION_UPDATE:
			GeneralBean general = (GeneralBean) data.getSerializableExtra("general");
			mAdapter.update(mPosition, general);
			break;

		case ACTION_ADD:

			break;
		}
	}
}
其中:
在initData()方法中,拿到了定义好的array中的数据,并放到了一个List中。
在GeneralAdapter类中,继承了BaseAdapter类,要实现其中的四个抽象方法。重要的是getCount()方法和getView()方法。
因为ListView中,每一项的布局是相同的,所以我们要建立一个共同布局供ListView使用。在item_general.xml中我们建立了这个共同布局。
<RelativeLayout xmlns:android="http://schemas.android.com/apk/res/android"
    xmlns:tools="http://schemas.android.com/tools"
    android:layout_width="match_parent"
    android:layout_height="match_parent"
     >

    <TextView
        android:id="@+id/tvName"
        android:layout_width="wrap_content"
        android:layout_height="60dp"
        android:gravity="center_vertical"
        android:textSize="20sp"
        android:text="白起"
        />

</RelativeLayout>
在getView()方法中,contentView = View.inflate(context, R.layout.item_general, null);实现了将拿到的ListViewItem布局,转化为View类型的java对象。(此方法也可以用在其他地方,就是用来拿不是main_activity.xml的页面。很重要呢。)
在initView()方法中关联了页面和适配器,从而拿到了数据。
mAdapter = new GeneralAdapter(mGenerals, this); //创建适配器
mlvGeneral.setAdapter(mAdapter);//关联适配器
然后是监听事件,setListener() 方法中定义。当长按某一个Item的时候,触发时间,弹出一个增删查改的对话框,进行选择然后调用其对应方法。
在查找中,只是找到对应的选项,将其信息显示出来了。
其中用到了dialog对话框控件。这里用的是列表对话框。(常用的有标准对话框,列表对话框,和自定义对话框)。
这里说几点ListView的优化:
定义ListView控件的高度和宽度要避免使用wrap_content,否则会导致getView()重复调用多次(因为随着ListView每一项的载入,若果使用包裹内容的话,会倒是ListView总是重新画),尽量使用match_parent或固定高宽。
contentView,第一次创建完成后,就重复利用第一次创建的,不会再使用view.inflate方法去拿要创建的列表项Item。
在删除中,我们调用了适配器类中的notifyDataSetChanged()方法。这个方法会通知AdapterView列表项发生了改变,需要重新调用getView()方法。
在更新中,启动修改的activity,并将要修改的对象传递过去。使用了Intent完成此项操作。startActivityForResult()用到了有返回结果的activity跳转。
创建了update_Activity:
package com.example.listviewcurd;

import com.example.entity.GeneralBean;

import android.os.Bundle;
import android.app.Activity;
import android.content.Intent;
import android.view.Menu;
import android.view.View;
import android.view.View.OnClickListener;
import android.widget.EditText;

public class UpdateActivity extends Activity {
	EditText metName,metDetails;
	@Override
	protected void onCreate(Bundle savedInstanceState) {
		super.onCreate(savedInstanceState);
		setContentView(R.layout.activity_update);
		initView();
		initData();
		setListener();
	}
	private void setListener() {
		setOKClickListener();
		setCancelClickListener();
	}
	private void setCancelClickListener() {
		findViewById(R.id.btnCancel).setOnClickListener(new OnClickListener() {

			@Override
			public void onClick(View arg0) {
				finish();//把窗口关闭
			}
		});
	}
	private void setOKClickListener() {
		findViewById(R.id.btnOK).setOnClickListener(new OnClickListener() {

			@Override
			public void onClick(View v) {
				String details = metDetails.getText().toString();
				String name = metName.getText().toString();
				GeneralBean general = new GeneralBean(name, details);
				Intent intent = new Intent(UpdateActivity.this, MainActivity.class);
				intent.putExtra("general", general);
				setResult(RESULT_OK, intent);
				finish();
			}
		});
	}
	private void initData() {
		Intent intent = getIntent();
		GeneralBean general = (GeneralBean) intent.getSerializableExtra("general");
		metName.setText(general.getName());
		metDetails.setText(general.getDetails());
	}
	private void initView() {
		metName = (EditText) this.findViewById(R.id.etName);
		metDetails = (EditText) this.findViewById(R.id.etDetails);
	}


}
对应的xml页面activity_update.xml:
 1 <RelativeLayout xmlns:android="http://schemas.android.com/apk/res/android"
 2     xmlns:tools="http://schemas.android.com/tools"
 3     android:layout_width="match_parent"
 4     android:layout_height="match_parent"
 5     >
 6
 7     <EditText
 8         android:id="@+id/etName"
 9         android:layout_width="80dp"
10         android:layout_height="wrap_content"
11         android:text="白起"
12         />
13     <EditText
14         android:id="@+id/etDetails"
15         android:layout_width="match_parent"
16         android:layout_height="80dp"
17         android:text="@string/detail"
18         android:layout_below="@id/etName"
19         />
20     <Button
21         android:id="@+id/btnOK"
22         android:layout_width="wrap_content"
23         android:layout_height="wrap_content"
24         android:text="修改"
25         android:layout_below="@id/etDetails"
26         android:layout_marginLeft="50dp"
27         />
28
29      <Button
30         android:id="@+id/btnCancel"
31         android:layout_width="wrap_content"
32         android:layout_height="wrap_content"
33         android:text="放弃"
34         android:layout_below="@id/etDetails"
35         android:layout_toRightOf="@id/btnOK"
36
37         />
38 </RelativeLayout>
原文:http://www.cnblogs.com/haojiahong/p/4605184.html