java中的三大特性:封装、继承、多态
在封装特性中,程序员在对属性的操作的时候,尽量要通过方法来操作属性。
当然并非是所有的都需要这么来进行操作,比如说static关键字修饰的属性,就可以直接通过类型.属性名来进行操作。但是通常来说,我们不涉及到static修饰的时候,我们都会通过public关键字修饰的方法来进行调用private关键字修饰的,因为public关键字修饰的更多的是要暴露给外部来进行使用。
继承做为承上启下的关键的一点,所以继承这一块要学好。因为承接了封装,也是多态的基石 。
继承是类和类之间的关系;继承是通过已经存在的类作为基础,从而建立起来新的类;所以继承中的知识就是围绕着继承来进行展开的。
首先需要进行声明的是:如果java中的一个类没有显示的有继承关系,也就是没有extends关键字,那么默认的继承的是Object类。
在之前的java封装中写过一个标准的javabean类,但是还是有些细节没有描述清楚
public class Person {
    private Integer id;
    private String username;

    public Person() {
    }

    public Person(Integer id, String username) {
        this.id = id;
        this.username = username;
    }

    public Integer getId() {
        return id;
    }

    public void setId(Integer id) {
        this.id = id;
    }

    public String getUsername() {
        return username;
    }

    public void setUsername(String username) {
        this.username = username;
    }

    @Override
    public String toString() {
        return "Person{" +
                "id=" + id +
                ", username=‘" + username + ‘\‘‘ +
                ‘}‘;
    }
}
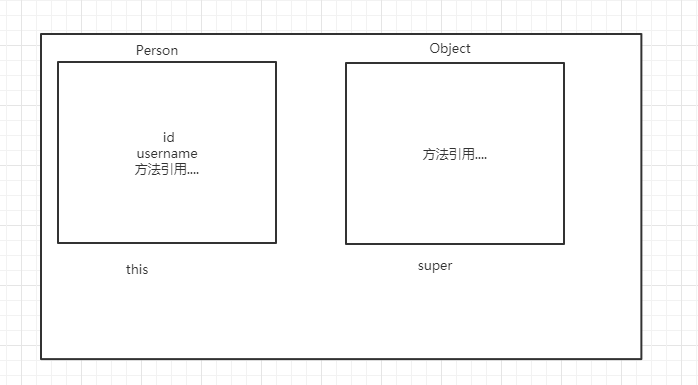
可以从上面看到类上没有extends关键字,在java中默认给省略了,其实是继承了Object类的。关键没有显示的写,但是最终依然会使用到其中的方法
public class Object {

    private static native void registerNatives();
    static {
        registerNatives();
    }

    // 这个也是经常使用到的方法
    public final native Class<?> getClass();

	// 下面两个方法是常用的方法
    public native int hashCode();


    public boolean equals(Object obj) {
        return (this == obj);
    }


    protected native Object clone() throws CloneNotSupportedException;

    // 最常用的方法。但是这个方法通常都是要被重写的,因为这个原始方法没有太大的参考意义
    public String toString() {
        return getClass().getName() + "@" + Integer.toHexString(hashCode());
    }

	// 线程中的方法
    public final native void notify();


    public final native void wait(long timeout) throws InterruptedException;


    public final void wait(long timeout, int nanos) throws InterruptedException {
        if (timeout < 0) {
            throw new IllegalArgumentException("timeout value is negative");
        }

        if (nanos < 0 || nanos > 999999) {
            throw new IllegalArgumentException(
                                "nanosecond timeout value out of range");
        }

        if (nanos > 0) {
            timeout++;
        }

        wait(timeout);
    }


    public final void wait() throws InterruptedException {
        wait(0);
    }

	// 垃圾回收调用的方法
    protected void finalize() throws Throwable { }
}
对于继承来说,我更感觉每个子类实例对象都拥有了父类的一块空间。因为对于一个子类来说,父类是一个通用的模板。每个子类都有着父类的空间。
我在这里画出来自己理解的一块内存图:
这里模拟三个类之间继承的关系图,有些不太准备,应该有方法区的引用信息,这里没有画出:
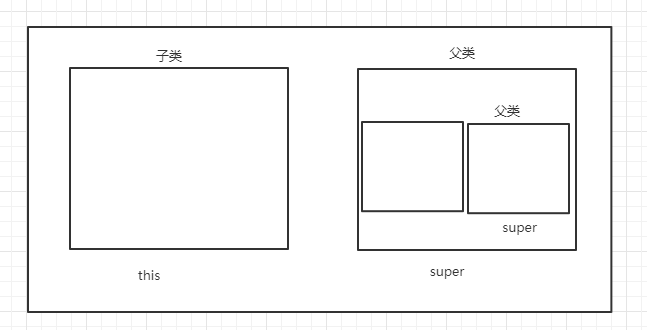
对于当前类来说,对象实例在堆内存有一块空间,但是这块内存并非只包含了当前类的属性和方法的空间,还包含了父类的一些信息,还有父类的父类的一些信息。
针对于上面的Person类,那么对应的关系图就应该是:
那么接下来就需要详细的讲解下一个对象中的内存图的初始化过程。
类似之前C语言中提到过的变量为什么需要进行初始化,创建出来一个对象,也需要经过分配内存和初始化操作等。
对于创建一个对象来说:
Person person = new Person();
这段代码的实现做了三件事情:
1、new关键字负责向操作系统申请分配内存;
2、调用了Person类的构造函数;
3、Person将会去初始化父类空间。
在第一步中我们无需关注,更多的是需要关注第二步和第三步。
从第二步中首先会调用Person类的构造函数,如下所示:
    public Person() {
    }

    public Person(Integer id, String username) {
        this.id = id;
        this.username = username;
    }
首先,从构造函数入手。其实这里也省略了一些代码,我显示的写出来:
    public Person() {
        super();
    }

    public Person(Integer id, String username) {
        super();
        this.id = id;
        this.username = username;
    }
通过这个super,这结合着上面画的体系结构图,可以判断出这个super()使用来初始化父类空间的。但是因为没有new关键字,是不会创建父类对象的,只是用来做初始化的,初始化父类中的属性等。开篇的时候提到过,继承是通过已经存在的类创建出来一个新的类。
通过构造方法可以达到对父类空间的初始化,但是一般来说,都是隐式的,除非自己有特定的要求。
那么初始化父类空间做了一些什么事情?
首先会介绍一些概念,可能会引起各位看官的极度不适,非战斗人员请及时撤离:
参考博客:https://www.cnblogs.com/ysocean/p/8194428.html#_label0_2
静态代码块:静态代码块在类被加载的时候就运行了,而且只运行一次,并且优先于各种代码块以及构造函数。如果一个类中有多个静态代码块,会按照书写顺序依次执行
构造代码块:构造代码块在创建对象时被调用,每次创建对象都会调用一次,但是优先于构造函数执行。需要注意的是,如果不实例化对象,构造代码块是不会执行的。
构造函数:在类的对象创建时定义初始化的状态
普通代码块:普通代码块就是方法中的{}
下面来进行验证:
public class CodeblockDemo1 {
    static {
        System.out.println("hello,static code1");
    }

    static {
        System.out.println("hello,static code2");
    }

    static {
        System.out.println("hello,static code3");
    }
}
测试代码:
public class Test {
    public static void main(String[] args) {
        try {
            Class.forName("com.guang.javaextends.CodeblockDemo1");
        } catch (ClassNotFoundException e) {
            e.printStackTrace();
        }
    }
}
查看控制台输出,可以看到输出了CodeblockDemo1类中的静态代码块,验证了上面说过的,在类加载的时候就运行,而且是按照静态代码块的顺序执行的。
但是这里并没有证实只会运行一次,这个马上证明。
public class CodeblockDemo1 {
    static {
        System.out.println("hello,static code1");
    }

    static {
        System.out.println("hello,static code2");
    }

    static {
        System.out.println("hello,static code3");
    }

    {
        System.out.println("构造代码块....");
    }

    public CodeblockDemo1() {
        System.out.println("构造方法.......");
    }
}
测试类验证:
public class Test {
    public static void main(String[] args) {
        try {
            Class.forName("com.guang.javaextends.CodeblockDemo1");
            CodeblockDemo1 demo1 = new CodeblockDemo1();
            CodeblockDemo1 demo2 = new CodeblockDemo1();
            CodeblockDemo1 demo3 = new CodeblockDemo1();
        } catch (ClassNotFoundException e) {
            e.printStackTrace();
        }
    }
}
查看控制台输出:
hello,static code1
hello,static code2
hello,static code3
构造代码块....
构造方法.......
构造代码块....
构造方法.......
构造代码块....
构造方法.......
通过上面的Demo可以看到,静态代码块是只会在加载的时候执行一次,而构造代码块会结合着构造函数一同使用的。但是构造代码块一般来说使用的比较少。
下面再来证明一下上面将的顺序问题,再写一个类来继承CodeblockDemo1
public class CodeblockDemo2 extends CodeblockDemo1 {
    static {
        System.out.println("hello,static code11");
    }

    static {
        System.out.println("hello,static code22");
    }

    static {
        System.out.println("hello,static code33");
    }

    {
        System.out.println("构造代码块....");
    }

    public CodeblockDemo2() {
        System.out.println("构造方法.......");
    }
}
测试类:
public class Test {
    public static void main(String[] args) {
        try {
            Class.forName("com.guang.javaextends.CodeblockDemo2");
        } catch (ClassNotFoundException e) {
            e.printStackTrace();
        }
    }
}
查看控制台输出:
hello,static code1
hello,static code2
hello,static code3
hello,static code11
hello,static code22
hello,static code33
可以看到,先访问父类中的静态方法,然后再访问子类的静态方法。
在接着看,构造函数和静态方法的结合:
public class CodeblockDemo1 {
    static {
        System.out.println("hello,static code1");
    }

    static {
        System.out.println("hello,static code2");
    }

    static {
        System.out.println("hello,static code3");
    }

    {
        System.out.println("构造代码块1....");
    }

    public CodeblockDemo1() {
        System.out.println("构造方法11.......");
    }
}


public class CodeblockDemo2 extends CodeblockDemo1 {
    static {
        System.out.println("hello,static code11");
    }

    static {
        System.out.println("hello,static code22");
    }

    static {
        System.out.println("hello,static code33");
    }

    {
        System.out.println("构造代码块11....");
    }

    public CodeblockDemo2() {
        System.out.println("构造方法11.......");
    }
}
在测试类中测试:
public class Test {
    public static void main(String[] args) {
        try {
            Class.forName("com.guang.javaextends.CodeblockDemo2");
            CodeblockDemo2 demo1 = new CodeblockDemo2();
        } catch (ClassNotFoundException e) {
            e.printStackTrace();
        }
    }
}
查看控制台输出:
hello,static code1
hello,static code2
hello,static code3
hello,static code11
hello,static code22
hello,static code33
构造代码块1....
构造方法11.......
构造代码块11....
构造方法11.......
可以看到,先加载父类中的静态方法,然后再加载子类中的静态方法。然后访问构造函数中,先访问父类的构造代码块和构造函数,然后再去访问子类的。
其实这里也很好理解,因为对于类来说,不一定要创建对象,所以先将里面的静态方法加载完,然后再根据需要加载非静态的。
同时也可以看到,调用了构造代码块和构造方法,这里只是做一些初始化工作。
这两个关键字就非常简单了,可以理解成this就是当前类的对象,super代表的是当前类的父类引用。
唯一一点使用的时候在于构造函数中,不能够同时出现this()和super()等,不管是有参还是无参。
用上面的一张内存图来进行解释十分合理。
对于父子类:如果不需要创建对象,首先加载父类中的静态函数,然后加载子类中的静态函数;
对于创建一个对象来说,首先经过内存分配,然后对成员进行初始化。首先也需要经过上面的一步。然后需要经过父类的构造代码块和构造函数,再经过子类的构造代码块和构造函数。
原文:https://www.cnblogs.com/likeguang/p/15149386.html