首先安装 Confluent Platform
Use this quick start to get up and running with Confluent Platform and its main components in a development environment. This quick start uses Confluent Control Center included in Confluent Platform for topic management and event stream processing using ksqlDB.
In this quick start, you create Apache Kafka? topics, use Kafka Connect to generate mock data to those topics, and create ksqlDB streaming queries on those topics. You then go to Control Center to monitor and analyze the streaming queries.
See also
You can also run an automated version of this quick start designed for Confluent Platform local installs.
Prerequisites:
Internet connectivity.Operating System currently supported by Confluent Platform.A supported version of Java downloaded and installed.Java 8 and Java 11 are supported in this version of Confluent Platform (Java 9 and 10 are not supported). For more information, see Java supported versions.
Go to the downloads page.
Scroll to the Download Confluent Platform section and provide the following:
deb, rpm, tar, or zipClick DOWNLOAD FREE.
Tip
You have installation options for
Ansible,Docker, andKubernetes. Also, you can download a previous version from Previous Versions.
Decompress the file. You should have the directories, such as bin and etc.
Set the environment variable for the Confluent Platform directory.
export CONFLUENT_HOME=<path-to-confluent>
Add the Confluent Platform bin directory to your PATH.
export PATH=$PATH:$CONFLUENT_HOME/bin
Install the Kafka Connect Datagen source connector using the Confluent Hub client. This connector generates mock data for demonstration purposes and is not suitable for production. Confluent Hub is an online library of pre-packaged and ready-to-install extensions or add-ons for Confluent Platform and Kafka.
confluent-hub install --no-prompt confluentinc/kafka-connect-datagen:latest
Start Confluent Platform using the Confluent CLI confluent local services start command. This command starts all of the Confluent Platform components, including Kafka, ZooKeeper, Schema Registry, HTTP REST Proxy for Kafka, Kafka Connect, ksqlDB, and Control Center.
Important
The confluent local commands are intended for a single-node development environment and are not suitable for a production environment. The data that are produced are transient and are intended to be temporary. For production-ready workflows, see Install and Upgrade Confluent Platform.
confluent local services start
Your output should resemble:
Starting Zookeeper
Zookeeper is [UP]
Starting Kafka
Kafka is [UP]
Starting Schema Registry
Schema Registry is [UP]
Starting Kafka REST
Kafka REST is [UP]
Starting Connect
Connect is [UP]
Starting KSQL Server
KSQL Server is [UP]
Starting Control Center
Control Center is [UP]
In this step, you create Kafka topics using Confluent Control Center. Confluent Control Center provides the functionality for building and monitoring production data pipelines and event streaming applications.
Navigate to the Control Center web interface at http://localhost:9021.
If you installed Confluent Platform on a different host, replace localhost with the host name in the address.
It may take a minute or two for Control Center to come online.
Note
Control Center won’t connect to ksqlDB if Control Center isn’t open and running in a
localhostbrowser session.
Click the controlcenter.cluster tile.
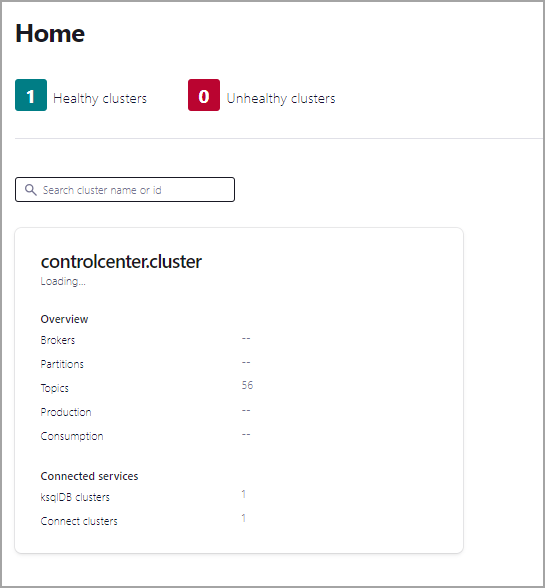
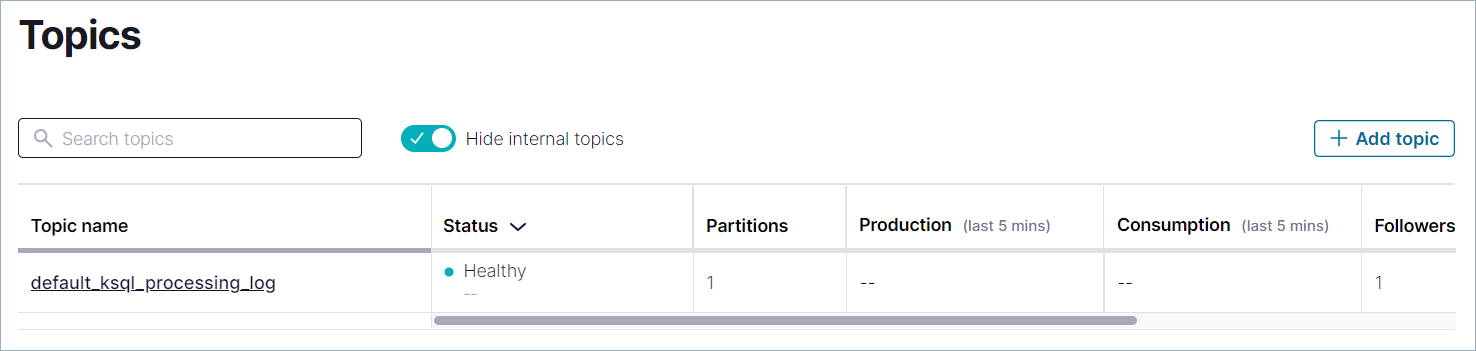
In the navigation bar, click Topics to open the topics list, and then click Add a topic.
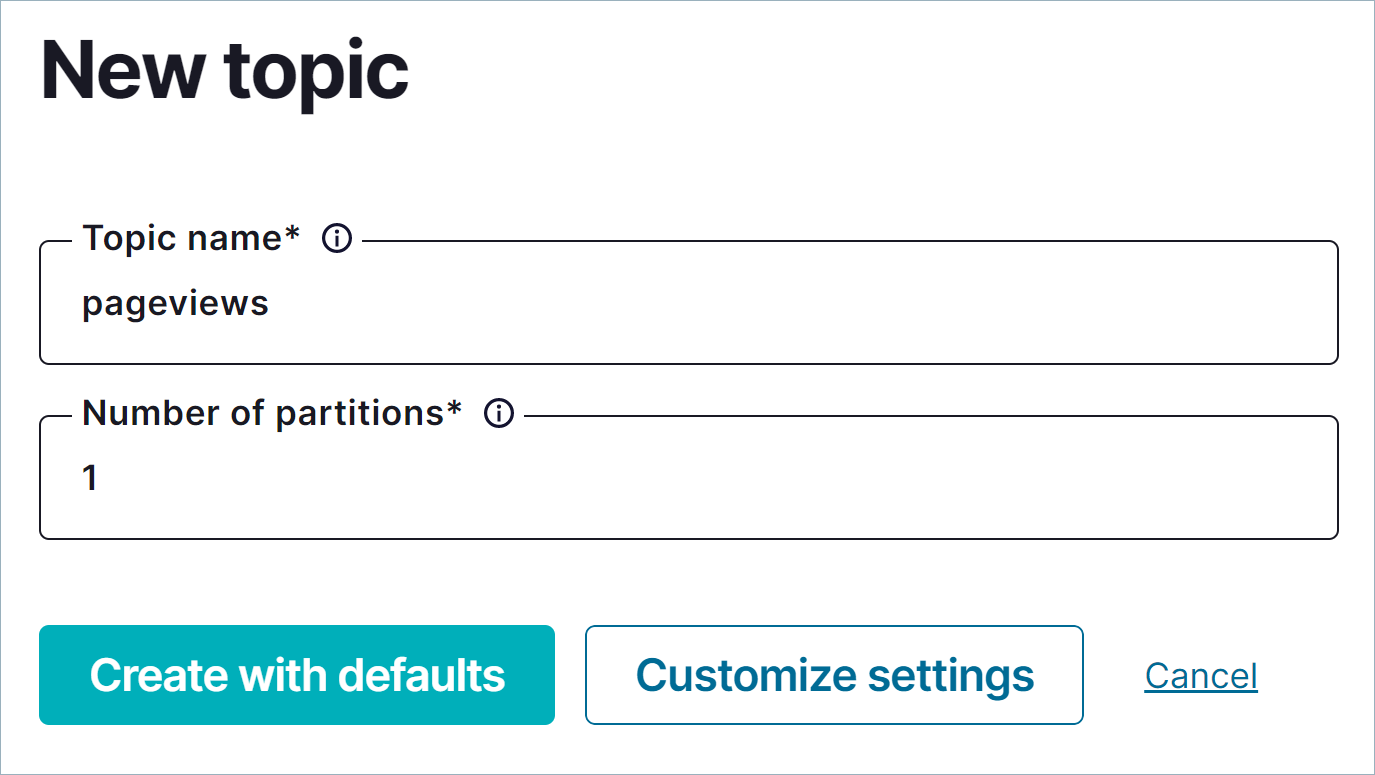
In the Topic name field, specify pageviews and click Create with defaults.
Note that topic names are case-sensitive.
In the navigation bar, click Topics to open the topics list, and then click Add a topic.
In the Topic name field, specify users and click Create with defaults.
In this step, you use Kafka Connect to run a demo source connector called kafka-connect-datagen that creates sample data for the Kafka topics pageviews and users.
Tip
The Kafka Connect Datagen connector was installed manually in Step 1: Download and Start Confluent Platform. If you encounter issues locating the Datagen Connector, refer to the Issue: Cannot locate the Datagen connector in the Troubleshooting section.
Run the first instance of the Kafka Connect Datagen connector to produce Kafka data to the pageviews topic in AVRO format.
In the navigation bar, click Connect.
Click the connect-default cluster in the Connect Clusters list.
Click Add connector.
Select the DatagenConnector tile.
Tip
To narrow displayed connectors, click Filter by category and click Sources.
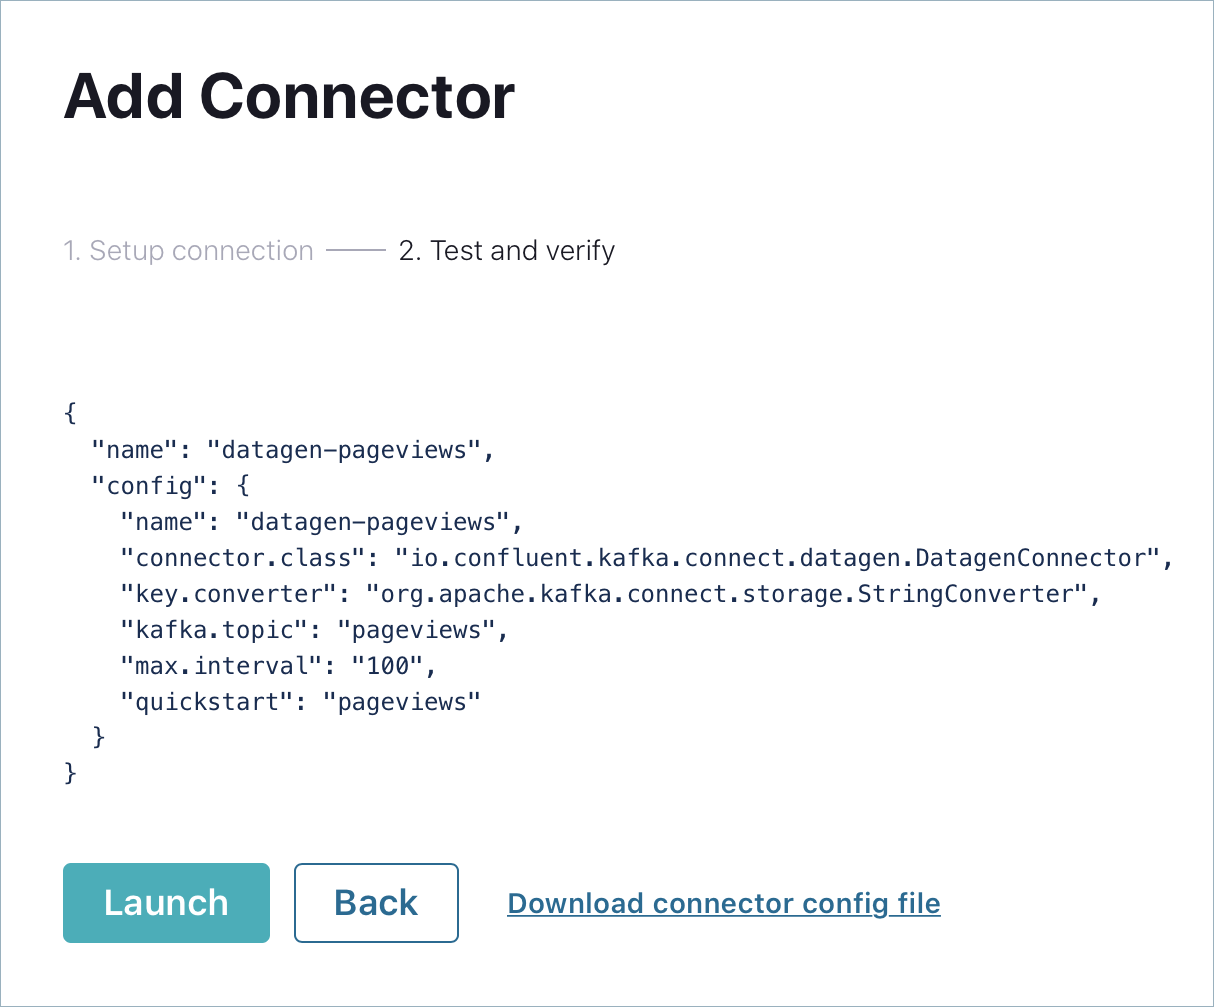
In the Name field, enter datagen-pageviews as the name of the connector.
Enter the following configuration values:
org.apache.kafka.connect.storage.StringConverter.pageviews.100.pageviews.Click Next.
Review the connector configuration and click Launch.
Run the second instance of the Kafka Connect Datagen connector to produce Kafka data to the users topic in AVRO format.
Click Add connector.
Select the DatagenConnector tile.
Tip
To narrow displayed connectors, click Filter by category and click Sources.
In the Name field, enter datagen-users as the name of the connector.
Enter the following configuration values:
org.apache.kafka.connect.storage.StringConverterusers1000usersClick Next.
Review the connector configuration and click Launch.
Tip
You can also run these commands using the ksqlDB CLI from your terminal with this command:
<path-to-confluent>/bin/ksql http://localhost:8088.
In this step, you use ksqlDB to create a stream for the pageviews topic and a table for the users topic.
In the navigation bar, click ksqlDB.
Select the ksqlDB application.
Copy the following code into the editor window and click Run query to create the pageviews stream. Stream names are not case-sensitive.
CREATE STREAM pageviews WITH (KAFKA_TOPIC=‘pageviews‘, VALUE_FORMAT=‘AVRO‘);
Copy the following code into the editor window and click Run query to create the users table. Table names are not case-sensitive.
CREATE TABLE users (id VARCHAR PRIMARY KEY)
  WITH (KAFKA_TOPIC=‘users‘, VALUE_FORMAT=‘AVRO‘);
In this step, you create ksqlDB queries against the stream and the table you created above.
In the Editor tab, click Add query properties to add a custom query property.
Set the auto.offset.reset parameter to Earliest.
The setting instructs ksqlDB queries to read all available topic data from the beginning. This configuration is used for each subsequent query. For more information, see the ksqlDB Configuration Parameter Reference.
Create the following queries.
Click Stop to stop the current running query.
Create a non-persistent query that returns data from a stream with the results limited to a maximum of three rows:
Enter the following query in the editor:
SELECT pageid FROM pageviews EMIT CHANGES LIMIT 3;
Click Run query. Your output should resemble:
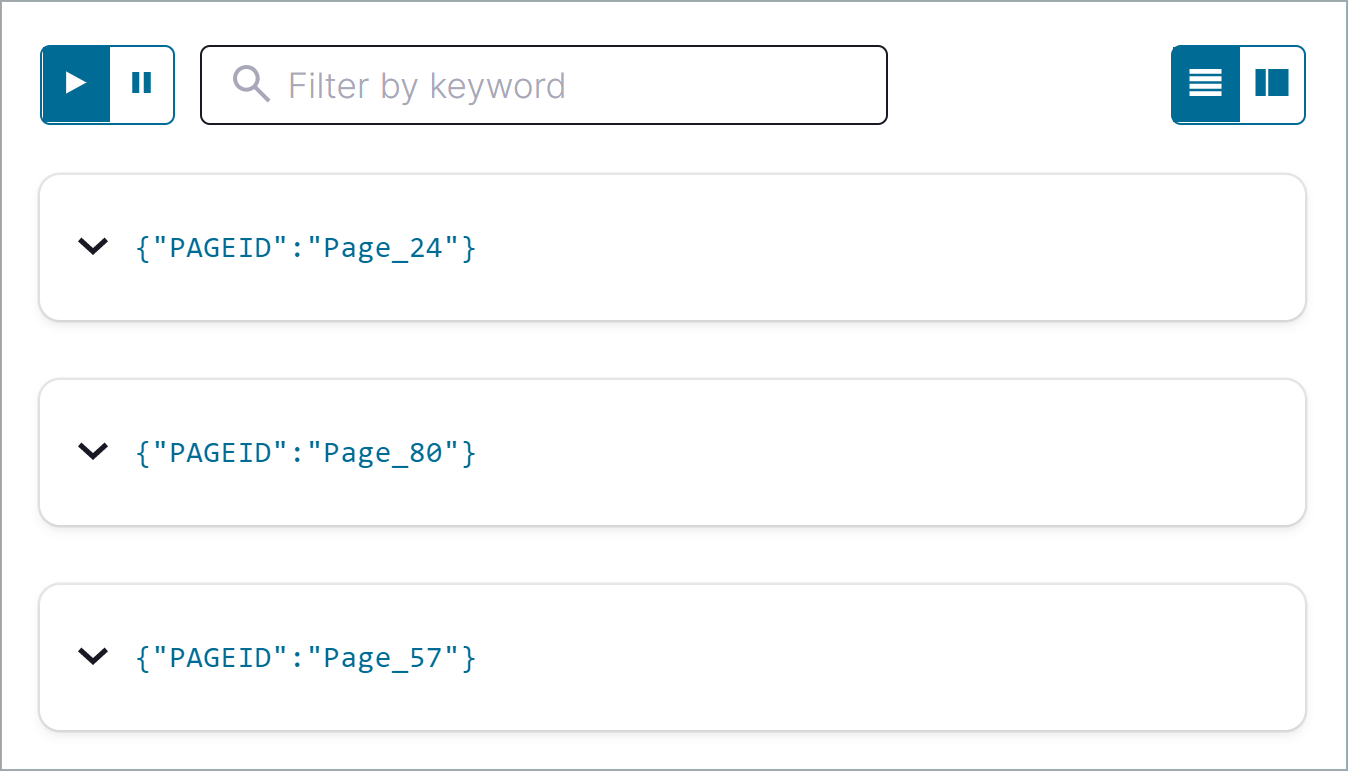
Click the Card view or Table view icon to change the output layout.
Create a persistent query (as a stream) that filters the PAGEVIEWS stream for female users. The results from this query are written to the Kafka PAGEVIEWS_FEMALE topic:
Enter the following query in the editor:
CREATE STREAM pageviews_female
  AS SELECT users.id AS userid, pageid, regionid
  FROM pageviews LEFT JOIN users ON pageviews.userid = users.id
  WHERE gender = ‘FEMALE‘
  EMIT CHANGES;
Click Run query. Your output should resemble:

Create a persistent query where REGIONID ends with 8 or 9. Results from this query are written to the Kafka topic named pageviews_enriched_r8_r9 as explicitly specified in the query:
Enter the following query in the editor:
CREATE STREAM pageviews_female_like_89
  WITH (KAFKA_TOPIC=‘pageviews_enriched_r8_r9‘, VALUE_FORMAT=‘AVRO‘)
  AS SELECT * FROM pageviews_female
  WHERE regionid LIKE ‘%_8‘ OR regionid LIKE ‘%_9‘
  EMIT CHANGES;
Click Run query. Your output should resemble:

Create a persistent query that counts the PAGEVIEWS for each REGION and GENDER combination in a tumbling window of 30 seconds when the count is greater than 1. Because the procedure is grouping and counting, the result is now a table, rather than a stream. Results from this query are written to a Kafka topic called PAGEVIEWS_REGIONS:
Enter the following query in the editor:
CREATE TABLE pageviews_regions WITH (KEY_FORMAT=‘JSON‘)
  AS SELECT gender, regionid, COUNT(*) AS numusers
  FROM pageviews LEFT JOIN users ON pageviews.userid = users.id
  WINDOW TUMBLING (SIZE 30 SECOND)
  GROUP BY gender, regionid
  HAVING COUNT(*) > 1
  EMIT CHANGES;
Click Run query. Your output should resemble:

Click the Persistent queries tab. You should see the following persisted queries:
Click the Editor tab. The All available streams and tables pane shows all of the streams and tables that you can access.
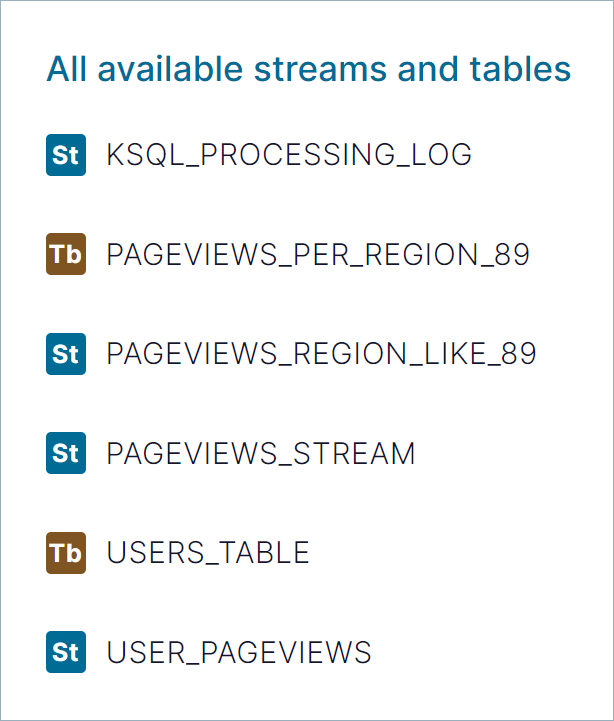
In the All available streams and tables section, click KSQL_PROCESSING_LOG to view the stream’s schema, including nested data structures.
In this step, you run the ksqlDB queries you save as streams and tables above in the previous section.
In the Streams tab, select the PAGEVIEWS_FEMALE stream.
Click Query stream.
The editor opens, and streaming output of the query displays.
Click Stop to stop the output generation.
In the Tables tab, select PAGEVIEWS_REGIONS table.
Click Query table.
The editor opens, and streaming output of the query displays.
Click Stop to stop the output generation.
In the navigation bar, click Consumers to view the consumers created by ksqlDB.
Click the consumer group ID to view details for the _confluent-ksql-default_query_CSAS_PAGEVIEWS_FEMALE_5 consumer group.
From the page, you can see the consumer lag and consumption values for your streaming query.
For more information, see the Control Center Consumers documentation.
When you are done working with the local install, you can stop Confluent Platform.
Stop Confluent Platform using the Confluent CLI confluent local services connect stop command.
confluent local services stop
Destroy the data in the Confluent Platform instance with the confluent local destroy command.
confluent local destroy
然后使用docker-compose运行Kafka
Once you have Confluent Platform running, an intuitive next step is try out some basic Kafka commands to create topics and work with producers and consumers. This should help orient Kafka newbies and pros alike that all those familiar Kafka tools are readily available in Confluent Platform, and work the same way. These provide a means of testing and working with basic functionality, as well as configuring and monitoring deployments. The commands surface a subset of the APIs available to you.
Confluent Platform ships with Kafka commands and utilities in $CONFLUENT_HOME/etc/kafka/bin. This bin/ directory includes both Confluent proprietary and open source Kafka utilities.
A few things to note:
$HOME (~/) directory. You do not have to run these from within $CONFLUENT_HOME.kafka- are the Kafka open source command utilities, also covered in various sections of the Apache Kafka documentation.kafka-topics or kafka-producer-perf-test.To help get you started, the sections below provide examples for some of the most fundamental and widely-used commands.
You can use kafka-topics for operations on topics (create, list, describe, alter, delete, and so forth).
In a command window, run the following commands to experiment with topics.
Create three topics, cool-topic, warm-topic, hot-topic.
kafka-topics --create --topic cool-topic --bootstrap-server localhost:9092
kafka-topics --create --topic warm-topic --bootstrap-server localhost:9092
kafka-topics --create --topic hot-topic --partitions 2 --replication-factor 2 --bootstrap-server localhost:9092
List all topics.
kafka-topics --list --bootstrap-server localhost:9092
Tip
System topics are prefaced by an underscore in the output. The topics you created are listed at the end.
Describe a topic.
This shows partitions, replication factor, and in-sync replicas for the topic.
kafka-topics --describe --topic cool-topic --bootstrap-server localhost:9092
Your output should resemble the following:
Topic: cool-topic PartitionCount: 1       ReplicationFactor: 1    Configs: segment.bytes=1073741824
  Topic: cool-topic       Partition: 0    Leader: 0       Replicas: 0     Isr: 0  Offline:
Tip
If you run
kafka-topics --describewith no specified topic, you get a detailed description of every topic on the cluster (system and user topics).
Describe another topic, using one of the other brokers in the cluster as the bootstrap server.
kafka-topics --describe --topic hot-topic --bootstrap-server localhost:9094
Here is that example output:
Topic: hot-topic  PartitionCount: 2       ReplicationFactor: 2    Configs: segment.bytes=1073741824
  Topic: hot-topic        Partition: 0    Leader: 1       Replicas: 1,0   Isr: 1,0        Offline:
  Topic: hot-topic        Partition: 1    Leader: 0       Replicas: 0,2   Isr: 0,2        Offline:
You can connect to any of the brokers in the cluster to run these commands because they all have the same data!
Alter a topic’s cofiguration.
For this example, change the partition count on hot-topic from 2 to 9.
kafka-topics --alter --topic hot-topic --partitions 9 --bootstrap-server localhost:9092
Tip
Dynamic topic modification is inherently limited by the current configurations. For example, you cannot decrease the number of partitions or modify the replication factor for a topic, as that would require partition reassignment.
Rerun --describe on the same topic.
kafka-topics --describe --topic hot-topic --bootstrap-server localhost:9092
Here is that example output, and verify that the partition count is updated to 9:
Topic: hot-topic  PartitionCount: 9       ReplicationFactor: 2    Configs: segment.bytes=1073741824
  Topic: hot-topic        Partition: 0    Leader: 2       Replicas: 2,1   Isr: 2,1        Offline:
  Topic: hot-topic        Partition: 1    Leader: 1       Replicas: 1,0   Isr: 1,0        Offline:
  Topic: hot-topic        Partition: 2    Leader: 1       Replicas: 1,2   Isr: 1,2        Offline:
  Topic: hot-topic        Partition: 3    Leader: 2       Replicas: 2,1   Isr: 2,1        Offline:
  Topic: hot-topic        Partition: 4    Leader: 0       Replicas: 0,2   Isr: 0,2        Offline:
  Topic: hot-topic        Partition: 5    Leader: 1       Replicas: 1,0   Isr: 1,0        Offline:
  Topic: hot-topic        Partition: 6    Leader: 2       Replicas: 2,0   Isr: 2,0        Offline:
  Topic: hot-topic        Partition: 7    Leader: 0       Replicas: 0,1   Isr: 0,1        Offline:
  Topic: hot-topic        Partition: 8    Leader: 1       Replicas: 1,2   Isr: 1,2        Offline:
Delete a topic.
kafka-topics --delete --topic warm-topic --bootstrap-server localhost:9092
List all topics.
kafka-topics --list --bootstrap-server localhost:9092
The command utilities kafka-console-producer and kafka-console-consumer allow you to manually produce messages to and consume from a topic.
Open two new command windows, one for a producer, and the other for a consumer.
Run a producer to produce to cool-topic.
kafka-console-producer --topic cool-topic --bootstrap-server localhost:9092
Send some messages.
Type your messages at the prompt (>), and hit Return after each one.
Your command window will resemble the following:
$ kafka-console-producer --broker-list localhost:9092 --topic cool-topic
>hi cool topic
>did you get this message?
>first
>second
>third
>yes! I love you cool topic
>
Tip
You can use the
--broker-listflag in place of--bootstrap-serverfor the producer, typically used to send data to specific brokers; shown here as an example.
In the other command window, run a consumer to read messages from cool-topic. Specify that you want to start consuming from the beginning, as shown.
kafka-console-consumer --topic cool-topic --from-beginning --bootstrap-server localhost:9092
Your output will resemble the following:
$ kafka-console-consumer --bootstrap-server localhost:9092 --from-beginning --topic cool-topic
hi cool topic on origin cluster
is this getting to your replica?
first
second
third
yes! I love you cool topic
When you want to stop the producer and consumer, type Ctl-C in their respective command windows.
Tip
You may want to leave at least the producer running for now, in case you want to send more messages when we revisit topics on the Control Center.
You can use kafka-consumer-perf-test in its own command window to generate test data to topics.
For example, open a new command window and type the following command to send data to hot-topic, with the specified throughput and record size.
kafka-producer-perf-test --producer-props bootstrap.servers=localhost:9092 --topic hot-topic --record-size 1000 --throughput 1000 --num-records 3600000
The command provides status output on messages sent, as shown:
4999 records sent, 999.8 records/sec (0.95 MB/sec), 1.1 ms avg latency, 240.0 ms max latency.
5003 records sent, 1000.2 records/sec (0.95 MB/sec), 0.5 ms avg latency, 4.0 ms max latency.
5003 records sent, 1000.2 records/sec (0.95 MB/sec), 0.6 ms avg latency, 5.0 ms max latency.
5001 records sent, 1000.2 records/sec (0.95 MB/sec), 0.3 ms avg latency, 3.0 ms max latency.
5001 records sent, 1000.0 records/sec (0.95 MB/sec), 0.3 ms avg latency, 4.0 ms max latency.
5000 records sent, 1000.0 records/sec (0.95 MB/sec), 0.8 ms avg latency, 24.0 ms max latency.
5001 records sent, 1000.2 records/sec (0.95 MB/sec), 0.6 ms avg latency, 3.0 ms max latency.
...
Open a new command window to consume the messages from hot-topic as they are sent (not from the beginning).
kafka-console-consumer --topic hot-topic --bootstrap-server localhost:9092
Type Ctl-C to stop the consumer.
Tip
You may want to leave the producer running for a moment, as you are about to revisit Topics on the Control Center.
To learn more, check out Benchmark Commands, Let’s Load test, Kafka!, and How to do Performance testing of Kafka Cluster
原文:https://www.cnblogs.com/satire/p/15131490.html