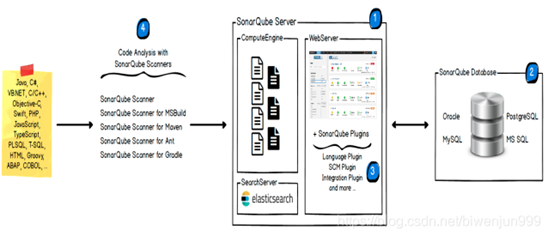
需要用到的软件有:SonarQubeWebServer,Sonar-scanner, SonarQube Database,LanguagePlugin;
SonarQube为代码检查的server,并提供可视化界面;
Sonar-scanner为client用于收集检查数据并且发送到server中。
SonarQube Database.用于存储扫描数据;
LanguagePlugin 用于各语言自己的检查规则;
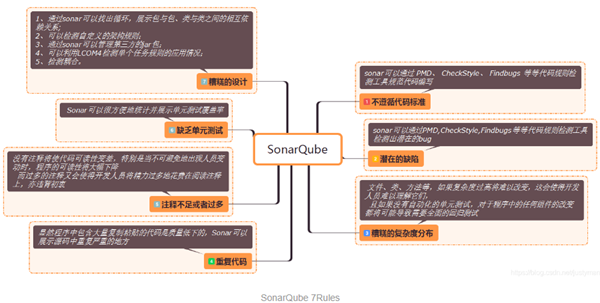
SonarQube 并不是简单地将各种质量或覆盖率检测工具的结果(例如 CheckStyle、JACOCO 等)直接展现给客户,而是通过不同的插件算法来对结果进行再加工,并最终以量化的方式来衡量代码质量,从而方便地对不同规模和种类的工程进行相应的代码质量管理,以便进行有针对性的代码修复或重构。
SonarQube 在进行代码质量管理时,会从以下的七个纬度对项目代码质量进行分析。
#关闭防火墙;
systemctl stop firewalld
#开机禁用防火墙;
systemctl disable firewalld

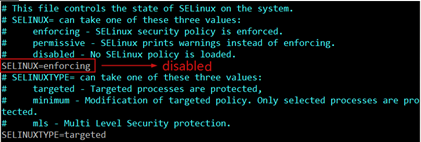
#关闭SELINUX
vim /etc/sysconfig/selinux
...
SELINUX=disabled
...
#重启系统
reboot
#查看selinux是否关闭
getenforce

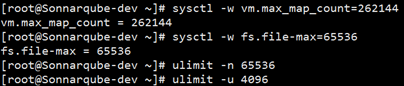
#最大虚拟内存
sysctl -w vm.max_map_count=262144
#打开文件数
ulimit -n 65536
#最大进程数
ulimit -u 4096
#文件末尾添加下述两行
vi /etc/sysctl.conf
    vm.max_map_count=262144
fs.file-max=65536
#在/etc/profile文件末尾添加ulimit -n 65536
vi /etc/profile
ulimit -n 65536
#保存后运行#source /etc/profile 使其生效
source /etc/profile
yum search java | grep -i --color openjdk
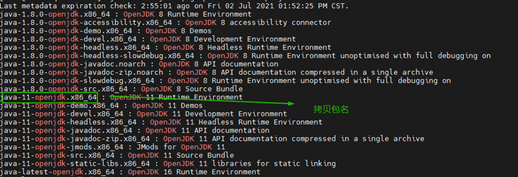
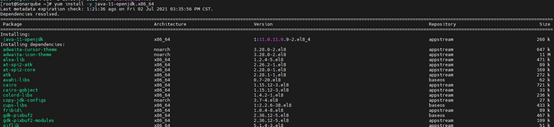
yum install -y java-11-openjdk.x86_64
java -version

locale -a
.....
zh_CN
zh_CN.gb18030
zh_CN.gbk
zh_CN.utf8
......
如能查找到上述语言,无需进行语言包的安装操作,否则按如下操作完成安装
yum list |grep -i langpack
yum list |grep -i langpack |grep -i zh

yum install -y glibc-langpack-zh.x86_64
【后期安装系统的过程中有选择语言的操作,因此需要提前安装避免后期配置的时候没有】
下载指定版本的地址:
wget https://get.enterprisedb.com/postgresql/postgresql-10.16-2-linux-x64.run
chmod +x postgresql-10.15-1-linux-x64.run
[root@Sonnarqube-dev ~]# ./postgresql-10.16-2-linux-x64.run
----------------------------------------------------------------------------
Welcome to the PostgreSQL Setup Wizard.
----------------------------------------------------------------------------
Please specify the directory where PostgreSQL will be installed.
Installation Directory [/opt/PostgreSQL/10]:  #安装目录回车为默认地址
----------------------------------------------------------------------------
Select the components you want to install; clear the components you do not want
to install. Click Next when you are ready to continue.
PostgreSQL Server [Y/n] :Y    选择Y
pgAdmin 4 [Y/n] :             #选择Y
Stack Builder [Y/n] :         #选择Y
Command Line Tools [Y/n] :    #选择Y
Is the selection above correct? [Y/n]:  #选择Y
----------------------------------------------------------------------------
Please select a directory under which to store your data.
Data Directory [/opt/PostgreSQL/10/data]:   #填写安装数据库存储数据的目录 ,回车为默认
----------------------------------------------------------------------------
Please provide a password for the database superuser (postgres). A locked Unix
user account (postgres) will be created if not present.
Password :           #设置postgres用户的密码
Retype password :      #再次确认postgres密码
----------------------------------------------------------------------------
Please select the port number the server should listen on.
Port [5432]:      #填写数据库的端口号,回车为默认端口
----------------------------------------------------------------------------
Advanced Options
Select the locale to be used by the new database cluster.
Locale
[1] [Default locale]
[2] C
[3] C.utf8
[4] en_AG
[5] en_AU
[6] en_AU.utf8
[7] en_BW
[8] en_BW.utf8
[9] en_CA
[10] en_CA.utf8
[11] en_DK
[12] en_DK.utf8
[13] en_GB
[14] en_GB.iso885915
[15] en_GB.utf8
[16] en_HK
[17] en_HK.utf8
[18] en_IE
[19] en_IE@euro
[20] en_IE.utf8
[21] en_IL
[22] en_IN
[23] en_NG
[24] en_NZ
[25] en_NZ.utf8
[26] en_PH
[27] en_PH.utf8
[28] en_SC.utf8
[29] en_SG
[30] en_SG.utf8
[31] en_US
[32] en_US.iso885915
[33] en_US.utf8
[34] en_ZA
[35] en_ZA.utf8
[36] en_ZM
[37] en_ZW
[38] en_ZW.utf8
[39] POSIX
[40] zh_CN
[41] zh_CN.utf8
[42] zh_HK.utf8
[43] zh_SG
[44] zh_SG.utf8
[45] zh_TW.euctw
[46] zh_TW.utf8
Please choose an option [1] : 41   #选择本地的编码字符集
----------------------------------------------------------------------------
Pre Installation Summary     #安装概要预览
The following settings will be used for the installation::
Installation Directory: /opt/PostgreSQL/10
Server Installation Directory: /opt/PostgreSQL/10
Data Directory: /opt/PostgreSQL/10/data
Database Port: 5432
Database Superuser: postgres
Operating System Account: postgres
Database Service: postgresql-10
Command Line Tools Installation Directory: /opt/PostgreSQL/10
pgAdmin4 Installation Directory: /opt/PostgreSQL/10/pgAdmin 4
Stack Builder Installation Directory: /opt/PostgreSQL/10
Press [Enter] to continue:  #确认后,回车进行安装
----------------------------------------------------------------------------
Setup is now ready to begin installing PostgreSQL on your computer.
Do you want to continue? [Y/n]:   #确认后,回车/Y进行安装
----------------------------------------------------------------------------
Please wait while Setup installs PostgreSQL on your computer.
 Installing
 0% ______________ 50% ______________ 100%
 #########################################
----------------------------------------------------------------------------
Setup has finished installing PostgreSQL on your computer.
systemctl status postgresql-10.service -l
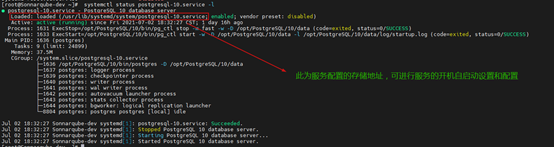
systemctl restart postgresql-10.service
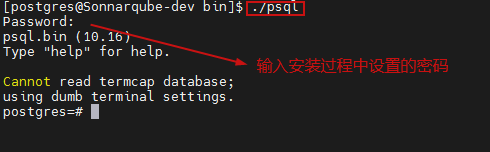
su - postgres
此用户为数据库安装过程中默认创建的用户


[postgres@Sonnarqube-dev bin]$ ./psql
#创建用户为sonar,并设置密码为:sonar
postgres=# create user sonar with password ‘sonar‘;
#创建数据库为sonar_data,指定所属者sonar
postgres=# create database sonar_data owner sonar;
#将数据库sonar_data的权限,全部赋给sonar用户
postgres=# grant all on database sonar_data to sonar;
#授权用户超级管理员权限
postgres=# alter role sonar superuser;
#授权用户创建角色的权限
postgres=# alter role sonar createrole;
#授权用户创建数据库的权限
postgres=# alter role sonar createdb;
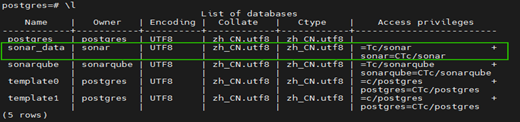
#输入\l查看当前数据库列表
postgres=# \l
#查看角色的权限表
postgres=# \du
需要注意:
1.要以英文分号结尾;2.密码需要引号包裹;

至此准备工作已完成
wget https://binaries.sonarsource.com/Distribution/sonarqube/sonarqube-7.9.6.zip
[root@Sonnarqube-dev opt]# unzip sonarqube-7.9.6.zip
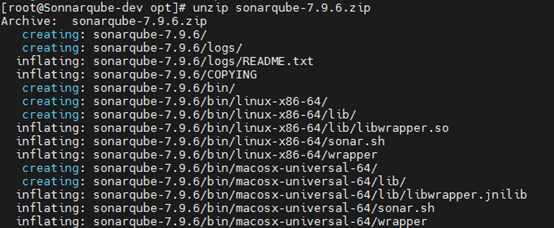
[root@Sonnarqube-dev opt]# mv sonarqube-7.9.6 sonarqube
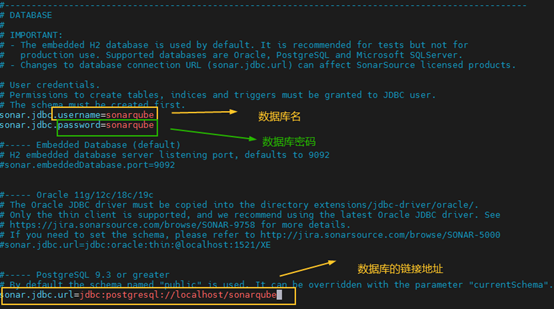
进入到sonarqube的配置文件目录:/opt/sonarqube/conf
修改sonarqube的配置文件:vim sonar.properties
[root@Sonnarqube-dev ~]# adduser sonar_user
[root@Sonnarqube-dev ~]# passwd sonar_user

[root@Sonnarqube-dev ~]# chown -R sonar_user:sonar_user /opt/sonarqube/
[root@Sonnarqube-dev ~]# su - sonar_user
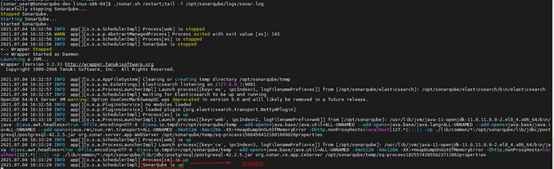
[sonar_user@Sonnarqube-dev linux-x86-64]$ ./sonar.sh start

切记,sonarqube的启动不能用root
[sonar_user@Sonnarqube-dev linux-x86-64]$ ./sonar.sh restart;tail -f /opt/sonarqube/logs/sonar.log
[sonar_user@Sonnarqube-dev linux-x86-64]$ ss -tnl

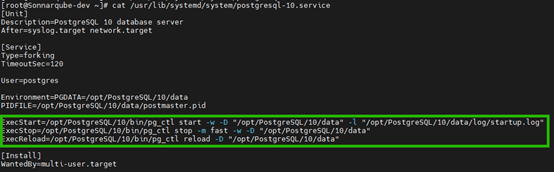
[root@Sonnarqube-dev ~]# vim /etc/systemd/system/sonarqube.service
[Unit]
Description=SonarQube service
After=syslog.target network.target
[Service]
Type=forking
#根据自己安装目录的启动路径填写
ExecStart=/opt/sonarqube/bin/linux-x86-64/sonar.sh start
ExecStop=/opt/sonarqube/bin/linux-x86-64/sonar.sh stop
#填写启动sonarqube的授权用户和用户组
User=sonar_user
Group=sonar_user
Restart=always
#linux调优
LimitNOFILE=65536
LimitNPROC=10240
[Install]
WantedBy=multi-user.target

[root@Sonnarqube-dev ~]# systemctl enable sonarqube.service
[root@Sonnarqube-dev ~]# systemctl list-unit-files
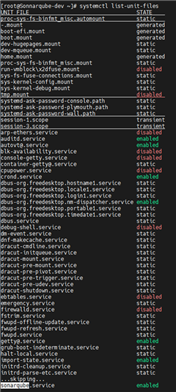
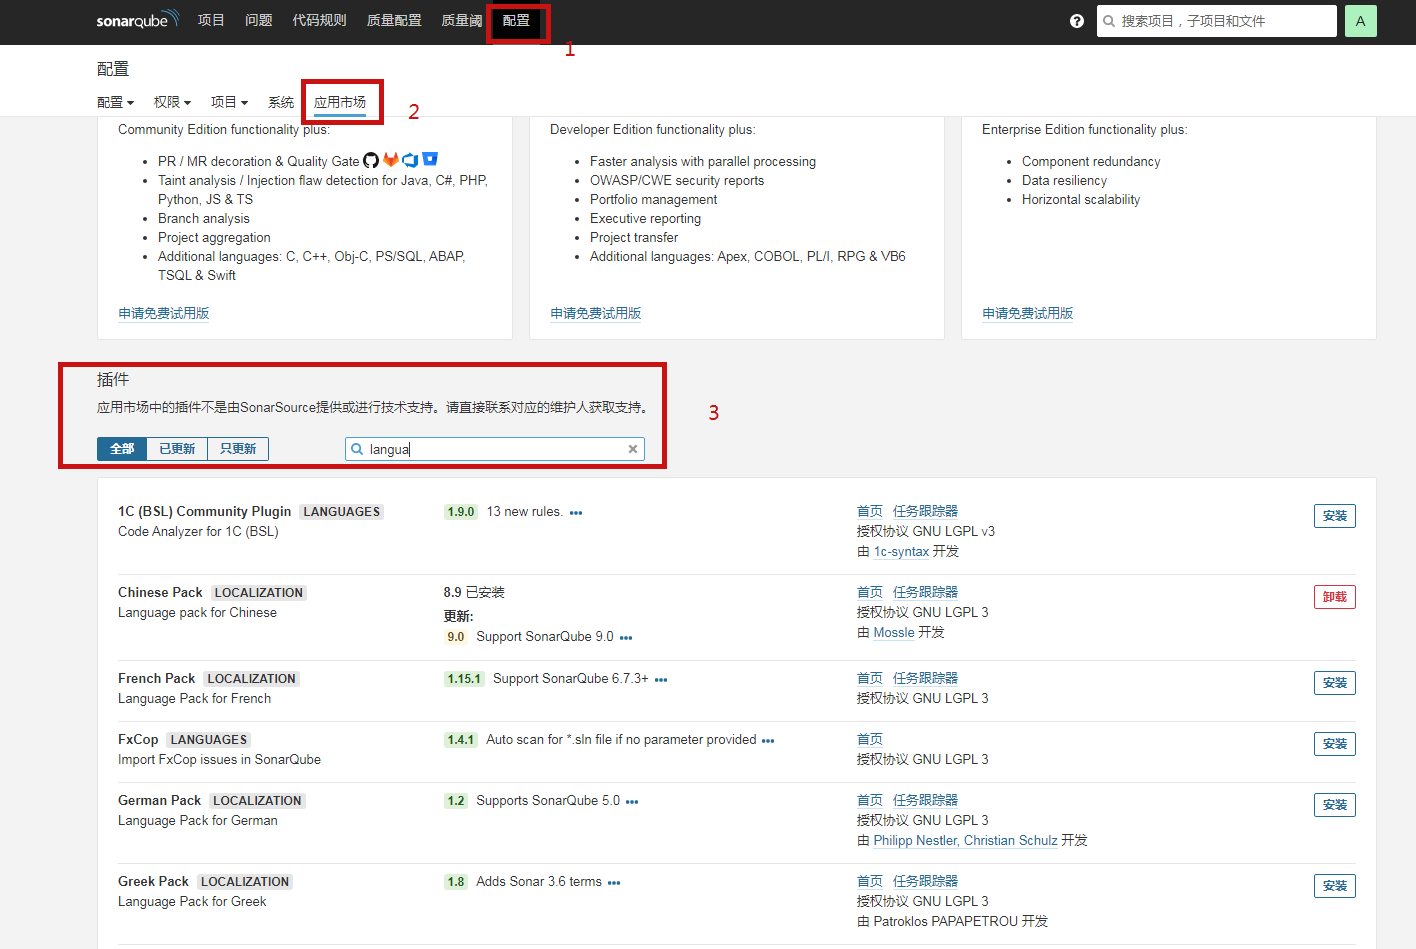
按照需要的插件,切记每次下载完成之后重启服务

jenkins Windows构建节点配置
解压相关文件并复制到C:\DevOps_tools
image
image
添加系统环境变量path
C:\DevOps_tools\sonar-scanner-msbuild-5.2.1.31210-net46\
添加vs MSBuild.exe 到系统环境变量path中
image
sonar-scanner节点配置完成
jenkins 配置
jenkins 任务创建
image
image
image
image
pipeline
pipeline {
agent any
environment {
gitlab_tokenid = ‘a6710614-3bbd-4efb-acc2-63aa8b615290‘ //gitlab令牌
sonar_tokenid = ‘a3e55c8b9b39c05be659b44efef4d632b8764195‘ //前面创建的令牌
}
triggers{
GenericTrigger(
genericVariables:[
[key:‘event_name‘,value:‘$.event_name‘], //触发动作 pubat or tag_pubat
[key:‘user_email‘,value:‘$.user_email‘], //GitLab公共邮箱需要自行配置否则获取不到
[key:‘project_name‘,value:‘$.project.name‘], //项目名称 DevOps_Test
[key:‘git_url‘,value:‘$.project.git_http_url‘], //git_url
[key:‘ref‘,value:‘$.ref‘], //分支或tag信息
[key:‘group_name‘,value:‘$.project.namespace‘], //GITLAB_GROUP
[key:‘commits_id‘,value:‘$.commits[0].id‘]
],
token:"qazwsx",
causeString:‘Triggered on $ref‘,
printContributedVariables:true,
printPostContent:true
)
}
stages {
stage(‘Clean‘) {
steps{
cleanWs(
cleanWhenAborted: true,
cleanWhenFailure: true,
cleanWhenNotBuilt: true,
cleanWhenSuccess: true,
cleanWhenUnstable: true,
cleanupMatrixParent: true,
disableDeferredWipeout: true,
deleteDirs: true
)
}
}
stage(‘init‘) {
steps {
git credentialsId: "$gitlab_tokenid", url: "$git_url"
script {
tagname = ref.tokenize(‘/‘)[2]
bat "git checkout $tagname"
// 从文件中读取 JSON 字符串
projectsjson = readJSON file: ‘projects.json‘
}
}
}
stage(‘SonarScanner‘) {
steps {
script{
for(j in projectsjson.projects){
if (j.sonar == "yes"){
if (j.sln_path != "./"){
// MsBuild.exe /t:Rebuild 需要找到*.sln 所以这里进行CD 切换目录
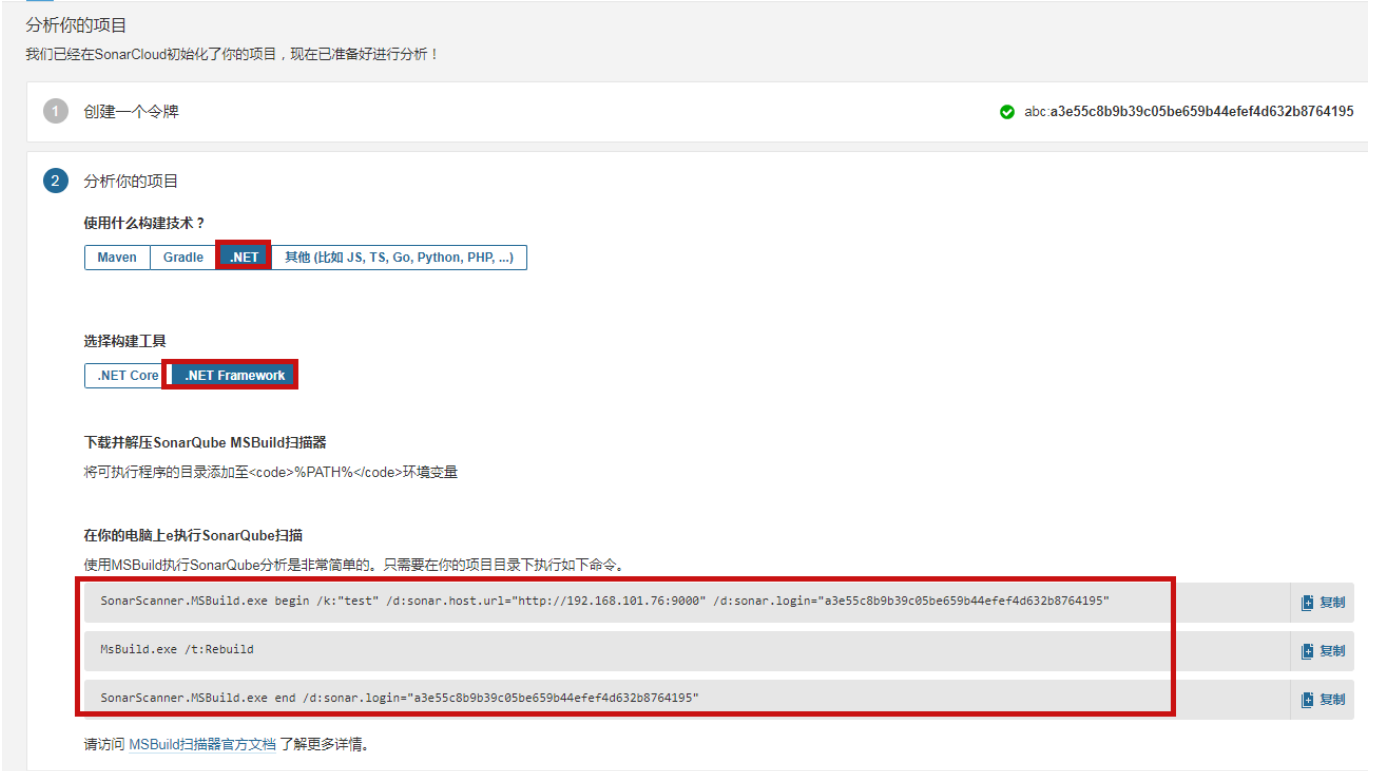
bat "cd $j.sln_path && SonarScanner.MSBuild.exe begin /k:$project_name /d:sonar.host.url=\"http://SonarQube:9000\" /d:sonar.login=$sonar_tokenid"
bat "cd $j.sln_path && MsBuild.exe /t:Rebuild"
bat "cd $j.sln_path && SonarScanner.MSBuild.exe end /d:sonar.login=$sonar_tokenid"
}else{
bat "SonarScanner.MSBuild.exe begin /k:$project_name /d:sonar.host.url=\"http://SonarQube:9000\" /d:sonar.login=$sonar_tokenid"
bat "MsBuild.exe /t:Rebuild"
bat "SonarScanner.MSBuild.exe end /d:sonar.login=$sonar_tokenid" //引用上面令牌
}
}else{
echo "已跳过$j.name项目sonar代码扫描。"
}
}
}
}
}
}
post {
always {
bat ""
echo ‘构建结束...‘
}
success {
echo ‘恭喜您,构建成功!!!‘
mail subject: "‘${env.JOB_NAME} [${env.BUILD_NUMBER}]‘ 执行成功",
body: """
<div id="content">
<h1>CI报告</h1>
<div id="sum2">
<h2>Jenkins 运行结果</h2>
<ul>
<li>jenkins的执行结果 : <a>jenkins 执行成功</a></li>
<li>jenkins的Job名称 : <a id="url_1">${env.JOB_NAME} [${env.BUILD_NUMBER}]</a></li>
<li>jenkins的URL : <a href=‘${env.BUILD_URL}‘>${env.BUILD_URL}</a></li>
<li>jenkins项目名称 : <a>${env.JOB_NAME}</a></li>
<li>Job URL : <a href=‘${env.BUILD_URL}‘>${env.BUILD_URL}</a></li>
<li>构建日志:<a href="${BUILD_URL}console">${BUILD_URL}console</a></li>
</ul>
</div>
<div id="sum0">
<h2>GIT 信息</h2>
<ul>
<li>GIT项目的地址 : <a>${git_url}</a></li>
<li>GIT项目当前的分支名 : ${ref}</li>
<li>GIT最后一次提交的commitID : ${commits_id}</li>
</ul>
</div>
</div>
""",
charset: ‘utf-8‘,
from: ‘IBM_nmc@naura.local‘,
mimeType: ‘text/html‘,
to: "$user_email"
//to : "${Recipient}"
}
failure {
echo ‘抱歉,构建失败!!!‘
mail subject: "‘${env.JOB_NAME} [${env.BUILD_NUMBER}]‘ 执行失败",
body: """
<div id="content">
<h1>CI报告</h1>
<div id="sum2">
<h2>Jenkins 运行结果</h2>
<ul>
<li>jenkins的执行结果 : <a>jenkins 执行失败</a></li>
<li>jenkins的Job名称 : <a id="url_1">${env.JOB_NAME} [${env.BUILD_NUMBER}]</a></li>
<li>jenkins的URL : <a href=‘${env.BUILD_URL}‘>${env.BUILD_URL}</a></li>
<li>jenkins项目名称 : <a>${env.JOB_NAME}</a></li>
<li>Job URL : <a href=‘${env.BUILD_URL}‘>${env.BUILD_URL}</a></li>
<li>构建日志:<a href="${BUILD_URL}console">${BUILD_URL}console</a></li>
</ul>
</div>
<div id="sum0">
<h2>GIT 信息</h2>
<ul>
<li>GIT项目的地址 : <a>${git_url}</a></li>
<li>GIT项目当前的分支名 : ${ref}</li>
<li>GIT最后一次提交的commitID : ${commits_id}</li>
</ul>
</div>
</div>
""",
charset: ‘utf-8‘,
from: ‘IBM_nmc@naura.local‘,
mimeType: ‘text/html‘,
to: "$user_email"
}
unstable {
echo ‘该任务已经被标记为不稳定任务....‘
}
changed {
echo ‘‘
}
}
}
SonarQube的系统架构、原理、及centos 上的安装、配置与使用
原文:https://www.cnblogs.com/cndevops/p/15007420.html