nginx从1.9.0版本开始支持TCP模式的负载均衡,在1.9.13版本开始支持udp协议的负载均衡,udp主要用户DNS域名解析。
以下指令由ngx_stream_core_module模块提供,主要用于实现基于tcp或udp的反向代理。
stream { … }
配置环境:main
定义stream配置文件模块,与http配置文件模块平级
listen
设置address和port用于服务器将接受连接的套接字。可以只指定端口。地址也可以是主机名
配置语法:
? listen address:port [ssl] [udp] [proxy_protocol] [backlog=number] [bind]
? [ipv6only=on|off] [reuseport]
? [so_keepalive=on|off|[keepidle]:[keepintvl]:[keepcnt];
? 配置环境:server
以下指令由ngx_stream_proxy_module模块提供,主要用于实现基于tcp或udp的反向代理。
proxy_pass
指定后端服务器地址
配置格式:proxy_pass address;
配置环境:server
proxy_timeout
无数据传输时,保持连接状态的超时时长,默认为10m
配置格式:proxy_timeout timeout;
配置环境:stream, server
proxy_connect_timeout
设置nginx与被代理的服务器尝试建立连接的超时时长,默认为60s
配置格式:proxy_connect_timeout time;
配置环境:stream, server
以下指令由ngx_stream_upstream_module模块提供,主要用于实现负载均衡功能。
以上指令的使用示例如下:
stream {
    upstream backend {
        hash $remote_addr consistent;
        server backend1.example.com:8888 weight=1; max_fails=3 fail_timeout=10s;
        server 127.0.0.1:8889 max_fails=3 fail_timeout=10s;
        server unix:/path;
    }

    upstream dns {
        server 1.1.1.1:8853;
        server 1.1.1.2:53;
    }

    server {
        listen 1.1.1.3:8888;
        proxy_pass backend;
        proxy_timeout 5s;
        proxy_connect_timeout 10s;
    }

    server {
        listen 53 udp reuseport;
        proxy_timeout 10s;
        proxy_pass dns;
    }

    server {
        listen [::1]:1111;
        proxy_pass unix:/path/abc.socket;
    }
}
实验场景如下:
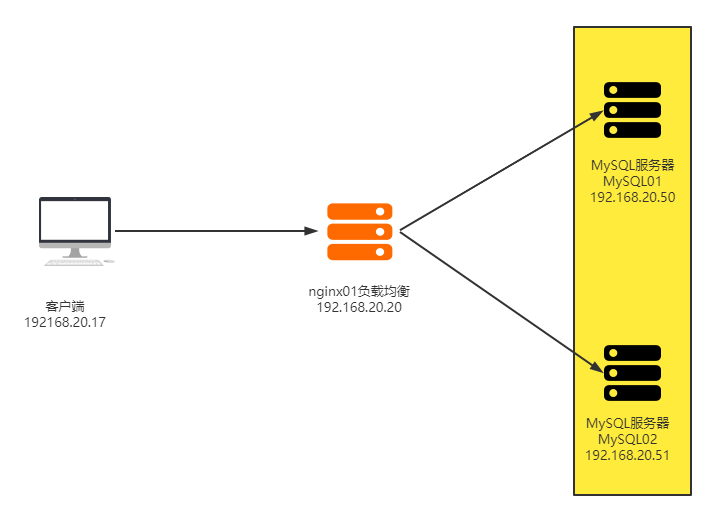
mysql部署
#1.安装mariadb
[root@mysql01 ~]# yum install mariadb mariadb-server -y

#2.启动数据库服务:
[root@mysql01 ~]# systemctl start mariadb

[root@mysql01 ~]# ss -ntlp
State      Recv-Q Send-Q  Local Address:Port                 Peer Address:Port
LISTEN     0      50                  *:3306                            *:*                   users:(("mysqld",pid=2024,fd=14))

#3.安全初始化:
[root@mysql01 ~]# mysql_secure_installation

#4.授权root用户可以访问数据库:
[root@mysql01 ~]# mysql -uroot -p123456
Welcome to the MariaDB monitor.  Commands end with ; or \g.
Your MariaDB connection id is 2
Server version: 5.5.65-MariaDB MariaDB Server

Copyright (c) 2000, 2018, Oracle, MariaDB Corporation Ab and others.

Type ‘help;‘ or ‘\h‘ for help. Type ‘\c‘ to clear the current input statement.
MariaDB [(none)]> GRANT ALL PRIVILEGES ON *.* TO ‘root‘@‘%‘IDENTIFIED BY ‘123456‘;
Query OK, 0 rows affected (0.00 sec)

MariaDB [(none)]> FLUSH PRIVILEGES;
Query OK, 0 rows affected (0.00 sec)

MariaDB [(none)]> show databases;
+--------------------+
| Database           |
+--------------------+
| information_schema |
| mysql              |
| performance_schema |
| test               |
+--------------------+
4 rows in set (0.00 sec)
MariaDB [(none)]> exit
Bye
nginx负载均衡部署
#1.nginx的配置文件如下:
#注意:不再使用http配置块,直接在主配置文件下编写。
[root@nginx01 ~]# cat /etc/nginx/nginx.conf
stream {
	upstream mysql {
		server 192.168.20.50:3306 max_fails=3 fail_timeout=10s;
		server 192.168.20.51:3306 max_fails=3 fail_timeout=10s;
	}

	server {
		listen 3306;
		proxy_timeout 15s;
		proxy_connect_timeout 5s;
		proxy_pass mysql;
	}
}

#2.重启nginx服务:
[root@nginx01 ~]# systemctl reload nginx.service

#3.nginx监听在3306端口
[root@nginx01 ~]# ss -ntlp
State      Recv-Q Send-Q  Local Address:Port                 Peer Address:Port
LISTEN     0      128                 *:3306                            *:*                   users:(("nginx",pid=11462,fd=27),("nginx",pid=11461,fd=27),("nginx",pid=1096,fd=27))
客户端测试:
#1.安装mariadb
[root@xuzhichao ~]# yum install mariadb

#2.测试通过访问nginx负载均衡器进入后端mariadb的数据库
[root@xuzhichao ~]# mysql -uroot -p123456 -h192.168.20.20
Welcome to the MariaDB monitor.  Commands end with ; or \g.
Your MariaDB connection id is 12
Server version: 5.5.65-MariaDB MariaDB Server

Copyright (c) 2000, 2018, Oracle, MariaDB Corporation Ab and others.

Type ‘help;‘ or ‘\h‘ for help. Type ‘\c‘ to clear the current input statement.

MariaDB [(none)]> show databases;
+--------------------+
| Database           |
+--------------------+
| information_schema |
| mysql              |
| performance_schema |
| test               |
+--------------------+
4 rows in set (0.00 sec)

MariaDB [(none)]>
WEB服务与NGINX(23)- nginx的四层负载均衡功能
原文:https://www.cnblogs.com/xuwymm/p/14961182.html