我最新最全的文章都在 南瓜慢说 www.pkslow.com ,欢迎大家来喝茶!
Spring Security作为成熟且强大的安全框架,得到许多大厂的青睐。而作为前后端分离的SSO方案,JWT也在许多项目中应用。本文将介绍如何通过Spring Security实现JWT认证。
用户与服务器交互大概如下:
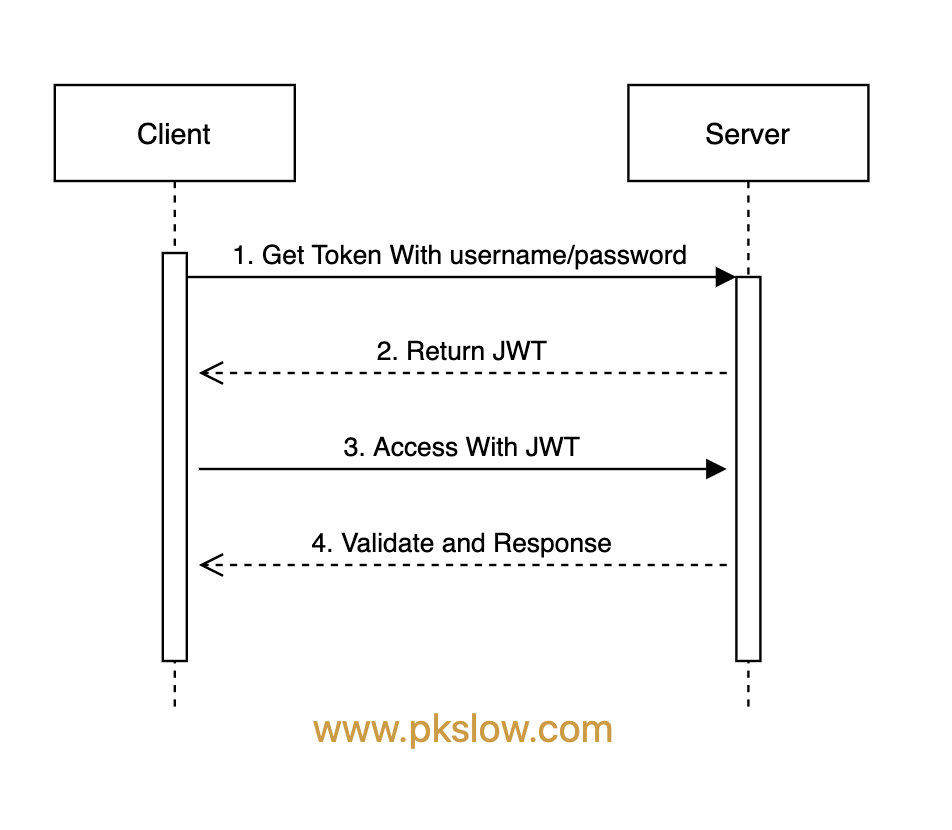
JWT,一般通过POST方法把用户名/密码传给server;JWT并返回;不正确则返回错误;JWT后,在有效期内都可以通过JWT来访问资源了,一般把JWT放在请求头;一次获取,多次使用;JWT是否合法,合法则允许客户端正常访问,不合法则返回401。我们把要整合的Spring Security和JWT加入到项目的依赖中去:
<dependency>
  <groupId>org.springframework.boot</groupId>
  <artifactId>spring-boot-starter-web</artifactId>
</dependency>
<dependency>
  <groupId>org.springframework.boot</groupId>
  <artifactId>spring-boot-starter-security</artifactId>
</dependency>
<dependency>
  <groupId>io.jsonwebtoken</groupId>
  <artifactId>jjwt</artifactId>
  <version>0.9.1</version>
</dependency>
JWT工具类起码要具有以下功能:
具体代码如下:
@Component
public class JwtTokenProvider {

    @Autowired JwtProperties jwtProperties;

    @Autowired
    private CustomUserDetailsService userDetailsService;

    private String secretKey;

    @PostConstruct
    protected void init() {
        secretKey = Base64.getEncoder().encodeToString(jwtProperties.getSecretKey().getBytes());
    }

    public String createToken(String username, List<String> roles) {

        Claims claims = Jwts.claims().setSubject(username);
        claims.put("roles", roles);

        Date now = new Date();
        Date validity = new Date(now.getTime() + jwtProperties.getValidityInMs());

        return Jwts.builder()//
                .setClaims(claims)//
                .setIssuedAt(now)//
                .setExpiration(validity)//
                .signWith(SignatureAlgorithm.HS256, secretKey)//
                .compact();
    }

    public Authentication getAuthentication(String token) {
        UserDetails userDetails = this.userDetailsService.loadUserByUsername(getUsername(token));
        return new UsernamePasswordAuthenticationToken(userDetails, "", userDetails.getAuthorities());
    }

    public String getUsername(String token) {
        return Jwts.parser().setSigningKey(secretKey).parseClaimsJws(token).getBody().getSubject();
    }

    public String resolveToken(HttpServletRequest req) {
        String bearerToken = req.getHeader("Authorization");
        if (bearerToken != null && bearerToken.startsWith("Bearer ")) {
            return bearerToken.substring(7);
        }
        return null;
    }

    public boolean validateToken(String token) {
        try {
            Jws<Claims> claims = Jwts.parser().setSigningKey(secretKey).parseClaimsJws(token);

            if (claims.getBody().getExpiration().before(new Date())) {
                return false;
            }

            return true;
        } catch (JwtException | IllegalArgumentException e) {
            throw new InvalidJwtAuthenticationException("Expired or invalid JWT token");
        }
    }

}
工具类还实现了另一个功能:从HTTP请求头中获取JWT。
Filter是Security处理的关键,基本上都是通过Filter来拦截请求的。首先从请求头取出JWT,然后校验JWT是否合法,如果合法则取出Authentication保存在SecurityContextHolder里。如果不合法,则做异常处理。
public class JwtTokenAuthenticationFilter extends GenericFilterBean {

    private JwtTokenProvider jwtTokenProvider;

    public JwtTokenAuthenticationFilter(JwtTokenProvider jwtTokenProvider) {
        this.jwtTokenProvider = jwtTokenProvider;
    }

    @Override
    public void doFilter(ServletRequest req, ServletResponse res, FilterChain filterChain)
            throws IOException, ServletException {
        HttpServletRequest request = (HttpServletRequest) req;
        HttpServletResponse response = (HttpServletResponse) res;

        try {
            String token = jwtTokenProvider.resolveToken(request);
            if (token != null && jwtTokenProvider.validateToken(token)) {
                Authentication auth = jwtTokenProvider.getAuthentication(token);

                if (auth != null) {
                    SecurityContextHolder.getContext().setAuthentication(auth);
                }
            }
        } catch (InvalidJwtAuthenticationException e) {
            response.setStatus(HttpStatus.UNAUTHORIZED.value());
            response.getWriter().write("Invalid token");
            response.getWriter().flush();
            return;
        }

        filterChain.doFilter(req, res);
    }
}
对于异常处理,使用@ControllerAdvice是不行的,应该这个是Filter,在这里抛的异常还没有到DispatcherServlet,无法处理。所以Filter要自己做异常处理:
catch (InvalidJwtAuthenticationException e) {
  response.setStatus(HttpStatus.UNAUTHORIZED.value());
  response.getWriter().write("Invalid token");
  response.getWriter().flush();
  return;
}
最后的return;不能省略,因为已经把要输出的内容给Response了,没有必要再往后传递,否则会报错:
java.lang.IllegalStateException: getWriter() has already been called
JWT需要配置一个密钥来加密,同时还要配置JWT令牌的有效期。
@Configuration
@ConfigurationProperties(prefix = "pkslow.jwt")
public class JwtProperties {
    private String secretKey = "pkslow.key";
    private long validityInMs = 3600_000;
//getter and setter
}
Spring Security的整个框架还是比较复杂的,简化后大概如下图所示:
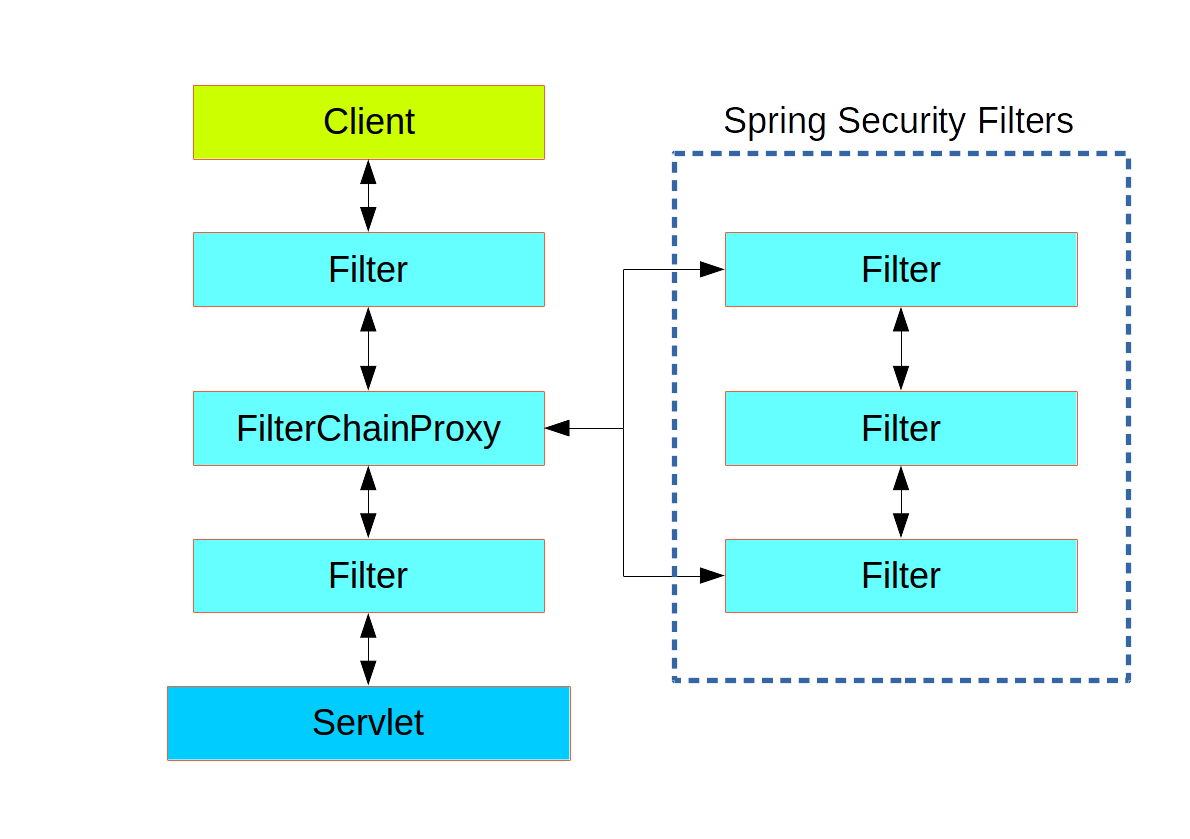
它是通过一连串的Filter来进行安全管理。细节这里先不展开讲。
这个配置也可以理解为是FilterChain的配置,可以不用理解,代码很好懂它做了什么:
@Configuration
public class SecurityConfig extends WebSecurityConfigurerAdapter {


    @Autowired
    JwtTokenProvider jwtTokenProvider;

    @Bean
    @Override
    public AuthenticationManager authenticationManagerBean() throws Exception {
        return super.authenticationManagerBean();
    }

    @Bean
    public PasswordEncoder passwordEncoder() {
        return NoOpPasswordEncoder.getInstance();
    }

    @Override
    protected void configure(HttpSecurity http) throws Exception {
        http
            .httpBasic().disable()
            .csrf().disable()
            .sessionManagement().sessionCreationPolicy(SessionCreationPolicy.STATELESS)
            .and()
            .authorizeRequests()
            .antMatchers("/auth/login").permitAll()
            .antMatchers(HttpMethod.GET, "/admin").hasRole("ADMIN")
            .antMatchers(HttpMethod.GET, "/user").hasRole("USER")
            .anyRequest().authenticated()
            .and()
            .apply(new JwtSecurityConfigurer(jwtTokenProvider));
    }
}
这里通过HttpSecurity配置了哪些请求需要什么权限才可以访问。
/auth/login用于登陆获取JWT,所以都能访问;/admin只有ADMIN用户才可以访问;/user只有USER用户才可以访问。而之前实现的Filter则在下面配置使用:
public class JwtSecurityConfigurer extends SecurityConfigurerAdapter<DefaultSecurityFilterChain, HttpSecurity> {

    private JwtTokenProvider jwtTokenProvider;

    public JwtSecurityConfigurer(JwtTokenProvider jwtTokenProvider) {
        this.jwtTokenProvider = jwtTokenProvider;
    }

    @Override
    public void configure(HttpSecurity http) throws Exception {
        JwtTokenAuthenticationFilter customFilter = new JwtTokenAuthenticationFilter(jwtTokenProvider);
        http.exceptionHandling()
                .authenticationEntryPoint(new JwtAuthenticationEntryPoint())
                .and()
                .addFilterBefore(customFilter, UsernamePasswordAuthenticationFilter.class);
    }
}
通常在Spring Security的世界里,都是通过实现UserDetailsService来获取UserDetails的。
@Component
public class CustomUserDetailsService implements UserDetailsService {

    private UserRepository users;

    public CustomUserDetailsService(UserRepository users) {
        this.users = users;
    }

    @Override
    public UserDetails loadUserByUsername(String username) throws UsernameNotFoundException {
        return this.users.findByUsername(username)
                .orElseThrow(() -> new UsernameNotFoundException("Username: " + username + " not found"));
    }
}
对于UserRepository,可以从数据库中读取,或者其它用户管理中心。为了方便,我使用Map放了两个用户:
@Repository
public class UserRepository {

    private static final Map<String, User> allUsers = new HashMap<>();

    @Autowired
    private PasswordEncoder passwordEncoder;

    @PostConstruct
    protected void init() {
        allUsers.put("pkslow", new User("pkslow", passwordEncoder.encode("123456"), Collections.singletonList("ROLE_ADMIN")));
        allUsers.put("user", new User("user", passwordEncoder.encode("123456"), Collections.singletonList("ROLE_USER")));
    }

    public Optional<User> findByUsername(String username) {
        return Optional.ofNullable(allUsers.get(username));
    }
}
完成代码编写后,我们来测试一下:
(1)无JWT访问,失败
curl http://localhost:8080/admin
{"timestamp":"2021-02-06T05:45:06.385+0000","status":403,"error":"Forbidden","message":"Access Denied","path":"/admin"}

$ curl http://localhost:8080/user
{"timestamp":"2021-02-06T05:45:16.438+0000","status":403,"error":"Forbidden","message":"Access Denied","path":"/user"}
(2)admin获取JWT,密码错误则失败,密码正确则成功
$ curl http://localhost:8080/auth/login -X POST -d ‘{"username":"pkslow","password":"xxxxxx"}‘ -H ‘Content-Type: application/json‘
{"timestamp":"2021-02-06T05:47:16.254+0000","status":403,"error":"Forbidden","message":"Access Denied","path":"/auth/login"}

$ curl http://localhost:8080/auth/login -X POST -d ‘{"username":"pkslow","password":"123456"}‘ -H ‘Content-Type: application/json‘
eyJhbGciOiJIUzI1NiJ9.eyJzdWIiOiJwa3Nsb3ciLCJyb2xlcyI6WyJST0xFX0FETUlOIl0sImlhdCI6MTYxMjU5MDYxNCwiZXhwIjoxNjEyNTkxMjE0fQ.d4Gi50aaOsHHqpM0d8Mh1960otnZf7rlE3x6xSfakVo
(3)admin带JWT访问/admin,成功;访问/user失败
$ curl http://localhost:8080/admin -H ‘Authorization: Bearer eyJhbGciOiJIUzI1NiJ9.eyJzdWIiOiJwa3Nsb3ciLCJyb2xlcyI6WyJST0xFX0FETUlOIl0sImlhdCI6MTYxMjU5MDYxNCwiZXhwIjoxNjEyNTkxMjE0fQ.d4Gi50aaOsHHqpM0d8Mh1960otnZf7rlE3x6xSfakVo‘
you are admin

$ curl http://localhost:8080/user -H ‘Authorization: Bearer eyJhbGciOiJIUzI1NiJ9.eyJzdWIiOiJwa3Nsb3ciLCJyb2xlcyI6WyJST0xFX0FETUlOIl0sImlhdCI6MTYxMjU5MDYxNCwiZXhwIjoxNjEyNTkxMjE0fQ.d4Gi50aaOsHHqpM0d8Mh1960otnZf7rlE3x6xSfakVo‘
{"timestamp":"2021-02-06T05:51:23.099+0000","status":403,"error":"Forbidden","message":"Forbidden","path":"/user"}
(4)使用过期的JWT访问,失败
$ curl http://localhost:8080/admin -H ‘Authorization: Bearer eyJhbGciOiJIUzI1NiJ9.eyJzdWIiOiJwa3Nsb3ciLCJyb2xlcyI6WyJST0xFX0FETUlOIl0sImlhdCI6MTYxMjU5MDQ0OSwiZXhwIjoxNjEyNTkwNTA5fQ.CSaubE4iJcYATbLmbb59aNFU1jNCwDFHUV3zIakPU64‘
Invalid token
对于用户user同样可以测试,这里不列出来了。
代码请查看:https://github.com/LarryDpk/pkslow-samples
欢迎关注微信公众号<南瓜慢说>,将持续为你更新...

多读书,多分享;多写作,多整理。
Springboot集成Spring Security实现JWT认证
原文:https://www.cnblogs.com/larrydpk/p/14939748.html