Ctrl+Shift+p      # 打开搜索框

Ctrl+Shift+x      # 打开扩展框
快捷方式:Ctrl+Shift+p(打开搜索框)  或者  点击Exetnsions(扩展)打开扩展快捷方式 Ctrl+Shift+x  >

搜索configure display language(配置显示语言)    >

选择扩展插件:Chinese (Simplified) Language Pack for Visua(视觉中文(简体)语言包)  >
  # 适用于 VS Code 的中文(简体)语言包

选择install(安装)  >
  # Uninstall(表示卸载)
  # 安装后提示信息:Would you like to change VS Code‘s UI language to Chinese Simplified and restart?(您想将VS Code的UI语言更改为简体中文并重新启动吗?)

重启VScode
  # 点击Change Language and Restart(更改语言并重新启动)
# 登陆数据库,配置账户
[root@localhost ~]# mysql -uroot -p
Enter password:
ERROR 2002 (HY000): Can t connect to local MySQL server through socket ‘/var/lib/mysql/mysql.sock‘ (111)

数据库未启用,启用数据库

---

[root@localhost ~]# ss -tunlp
Netid  State    Recv-Q   Send-Q             Local Address:Port       Peer Address:Port
udp    UNCONN   0        0           192.168.208.246%eth0:68              0.0.0.0:*       users:(("NetworkManager",pid=947,fd=20))
udp    UNCONN   0        0                      127.0.0.1:323             0.0.0.0:*       users:(("chronyd",pid=916,fd=6))
udp    UNCONN   0        0                          [::1]:323                [::]:*       users:(("chronyd",pid=916,fd=7))
tcp    LISTEN   0        128                    127.0.0.1:45233           0.0.0.0:*       users:(("node",pid=1900,fd=18))
tcp    LISTEN   0        128                      0.0.0.0:22              0.0.0.0:*       users:(("sshd",pid=956,fd=5))
tcp    LISTEN   0        128                         [::]:22                 [::]:*       users:(("sshd",pid=956,fd=7))

3306端口不存在,可以启用

---

[root@localhost ~]# systemctl start mariadb.service
[root@localhost ~]# ss -tunlp
Netid  State    Recv-Q   Send-Q             Local Address:Port       Peer Address:Port
udp    UNCONN   0        0           192.168.208.246%eth0:68              0.0.0.0:*       users:(("NetworkManager",pid=947,fd=20))
udp    UNCONN   0        0                      127.0.0.1:323             0.0.0.0:*       users:(("chronyd",pid=916,fd=6))
udp    UNCONN   0        0                          [::1]:323                [::]:*       users:(("chronyd",pid=916,fd=7))
tcp    LISTEN   0        128                    127.0.0.1:45233           0.0.0.0:*       users:(("node",pid=1900,fd=18))
tcp    LISTEN   0        128                      0.0.0.0:22              0.0.0.0:*       users:(("sshd",pid=956,fd=5))
tcp    LISTEN   0        128                         [::]:22                 [::]:*       users:(("sshd",pid=956,fd=7))
tcp    LISTEN   0        80                             *:3306                  *:*       users:(("mysqld",pid=3512,fd=20))

数据库启用成功,连接数据库

---

# 登陆(连接)数据库
[root@localhost ~]# mysql -uroot -p
Enter password:
Welcome to the MariaDB monitor.  Commands end with ; or \g.
Your MariaDB connection id is 8
Server version: 10.3.17-MariaDB MariaDB Server

Copyright (c) 2000, 2018, Oracle, MariaDB Corporation Ab and others.

Type ‘help;‘ or ‘\h‘ for help. Type ‘\c‘ to clear the current input statement.

MariaDB [(none)]>

连接成功

---


# 数据库允许远程登录

MariaDB [(none)]> show databases;

查看库

---


MariaDB [(none)]> use mysql;

切换数据库,使用另一个数据库。 将数据库名称作为参数。

---


MariaDB [mysql]> show tables;

查看表

---


MariaDB [mysql]> select host,user,password from user;
+-----------+------+-------------------------------------------+
| host      | user | password                                  |
+-----------+------+-------------------------------------------+
| localhost | root | *81F5E21E35407D884A6CD4A731AEBFB6AF209E1B |
| 127.0.0.1 | root | *81F5E21E35407D884A6CD4A731AEBFB6AF209E1B |
| ::1       | root | *81F5E21E35407D884A6CD4A731AEBFB6AF209E1B |
| %         | root | *6BB4837EB74329105EE4568DDA7DC67ED2CA2AD9 |
| %         | gogs | *461C3A96BAEF66E327658B3AFF86F8D71BEE3F99 |
+-----------+------+-------------------------------------------+
5 rows in set (0.000 sec)

查看user表的三个字段,% 允许所有地址对应的密码忘记,删除所有允许所有地址登录

---


MariaDB [mysql]> delete from user where host=‘%‘;
Query OK, 2 rows affected (0.000 sec)

MariaDB [mysql]> select host,user,password from user;
+-----------+------+-------------------------------------------+
| host      | user | password                                  |
+-----------+------+-------------------------------------------+
| localhost | root | *81F5E21E35407D884A6CD4A731AEBFB6AF209E1B |
| 127.0.0.1 | root | *81F5E21E35407D884A6CD4A731AEBFB6AF209E1B |
| ::1       | root | *81F5E21E35407D884A6CD4A731AEBFB6AF209E1B |
+-----------+------+-------------------------------------------+
3 rows in set (0.000 sec)

删除成功

---


MariaDB [mysql]> GRANT ALL PRIVILEGES ON *.* TO ‘root‘@‘%‘IDENTIFIED BY ‘root‘ WITH GRANT OPTION;
Query OK, 0 rows affected (0.000 sec)

MariaDB [mysql]> select host,user,password from user;
+-----------+------+-------------------------------------------+
| host      | user | password                                  |
+-----------+------+-------------------------------------------+
| localhost | root | *81F5E21E35407D884A6CD4A731AEBFB6AF209E1B |
| 127.0.0.1 | root | *81F5E21E35407D884A6CD4A731AEBFB6AF209E1B |
| ::1       | root | *81F5E21E35407D884A6CD4A731AEBFB6AF209E1B |
| %         | root | *81F5E21E35407D884A6CD4A731AEBFB6AF209E1B |
+-----------+------+-------------------------------------------+
4 rows in set (0.000 sec)

MariaDB [mysql]> FLUSH PRIVILEGES;
Query OK, 0 rows affected (0.000 sec)

all privileges:表示将所有权限授予给用户。也可指定具体的权限,如:SELECT、CREATE、DROP等。

on:表示这些权限对哪些数据库和表生效,格式:数据库名.表名,这里写“*”表示所有数据库,所有表。如果我要指定将权限应用到test库的user表中,可以这么写:test.user

to:将权限授予哪个用户。格式:”用户名”@”登录IP或域名”。%表示没有限制,在任何主机都可以登录。比如:”yangxin”@”192.168.0.%”,表示yangxin这个用户只能在192.168.0IP段登录

identified by:指定用户的登录密码

with grant option:表示允许用户将自己的权限授权给其它用户

FLUSH PRIVILEGES: 更新表

---

# 关闭防火墙,防火墙会拦截 mariadb客户端连接3306端口
systemctl stop firewalld
安装插件
插件安装成功后进行数据库连接
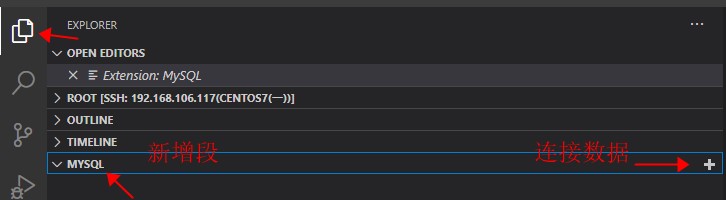
按顺序输入完主机名、用户名、密码、端口号,最后一项省略 之后左侧连接成功
原文:https://www.cnblogs.com/hao-ran/p/14745676.html