Rsync是一款开源的快速的、可实现全量及增量的本地或远程数据备份的多功能优秀工具,并且在复制的时候不改变原有数据的属性信息,可实现数据的备份迁移特性。适用于Unix、Linux、Windows等多种操作系统平台。
Rsync具有可以使本地和远程两台主机之间的数据快速复制、远程备份的功能,Rsync软件自带rsync命令本身就可以实现异地主机复制数据,此外Rsync软件还可以支持以配置守护进程方式实现异机数据复制。
Rsync有三种数据传输模式,具体介绍如下:
1、本地(local)数据传输模式
Rsync的本地数据传输模式,很类似于cp本地复制命令,可以实现文件、目录的移动备份等功能,所不同的是Rsync有增量复制的功能
利用rsync命令实现本地文件复制,命令如下
[root@localhost ~]# cd /tmp
[root@localhost tmp]# ls hosts
ls: 无法访问hosts: 没有那个文件或目录
[root@localhost tmp]# rsync /etc/hosts /tmp
[root@localhost tmp]# ls hosts
hosts
利用rsync命令复制本地目录
[root@localhost tmp]# mkdir /wjtest -p
[root@localhost tmp]# touch /wjtest/file{1..5}.txt
[root@localhost tmp]# ls /wjtest
file1.txt file2.txt file3.txt file4.txt file5.txt
[root@localhost tmp]# rsync /wjtest /tmp #复制目录的时候需要加参数-r,否则不能复制
skipping directory wjtest
[root@localhost tmp]# rsync -r /wjtest /tmp
[root@localhost tmp]# ls wjtest
file1.txt file2.txt file3.txt file4.txt file5.t
作为删除数据的命令使用(类似rm命令)
利用rsync命令的删除功能清空文件内容
[root@localhost tmp]# mkdir /jzff/null -p #创建的空文件,以空文件为模板,进行清空文件
[root@localhost tmp]# rsync -r --delete /jzff/null/ /tmp/
[root@localhost tmp]# ls
命令分解 rsync -r --delete /jzff/null/ /tmp/ #表示清空/tmp下的所有文档 --delete #表示删除功能参数
利用rsync命令删除功能清空文件内容
[root@localhost tmp]# echo "i like you, but just like you to feifei" > test.txt
[root@localhost tmp]# cat test.txt
i like you, but just like you to feifei
[root@localhost tmp]# touch null.txt
[root@localhost tmp]# rsync -r --delete /tmp/null.txt test.txt #同样以空文件/tmp/null.txt为模板
[root@localhost tmp]# cat test.txt
[root@localhost tmp]#
作为数据查询命令使用(类似ls命令)
[root@localhost tmp]# rsync /etc/hosts
-rw-r--r-- 158 2013/06/07 22:31:32 hosts
[root@localhost tmp]# rsync /etc
drwxr-xr-x 8,192 2021/05/04 14:37:14 etc
2、远程shell数据传输模式
远程shell数据传输模式分为拉取和推送两种模式,拉取是指从远程服务器把数据拉取到本地服务器;推送是指把数据从本地服务器推送到远端服务器。
利用拉取模式从远端服务器把/etc/hosts 复制到本地/tmp
注意此刻我们需要登录另外一个服务器了,也就是我们的客户端服务器192.168.146.100
[root@web1 ~]# rsync -av -e ‘ssh -p 22‘ root@192.168.146.100:/etc/hosts /tmp
The authenticity of host ‘192.168.146.100 (192.168.146.100)‘ can‘t be established.
ECDSA key fingerprint is SHA256:51fxEGZteH1XI4HVxwEytApnXHSAUGgi6js+YgHlx60.
ECDSA key fingerprint is MD5:ed:c9:de:60:1d:97:37:06:34:9f:49:d9:18:ed:d8:ae.
Are you sure you want to continue connecting (yes/no)? yes
Warning: Permanently added ‘192.168.146.100‘ (ECDSA) to the list of known hosts.
root@192.168.146.100‘s password: #此处输入密码
receiving incremental file list
hosts
sent 43 bytes received 243 bytes 24.87 bytes/sec
total size is 158 speedup is 0.55
[root@web1 ~]# ls /tmp/hosts #拉取完之后进行查看是否成功
/tmp/hosts
[root@web1 ~]#
利用推送模式从本地服务器把/etc/hosts 复制到远端主机的/tmp
[root@web1 ~]# rsync -av /etc/hosts root@192.168.146.100:/tmp
root@192.168.146.100‘s password: #输入远端主机的root密码
sending incremental file list
hosts
sent 243 bytes received 35 bytes 42.77 bytes/sec
total size is 158 speedup is 0.57
进入到远端主机及服务端查看文件时候传输成功
[root@localhost tmp]# ls
hosts null.txt test.txt
3、守护进程传输模式
守护进程传输模式是在客户端与服务端之间进行数据复制的,通常需要服务端部署守护进程,然后再客户端执行命令,实现数据的拉取和推送复制,即把数据推送到服务端,或者从服务端把数据拉取到本地客户端。
在部署进程之前先查看部署的环境是否合适
[root@web1 ~]# cat /etc/redhat-release
CentOS Linux release 7.8.2003 (Core)
[root@web1 ~]# uname -r
3.10.0-1127.el7.x86_64
[root@web1 ~]# rpm -qa rsync
rsync-3.1.2-10.el7.x86_64
首先在服务器Rsync进行部署(即在192.168.146.100上部署)
修改配置文件rsyncd.conf
[root@localhost tmp]# cat > /etc/rsyncd.conf <<EOF #给配置文件中输入内容
> #rsync_config____________________start
> #created by oldboy
>
> uid=rsync
> gid=rsync
> fake super = yes #centos7中必须有
> use chroot = no
> max connections = 200
> timeout = 600
> pid file = /var/run/rsyncd.pid
> lock file = /var/run/rsyncd.lock
> log file = /var/run/rsyncd.log
> ignore errors
> read only = false
> list = false
> hosts allow = 192.168.146.0/24
> hosts deny =0.0.0.0/32
> auth users = rsync_backup
> secrets file = /etc/rsync.password
> [backup]
> comment = welcome to backup!
> path = /backup/
> EOF
[root@localhost tmp]#
配置用于数据备份的目录
[root@localhost ~]# useradd rsync -s /sbin/nologin -M #创建备份用户
[root@localhost ~]# mkdir -p /backup #创建备份目录
[root@localhost ~]# chown -R rsync.rsync /backup #修改目录权限
配置用于Rsync复制的账号、密码及账号文件权限
在Rsync服务端创建用于Rsync客户端与服务端进行验证的账号与密码,并将其写入文件。
创建服务认证账号和密码文件的命令如下。
[root@localhost ~]# echo "rsync_backup:rsync" >/etc/rsync.password #创建验证账号,及其密码
[root@localhost ~]# chmod 600 /etc/rsync.password #修改账号及密码的文件权限
检查认证文件信息
[root@localhost ~]# cat /etc/rsync.password
rsync_backup:rsync
[root@localhost ~]# ll /etc/rsync.password
-rw-------. 1 root root 19 5月 4 21:43 /etc/rsync.password
启动Rsync服务以及检查确认
[root@localhost ~]# systemctl start rsyncd
[root@localhost ~]# systemctl enable rsyncd
Created symlink from /etc/systemd/system/multi-user.target.wants/rsyncd.service to /usr/lib/systemd/system/rsyncd.service.
[root@localhost ~]# systemctl status rsyncd
● rsyncd.service - fast remote file copy program daemon
Loaded: loaded (/usr/lib/systemd/system/rsyncd.service; enabled; vendor preset: disabled)
Active: active (running) since 二 2021-05-04 21:49:29 CST; 38s ago
Main PID: 27626 (rsync)
CGroup: /system.slice/rsyncd.service
└─27626 /usr/bin/rsync --daemon --no-detach
5月 04 21:49:29 localhost.localdomain systemd[1]: Started fast remote file copy program daemon.
[root@localhost ~]# ps -ef|grep rsync|grep -v grep
root 27626 1 0 21:49 ? 00:00:00 /usr/bin/rsync --daemon --no-detach
[root@localhost ~]# netstat -lntup|grep rsync #查看使用的端口
tcp 0 0 0.0.0.0:873 0.0.0.0:* LISTEN 27626/rsync
tcp6 0 0 :::873 :::* LISTEN 27626/rsync
[root@localhost ~]#
Rsync客户端配置
注意此处要登录客户端所对应的服务器192.168.146.110
首先配置密码文件
[root@web1 ~]# echo "rsync" > /etc/rsync.password #创建密码文件,注意此处的密码要与前面创建的账户密码对应,不可写错。
[root@web1 ~]# chmod 600 /etc/rsync.password #修改权限
[root@web1 ~]# cat /etc/rsync.password
rsync
[root@web1 ~]# ll /etc/rsync.password
-rw-------. 1 root root 6 5月 4 22:02 /etc/rsync.password
[root@web1 ~]#
至此,Rsync守护进程方式服务端和客户端的配置大功告成
测试数据同步效果
推送:从客户端同步文件或目录到服务器端
从客户端推送/etc 目录到服务器端Rsync指定的目录(这里为/backup)下
[root@web1 ~]# rsync -avzP /etc rsync_backup@192.168.146.100::backup --password-file=/etc/rsync.password
rsync: failed to connect to 192.168.146.100 (192.168.146.100): No route to host (113)
rsync error: error in socket IO (code 10) at clientserver.c(125) [sender=3.1.2] #出现此种情况,表示防火墙端口号未开启端口号873,可以用以下的方式验证
[root@web1 ~]# telnet 192.168.146.110
Trying 192.168.146.110...
telnet: connect to address 192.168.146.110: Connection refused #表示873端口号未开
开启服务端服务器的873端口(记得首先登录对方的服务器192.168.146.100)
[root@localhost ~]# firewall-cmd --list-ports #查看开启的端口
此时没有开启端口
[root@localhost ~]# firewall-cmd --state #查看防火墙的状态
running
[root@localhost ~]# systemctl start firewalld #开启防火墙
[root@localhost ~]# firewall-cmd --zone=public --add-port=873/tcp --permanent #开启端口
success
[root@localhost ~]# firewall-cmd --reload #重启防火墙
success
[root@localhost ~]# firewall-cmd --list-all #查看防火墙开启的端口
public (active)
target: default
icmp-block-inversion: no
interfaces: ens33
sources:
services: dhcpv6-client ssh
ports: 873/tcp #此时端口已经开启
protocols:
masquerade: no
forward-ports:
source-ports:
icmp-blocks:
rich rules:
端口开启之后,再重新的登录到客户端的服务器,重新推送文件
[root@web1 ~]# rsync -avzP /etc rsync_backup@192.168.146.100::backup --password-file=/etc/rsync.password
sending incremental file list
rsync: recv_generator: mkdir "etc" (in backup) failed: Permission denied (13)
*** Skipping any contents from this failed directory *** #文件传输失败,经过查询资料,发现是服务器端selinux导致的。
etc/
sent 91,465 bytes received 951 bytes 20,536.89 bytes/sec
total size is 36,028,074 speedup is 389.85
rsync error: some files/attrs were not transferred (see previous errors) (code 23) at main.c(1179) [sender=3.1.2]
[root@web1 ~]#
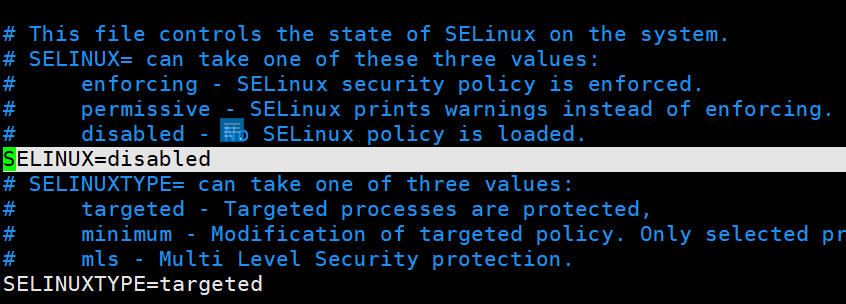
登录服务器端,修改SELinux的配置文件
[root@localhost ~]# vim /etc/selinux/config
注意将文件相关信息修改到与下面图片一致 。
修改完之后重启服务器
[root@localhost ~]# reboot
现在,在重新登录到客户端传输文件
[root@web1 ~]# rsync -avzP /etc rsync_backup@192.168.146.100::backup --password-file=/etc/rsync.password
-----------------------------------------------------------------------------------------------------------------------------------------------------------
省略部分输出信息
------------------------------------------------------------------------------------------------------------------------------------------------------------
etc/yum/vars/infra
6 100% 0.00kB/s 0:00:01 (xfr#2527, to-chk=0/3583)
sent 12,693,891 bytes received 52,960 bytes 1,019,748.08 bytes/sec
total size is 36,028,074 speedup is 2.83
登录到服务器,查看文件是否传输成功
[root@localhost ~]# ls /backup
etc
到这里,从客户端同步文件到服务器端就成功了,这也太坎坷了吧,各种问题都有。难过!!!
从服务端同步文件或目录到客户端
从服务器端Rsync指定的目录下拉取所有文件到本地客户端目录/opt
[root@web1 opt]# rsync -vzrtopg rsync_backup@192.168.146.100::backup/etc/hosts /opt --password-file=/etc/rsync.password
receiving incremental file list
hosts
sent 43 bytes received 144 bytes 374.00 bytes/sec
total size is 158 speedup is 0.84
[root@web1 opt]# ls
hosts rh
[root@web1 opt]# rsync -vzrtopg rsync_backup@192.168.146.100::backup/etc/hosts /opt \--password-file=/etc/rsync.password #这里需要注意一下,在命令中加入\,执行完结过之后不会增加其他文件,如果不加\,会增加目录rh,可以将此命令与前一条命令对比记忆。
receiving incremental file list
hosts
sent 43 bytes received 144 bytes 374.00 bytes/sec
total size is 158 speedup is 0.84
[root@web1 opt]# ls
hosts
[root@web1 opt]#
到这里,有关rsync的三种工作方式就介绍完了!!!

原文:https://www.cnblogs.com/luncy/p/14730460.html