title: SpringMVC学习总结
date: 2020-08-27 20:03:17
tags: springmvc
Mybatis:优化了dao层,降低了java与dao层的耦合。
Spring:优化了service层,降低了java与service层的耦合。
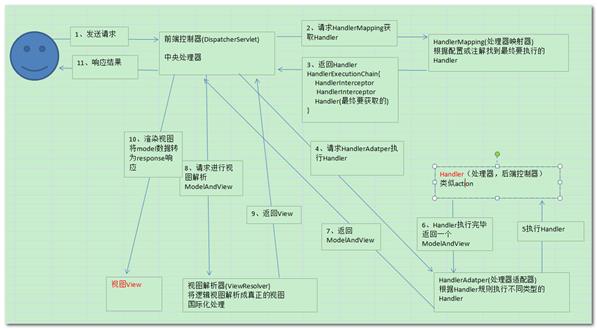
SpringMVC:优化了servlet,降低了java与servlet层的耦合。
目前市场上MVC框架,有SpringMVC(主流MVC框架,是spring框架的一部分),还有struts 和 Jfinal。
配置文件的约束:
<?xml version="1.0" encoding="UTF-8"?>
<beans
xmlns="http://www.springframework.org/schema/beans"
xmlns:xsi="http://www.w3.org/2001/XMLSchema-instance" 								xmlns:p="http://www.springframework.org/schema/p"
xmlns:context="http://www.springframework.org/schema/context"
xmlns:mvc="http://www.springframework.org/schema/mvc"
xsi:schemaLocation="http://www.springframework.org/schema/beans 			http://www.springframework.org/schema/beans/spring-beans.xsd
http://www.springframework.org/schema/mvc http://www.springframework.org/schema/mvc/spring-mvc-4.0.xsd
http://www.springframework.org/schema/context http://www.springframework.org/schema/context/spring-context.xsd">
</beans>
import org.springframework.web.servlet.ModelAndView;
import org.springframework.web.servlet.mvc.Controller;
public class MyController implements Controller {
    @Override
    public ModelAndView handleRequest(javax.servlet.http.HttpServletRequest httpServletRequest, javax.servlet.http.HttpServletResponse httpServletResponse) throws Exception {
        //创建视图模型对象
        ModelAndView m = new ModelAndView();
        m.addObject("name","张三");//往视图模型中加入流转数据
        m.setViewName("index.jsp");//设置要跳转的页面
        return m;
    }
}
<?xml version="1.0" encoding="UTF-8"?>
<beans xmlns="http://www.springframework.org/schema/beans"
xmlns:xsi="http://www.w3.org/2001/XMLSchema-instance" xmlns:p="http://www.springframework.org/schema/p"
xmlns:context="http://www.springframework.org/schema/context"
xmlns:mvc="http://www.springframework.org/schema/mvc"
xsi:schemaLocation="http://www.springframework.org/schema/beans http://www.springframework.org/schema/beans/spring-beans.xsd
http://www.springframework.org/schema/mvc http://www.springframework.org/schema/mvc/spring-mvc-4.0.xsd
http://www.springframework.org/schema/context http://www.springframework.org/schema/context/spring-context.xsd">
 <bean id="/myController" class="com.spring.controller.MyController"></bean>
</beans>
<?xml version="1.0" encoding="UTF-8"?>
<web-app xmlns="http://xmlns.jcp.org/xml/ns/javaee"
xmlns:xsi="http://www.w3.org/2001/XMLSchema-instance"
xsi:schemaLocation="http://xmlns.jcp.org/xml/ns/javaee http://xmlns.jcp.org/xml/ns/javaee/web-app_4_0.xsd"
version="4.0">
    <servlet>
        <servlet-name>dispatcherServlet</servlet-name>
        <servlet-class>org.springframework.web.servlet.DispatcherServlet</servlet-class>
    </servlet>
    <servlet-mapping>
        <servlet-name>dispatcherServlet</servlet-name>
        <url-pattern>/</url-pattern>    <!-- /: 代表所有的请求都经过中央调度器-->
    </servlet-mapping>
</web-app>
<?xml version="1.0" encoding="UTF-8"?>
<beans
xmlns="http://www.springframework.org/schema/beans"
xmlns:xsi="http://www.w3.org/2001/XMLSchema-instance" xmlns:p="http://www.springframework.org/schema/p"
xmlns:context="http://www.springframework.org/schema/context"
xmlns:mvc="http://www.springframework.org/schema/mvc"
xsi:schemaLocation="http://www.springframework.org/schema/beans http://www.springframework.org/schema/beans/spring-beans.xsd
http://www.springframework.org/schema/mvc http://www.springframework.org/schema/mvc/spring-mvc-4.0.xsd
http://www.springframework.org/schema/context http://www.springframework.org/schema/context/spring-context.xsd">
    <bean id="/myController" class="com.spring.controller.MyController"></bean>
    <!--放行静态资源image,css,js-->
    <mvc:resources mapping="/image/**" location="/image/"/>  <!-- mapping="/image/**"是uri的路径,其中**表示放行image目录下所有的文件及子目录下的文件-->
</beans>
在配置文件中加上下面:
<!-- 注册扫描器:作用是让注解被扫描 -->
<context:component-scan base-package="spring.control"></context:component-scan>
<!-- 配置注解驱动 -->
<mvc:annotation-driven></mvc:annotation-driven>
@Controller、@Scope 加载类上
@RequestMapping(类体上【命名空间】、方法上)、类上的@RequestMapping :限定范围的作用,限定在浏览器上访问的路径。
方法上的@RequestMapping :请求路径。
在类名@Controller下一行加:@Scope("prototype") //表示每次请求都会创建新的实例,去掉就不会了
package com.spring.controller;
import org.springframework.context.annotation.Scope;
import org.springframework.stereotype.Controller;
import org.springframework.web.bind.annotation.RequestMapping;
import org.springframework.web.servlet.ModelAndView;
import javax.servlet.http.HttpServletRequest;
import javax.servlet.http.HttpServletResponse;

@Controller    //加这个注解等同于:<bean id="/myController" class="com.spring.controller.MyController"/>,同时实现了接口
@Scope(value = "prototype") //原型模式
@RequestMapping("/user")   //类上面加了限定路径名,访问的时候/user/show
public class MyController{

    @RequestMapping("/show")   //在浏览器上请求处理的控制器方法,限定路径的访问名
    public ModelAndView show(){
        ModelAndView m = new ModelAndView();   //用视图模型对像作为数据载体
        m.addObject("name","曹操");
        m.setViewName("/index.jsp");
        return m;
    }
    @RequestMapping("/show2")
    public String show2(HttpServletRequest req, HttpServletResponse resp){  //内置对象,可以直接作为形式参数使用
        req.setAttribute("name","刘备");//req域作为数据的流转载体
        return "/index.jsp";//页面的跳转,如果在类上加了父路径名,这里在页面前加一个/表示访问起始从根路径开始
    }
}
@RequestMapping("/show2")
public String show2(HttpServletRequest req, HttpServletResponse resp){  //内置对象,可以直接作为形式参数使用
    req.setAttribute("name","刘备");//req域作为数据的流转载体
    return "/index.jsp";//页面的跳转,如果在类上加了父路径名,这里在页面前加一个/表示访问起始从根路径开始
}

@RequestMapping("/show3")
public String show3(HttpSession session, Map<String,String> map, Model model){
    session.setAttribute("name","赵飞燕");  //session域作为数据载体
    //使用Map作为数据载体
    map.put("city","长沙");
    map.put("province","湖南");
    model.addAttribute("phone","136789898798");
    return "/index.jsp";
}
接收请求参数
4.1 逐个接收 (涉及注解@RequestParam)
4.2 以对象形式整体接收
4.3 域属性参数的接收
4.4 数组或集合参数的接收
4.5 restfull风格,传参(涉及注解@ PathVariable)
4.6 接收json字符串(涉及注解@ResponseBody)
获取请求头中参数(涉及注解@RequestHeader)
package com.spring.controller;
import com.spring.pojo.User;
import org.springframework.format.annotation.DateTimeFormat;
import org.springframework.stereotype.Controller;
import org.springframework.web.bind.annotation.PathVariable;
import org.springframework.web.bind.annotation.RequestMapping;
import org.springframework.web.bind.annotation.ResponseBody;
import javax.servlet.http.HttpServletRequest;
import javax.servlet.http.HttpServletResponse;
import javax.servlet.http.HttpSession;
import java.util.Date;

@Controller
public class LoginController {
    @RequestMapping("/login")
    public String login(HttpServletRequest req, HttpServletResponse resp){
        String uname = req.getParameter("uname");
        String pwd = req.getParameter("pwd");
        System.out.println(uname);
        System.out.println(pwd);
        return "success.jsp";
    }
    //逐个接收提交的数据
    @RequestMapping("/login2")
    public String login2(String uname,String pwd,String[]favor,String birthday){  //参数名字与表单中的name里面的值一致即可
        System.out.println(uname);
        System.out.println(pwd);
        for(String str:favor){
            System.out.println(str);
        }
        System.out.println(birthday);
        return "success.jsp";
    }
    //逐个接收提交的数据
    @RequestMapping("/login3")
    public String login3(String uname, String pwd, String[]favor,@DateTimeFormat(pattern = "yyyy-MM-dd HH:mm:ss") Date birthday){  //@DateTimeFormat可以把提交字符串转成Date对象
        System.out.println(uname);
        System.out.println(pwd);
        for(String str:favor){
            System.out.println(str);
        }
        System.out.println(birthday);
        return "success.jsp";
    }
    @RequestMapping("/login4")
    public String login4(User user, HttpSession session){
        session.setAttribute("user",user);
        return "success.jsp";
    }
    @RequestMapping("/login5/{username}/{password}")  //{username}表示接收uri携带的数据,并取名为username
    public String login5(@PathVariable String username,@PathVariable String password){
        System.out.println(username);
        System.out.println(password);
        return "success.jsp";
    }
    @RequestMapping("/login6")
    @ResponseBody()  //加了这个注解之后返回的return变成了一个数据ResponseBody(响应体),而不是页面跳转
    public String login6(String name,String age){
        System.out.println(name);
        System.out.println(age);
        String json = "{‘name‘:‘"+name+"‘,‘age‘:‘"+age+"‘}";
        System.out.println(json);
//        return "success.jsp";//默认情况下return是跳转页面
        return json;
    }
}
<%@ page contentType="text/html;charset=UTF-8" language="java" %>
<%
    String path = request.getContextPath();
    String basePath = request.getScheme()+"://"+request.getServerName()+":"+request.getServerPort()+path+"/";
%>
<html>
<head>
    <base href="<%=basePath%>">
    <title>Title</title>
</head>
CharacterEncodeingFilter
<!--使用过滤器统一设置请求编码-->
<filter>
    <filter-name>characterEncodingFilter</filter-name>
    <filter-class>org.springframework.web.filter.CharacterEncodingFilter</filter-class>
    <init-param>
        <param-name>encoding</param-name>
        <param-value>utf-8</param-value>
    </init-param>
</filter>
<filter-mapping>
    <filter-name>characterEncodingFilter</filter-name>
    <url-pattern>/*</url-pattern>
</filter-mapping>
controller中的方法设置响应编码
@RequestMapping(value = "/login",produces = "text/html;charset=utf-8")
处理器方法的返回值
8.1 ModelAndView
8.2 String
8.3 void (使用场景:方法参数为HttpServletRequest和HttpServletResponse时获取用户提交数据时使用)
8.4 Object(涉及注解@ResponseBody ,导入jackson相关的包)
package com.spring.controller;

import com.spring.pojo.User;
import org.springframework.stereotype.Controller;
import org.springframework.web.bind.annotation.RequestMapping;
import org.springframework.web.bind.annotation.ResponseBody;
import javax.servlet.ServletException;
import javax.servlet.http.HttpServletRequest;
import javax.servlet.http.HttpServletResponse;
import java.io.IOException;

@Controller
public class TestController {
    @RequestMapping("/getMsg")
    public void getMsg(HttpServletRequest req, HttpServletResponse resp) throws ServletException, IOException {
//        req.getRequestDispatcher("success.jsp").forward(req,resp);  //请求转发
        resp.sendRedirect("success.jsp");
    }

    @RequestMapping("/getObj")
    @ResponseBody
    public Object getObj(){
        User user= new User("赵飞燕","123456");
        return user;//需要依赖user返回的过程之中会转成json数据
    }
}
package com.spring.controller;

import com.spring.pojo.User;
import org.springframework.stereotype.Controller;
import org.springframework.web.bind.annotation.RequestMapping;
import org.springframework.web.bind.annotation.ResponseBody;
import javax.servlet.ServletException;
import javax.servlet.http.HttpServletRequest;
import javax.servlet.http.HttpServletResponse;
import java.io.IOException;

@Controller
public class TestController2 {
    @RequestMapping("/showPage")
    public String showPage(){
        return "forward:success.jsp"; //默认就是请求转发,forward:默认情况下可以省略
    }
    @RequestMapping("/showPage2")
    public String showPage2(){
        return "redirect:success.jsp"; //重定向,redirect:不能省略
    }
}
放在WEB-INF下
原理:
静态及jsp资源放在WEB-INF下,客户端不能直接访问,服务端才可以访问到,也就是说别人不能够串改你的代码。为了方便让Spring映射:就是配置文件上会带有对静态资源的配置信息。如果想在页面中直接访问其中的文件,必须通过视图解析器对要访问的文件进行相应映射才能访问。
@Controller
public class PageController {
   //动态实现控制器跳转到jsp文件
    @RequestMapping("/{page}")
    public String getPage(@PathVariable String page){
        return page;
    }
}
<!-- jsp视图解析器 -->
<bean class="org.springframework.web.servlet.view.InternalResourceViewResolver">
        <property name="prefix" value="/WEB-INF/jsp/"></property>  <!-- 前缀,jsp页面所在的路径 -->
        <property name="suffix" value=".jsp"></property>  <!-- 文件的后缀 -->
        <property name="order" value="1"></property>   <!--解析器的优先级,数字越小优先级越高-->
</bean>

<!-- html视图解析器 -->
<!-- 配置freeMarker的模板路径 -->
<bean class="org.springframework.web.servlet.view.freemarker.FreeMarkerConfigurer">
        <property name="templateLoaderPath">
                <value>/WEB-INF/html/</value>  <!--html文件的前缀-->
        </property>
        <property name="defaultEncoding">
                <value>utf-8</value>
        </property>
</bean>
<!-- 配置freeMarker视图解析器 -->
<bean class="org.springframework.web.servlet.view.freemarker.FreeMarkerViewResolver">
        <property name="viewClass" value="org.springframework.web.servlet.view.freemarker.FreeMarkerView"/>
        <property name="contentType" value="text/html; charset=utf-8"/>
        <property name="suffix" value=".html" />  <!--html文件的后缀-->
        <property name="order" value="0"/>  <!--解析器的优先级,数字越小优先级越高-->
</bean>
配置html的解析器需要先引入freemarker-2.3.28.jar
在web.xml的中央调度器中配置
<servlet>
    <servlet-name>dispatcherServlet</servlet-name>
    <servlet-class>org.springframework.web.servlet.DispatcherServlet</servlet-class>
    <!--自定义SpringMVC的配置文件路径和文件名-->
    <init-param>
        <param-name>contextConfigLocation</param-name>
        <param-value>classpath:springmvc.xml</param-value>
    </init-param>
</servlet>
<servlet-mapping>
    <servlet-name>dispatcherServlet</servlet-name>
    <url-pattern>/</url-pattern>    <!-- /: 代表所有的请求都经过中央调度器-->
</servlet-mapping>
表单提交媒体类型enctype="multipart/form-data"
在springmvc配置文件中添加:

<!-- 注册文件上传解析器 ,id名字对应DispatcherServlet的源码中的属性multipartResolver-->
<bean id="multipartResolver" class="org.springframework.web.multipart.commons.CommonsMultipartResolver">
	<!-- 配置属性,解决文件中文名乱码的问题 -->
	<property name="defaultEncoding" value="utf-8"></property>
</bean>
Jsp页面代码
<%@ page contentType="text/html;charset=UTF-8" language="java" %>
<%
    String path = request.getContextPath();
    String basePath = request.getScheme() + "://" + request.getServerName() + ":" + request.getServerPort() + path + "/";
%>
<html>
<head>
    <base href="<%=basePath%>">
    <title>Title</title>
</head>
<body>
    <form action="upload" method="post" enctype="multipart/form-data"><%--文件上传属于多媒体数据,加这个数据描述enctype--%>
        文件:<input type="file" name="files"/><br/>
        <input type="submit" value="上传">
    </form>
</body>
</html>
Controller层的代码
import org.springframework.stereotype.Controller;
import org.springframework.web.bind.annotation.RequestMapping;
import org.springframework.web.multipart.MultipartFile;
import java.io.File;
import java.io.IOException;

@Controller
public class FileController {
    @RequestMapping("/upload")
    public String upload(MultipartFile files) throws IOException {  //这里的参数名得和前端提交的name值一致
        String fileName = files.getOriginalFilename();//获取上传过来的文件名
        File path = new File("d:/");//指定文件存储的位置
        File file= new File(path,fileName);
        files.transferTo(file);//进行数据的传输
        return "upload_success"; //不用写后缀了,由页面控制器转到视图解析器里面拼接前缀和后缀
    }
}
返回值类型: ResponseEntity<byte[]>
以附件的形式下载:
headers.add("Content-Disposition", "attachment;filename="+fileName);
@RequestMapping("/download")
    public ResponseEntity<byte[]> download() throws IOException {
        File file = new File("d:/idea使用.docx");//指定要下载的文件路径及文件名
        FileInputStream in = new FileInputStream(file);
        byte[] b = new byte[in.available()];//创建了一个byte数组和文件一样大
        in.read(b);//把文件中的数据全部放入byte数组中
        String fileName = file.getName();
        HttpHeaders headers = new HttpHeaders();
        //用附件的形式接收下载的文件
        headers.add("Content-Disposition", "attachment;filename="+ URLEncoder.encode(fileName,"utf-8"));//解决文件中文名不识别的问题
        //创建响应的状态码
        HttpStatus status = HttpStatus.OK;//代表响应码200,表示连接建立成功,可以传输数据
        ResponseEntity<byte[]> entity= new ResponseEntity<byte[]>(b,headers,status);
        return entity;
    }
在Spring整体框架的核心概念中,容器是核心思想,就是用来管理Bean的整个生命周期的,而在一个项目中,容器不一定只有一个,Spring中可以包括多个容器,而且容器有上下层关系,目前最常见的一种场景就是在一个项目中引入Spring和SpringMVC这两个框架,那么它其实就是两个容器,Spring是父容器,SpringMVC是其子容器,并且在Spring父容器中注册的Bean对于SpringMVC容器中是可见的,而在SpringMVC容器中注册的Bean对于Spring父容器中是不可见的,也就是子容器可以看见父容器中的注册的Bean,反之就不行。
环境搭建(jar包及web.xml)
<!-- 上下文参数:加载所有的配置文件 -->
	<context-param>
		<param-name>contextConfigLocation</param-name>
		<param-value>classpath:applicationContext-*.xml</param-value>   <!-- 加载src下所有的application-*.xml的配置文件 -->
	</context-param>
	<!-- 注册监听器,监听ServletContext对象,让其tomcat启动时创建Spring对象 -->
	<listener>
		<display-name>ContextLoaderListener</display-name>
		<listener-class>org.springframework.web.context.ContextLoaderListener</listener-class>
	</listener>
<!-- 配置DCPC的连接池 -->
<bean id="dataSource" class="org.apache.commons.dbcp.BasicDataSource">
	<!-- 属性注入 -->
	<property name="driverClassName" value="${jdbc.driver}"></property>
	<property name="username" value="${jdbc.username}"></property>
	<property name="password" value="${jdbc.password}"></property>
	<property name="url" value="${jdbc.url}" />
</bean>
<bean id="dataSource" class="com.mchange.v2.c3p0.ComboPooledDataSource">
	<property name="jdbcUrl" value="${jdbc.url}"></property>
	<property name="user" value="${jdbc.username}"></property>
	<property name="password" value="${jdbc.password}"></property>
	<property name="driverClass" value="${jdbc.driver}"></property>
</bean>
c3p0 提供最大空闲时间,当连接超过最大空闲连接时间时,当前连接就会被断掉。
dbcp 提供最大连接数,当连接数超过最大连接数时,所有连接都会被断开。
c3p0 有,效率相对较低
dbcp 没有,需要自己手动释放资源,dbcp效率相对较高
原文:https://www.cnblogs.com/fufengxi/p/14592726.html