360DBA团队 360云计算
前段时间,我们发了一篇文章《Elasticsearch安全策略》,介绍了Elasticsearch的一些安全策略,并在文中提到了Elasticsearch的权限系统-SearchGuard,后续有很多朋友问SearchGuard的相关内容,小编特地整理了SearchGuard安装使用的一些内容分享给大家,希望对使用Elasticsearch的朋友们有所帮助
PS:丰富的一线技术、多元化的表现形式,尽在“HULK一线技术杂谈”,点关注哦!
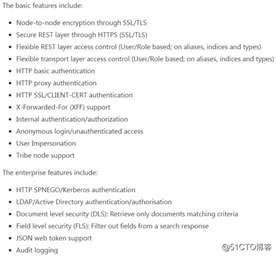
就大家最关心的问题简单总结一下(这里只翻译一下免费版提供的功能)
Search Guard支持Transport Layer(Node-to-node)和REST Layer(HTTP/HTTPS)的SSL/TLS加密传输,并且Transport Layer和REST Layer都可以单独配置是否开启SSL/TLS加密。
Search Guard提供了一套完整的“用户-角色-权限”控制系统。免费版权限可以控制到indice/type、host级别。
补充一点,Search Guard可以实现和Logstash、Kibana的完美结合(本文是以Elasticsearch 2.3.5为基础),对于使用ELK的用户大可不必担心,修改很容易的。
Search Guard要提供服务需要依赖Search Guard SSL。在Elasticsearch 5.x之前需要单独安装Search Guard和Search Guard SSL;Elasticsearch 5.x之后,Search Guard默认已经集成了对应版本的Search Guard SSL,无需单独安装了。
顺便提一下,Elasticsearch在5.x之后,对Search Guard、Search Guard SSL (当然还有Logstash 、Kibana)等插件的版本号都做了统一,变得更加的简单直观了。
以Elasticsearch 2.3.5版本为例,首先我们要获取对应版本的Search Guard和Search Guard SSL,版本对应关系参考这里:
https://github.com/floragunncom/search-guard/wiki
因为Elasticsearch默认插件安装方式是在线的,每个节点都需要联网(连国外的网,你懂得),因此推荐先下载插件安装包,采用本地安装的方式;而且便于做成自动化部署。
在此,我们介绍整个系统的部署流程及需要注意的细节问题
下载地址:https://www.elastic.co/downloads/past-releases/elasticsearch-2-3-5
根据自己的习惯选择rpm或者zip/tar包
下载地址:https://github.com/floragunncom/search-guard-ssl/tree/v2.3.5.19
下载地址:https://github.com/floragunncom/search-guard/tree/v2.3.5.10
安装方式:
/path-to-es-install-dir/bin/plugin install -b file:///your-path/search-guard-ssl-2.3.5.19.zip
安装方式:
/path-to-es-install-dir/bin/plugin install -b file:///your-path/search-guard-2-2.3.5.10.zip
不管是Transport Layer还是REST Layer,要想使用SSL/TLS,必须依赖于证书(certificates)。
简单起见,我们可以利用Search Guard SSL官方提供的Example PKI Scripts,稍作修改,来生成我们自己的证书。
这里因为内容较多,且不影响本文内容,后续可以单独成文,这里就暂不展开了。有兴趣的童鞋可以参考
https://github.com/floragunncom/search-guard-ssl-docs/blob/master/certificates.md
我们只要知道,这个工具为我们生成了集群所有节点公用的truststore.jks证书文件,以及每个节点独有的NODE_NAME-keystore.jks证书文件。
这里涉及到的三个密码,一定要牢记
ROOT_CA_PASS
YOUR_KEYSTORE_PASS
YOUR_TRUSTSTORE_PASS
接下来需要我们把truststore.jks和对应节点的NODE_NAME-keystore.jks证书文件分发到各个节点Elasticsearch的配置文件目录里,并且启动Elasticsearch服务的用户(强烈建议使用非root用户)需要有可读权限。
如果是zip/tgz安装的话,最终目录结构如下: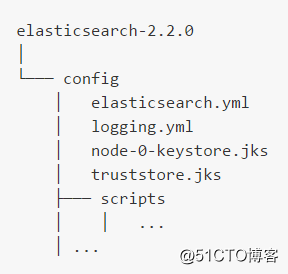
要想Elasticsearch加载并启用Search Guard,需要在elasticsearch.yml里增加如下内容: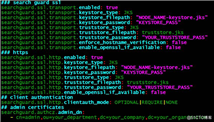
对Search Guard如何使用openssl感兴趣的可以参考这里:
https://github.com/floragunncom/search-guard-ssl-docs/blob/master/openssl.md
2.searchguard.ssl.http.enabled: true|false部分,这个可以根据实际需要选择是否开启;对应的客户端认证方式也有三种:
searchguard.ssl.http.clientauth_mode参数有三种选项:OPTIONAL|REQUIRE|NONE
默认是OPTIONAL
3.admin certificates部分,是配置从哪里可以调用sgadmin工具,向ELasticsearch导入Search Guard的权限配置。因为Search Guard是把权限等配置都作为index存储在Elasticsearch集群里的。
Search Guard 权限认证系统包括5个配置文件和两个shell脚本
Search Guard 权限认证的相关配置会以index的方式存储在Elasticsearch里,默认index名称是searchguard,并且这个索引是不可以向Elasticsearch其他索引一样可以直接通过Elasticsearch的API修改的。所有权限的修改尽可能使用sgadmin完成。
sgadmin可以在集群中任一节点上执行,也可以做成standalone的。
比如:在单独的管理机上远程执行,安装包可以在下面地址找到,但是需要安装对应版本的jdk。
https://github.com/floragunncom/search-guard/wiki
具体执行方法参考如下方式:
/path-to-es-install-dir/plugins/search-guard-2/tools/sgadmin.sh -h NODE -p PORT -cd /path-to-your-sgconfig/ -ks /path-to-your/NODE_NAME-keystore.jks -kspass
YOUR_KEYSTORE_PASS  -ts /path-to-your/truststore.jks -tspass YOUR_TRUSTSTORE_PASS -nhnv -cn YOUR_CLUSTERNAME
请注意,在Elasticsearch 5.x之前,searchguard这个index在第一次初始化之后,replica shard的数量并不会自动随着节点数的增加而增加,需要使用sgadmin进行设置才能实现auto-expand。
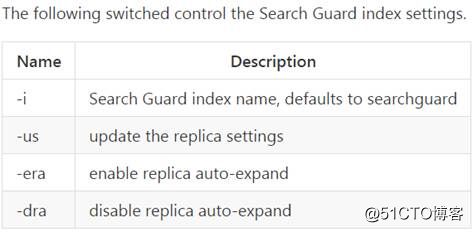
至此,Elasticsearch便已经集成了Search Guard。需要再次说明一下,这种配置可以完美解决REST API访问Elasticsearch的情况。但是如果使用各种client访问Elasticsearch的话,因为使用的是transport layer port,需要配置证书才能使用,证书和权限的管理复杂度就比较高了。
原文:https://blog.51cto.com/15127564/2668503