https://github.com/zq2599/blog_demos
内容:所有原创文章分类汇总及配套源码,涉及Java、Docker、Kubernetes、DevOPS等;
《JUnit5学习》系列旨在通过实战提升SpringBoot环境下的单元测试技能,一共八篇文章,链接如下:
本文是《JUnit5学习》系列的第三篇,主要是学习Assertions类(org.junit.jupiter.api.Assertions),Assertions类的一系列静态方法给我们提供了单元测试时常用的断言功能,本篇主要内容如下:
| 名称 | 链接 | 备注 |
|---|---|---|
| 项目主页 | https://github.com/zq2599/blog_demos | 该项目在GitHub上的主页 |
| git仓库地址(https) | https://github.com/zq2599/blog_demos.git | 该项目源码的仓库地址,https协议 |
| git仓库地址(ssh) | git@github.com:zq2599/blog_demos.git | 该项目源码的仓库地址,ssh协议 |

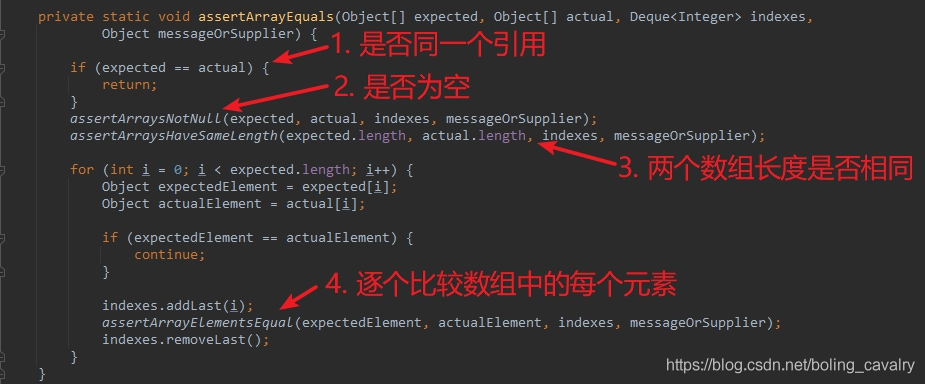
4. 判断两个数组是否相等的逻辑与判断两个对象略有不同,可以重点看看,方法源码如下:
	public static void assertArrayEquals(Object[] expected, Object[] actual) {
		AssertArrayEquals.assertArrayEquals(expected, actual);
	}
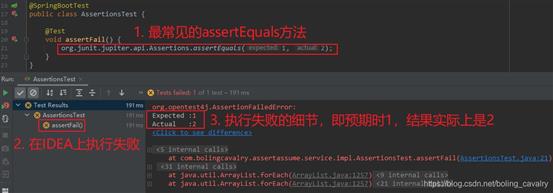
2. 最简单的判断,两个入参相等就不抛异常(AssertionFailedError):
    @Test
    @DisplayName("最普通的判断")
    void standardTest() {
       assertEquals(2, Math.addExact(1, 1));
    }
    @Test
    @DisplayName("带失败提示的判断(拼接消息字符串的代码只有判断失败时才执行)")
    void assertWithLazilyRetrievedMessage() {
        int expected = 2;
        int actual = 1;

        assertEquals(expected,
                actual,
                // 这个lambda表达式,只有在expected和actual不相等时才执行
                ()->String.format("期望值[%d],实际值[%d]", expected, actual));
    }
@Test
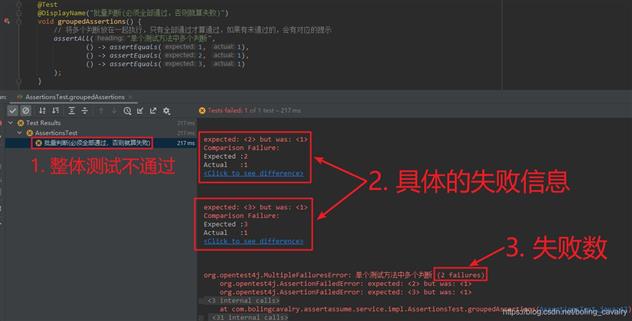
@DisplayName("批量判断(必须全部通过,否则就算失败)")
void groupedAssertions() {
// 将多个判断放在一起执行,只有全部通过才算通过,如果有未通过的,会有对应的提示
assertAll("单个测试方法中多个判断",
() -> assertEquals(1, 1),
() -> assertEquals(2, 1),
() -> assertEquals(3, 1)
);
}
上述代码执行结果如下:
    @Test
    @DisplayName("判断抛出的异常是否是指定类型")
    void exceptionTesting() {

        // assertThrows的第二个参数是Executable,
        // 其execute方法执行时,如果抛出了异常,并且异常的类型是assertThrows的第一个参数(这里是ArithmeticException.class),
        // 那么测试就通过了,返回值是异常的实例
        Exception exception = assertThrows(ArithmeticException.class, () -> Math.floorDiv(1,0));

        log.info("assertThrows通过后,返回的异常实例:{}", exception.getMessage());
    }
    @Test
    @DisplayName("在指定时间内完成测试")
    void timeoutExceeded() {
        // 指定时间是1秒,实际执行用了2秒
        assertTimeout(ofSeconds(1), () -> {
            try{
              Thread.sleep(2000);
            } catch (InterruptedException e) {
                e.printStackTrace();
            }
        });
    }
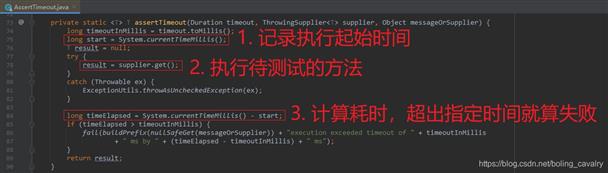
执行结果如下图:

3. 上面的演示中,assertTimeout的第二个入参类型是Executable,此外还有另一个assertTimeout方法,其第二个入参是ThrowingSupplier类型,该类型入参的get方法必须要有返回值,假设是XXX,而assertTimeout就拿这个XXX作为它自己的返回值,使用方法如下:
    @Test
    @DisplayName("在指定时间内完成测试")
    void timeoutNotExceededWithResult() {

        // 准备ThrowingSupplier类型的实例,
        // 里面的get方法sleep了1秒钟,然后返回一个字符串
        ThrowingSupplier<String> supplier = () -> {

            try{
                Thread.sleep(1000);
            } catch (InterruptedException e) {
                e.printStackTrace();
            }

            return "我是ThrowingSupplier的get方法的返回值";
        };

        // 指定时间是2秒,实际上ThrowingSupplier的get方法只用了1秒
        String actualResult = assertTimeout(ofSeconds(2), supplier);

        log.info("assertTimeout的返回值:{}", actualResult);
    }
上述代码执行结果如下,测试通过并且ThrowingSupplier实例的get方法的返回值也被打印出来:

4. 刚才咱们看过了assertTimeout的内部实现代码,是将入参Executable的execute方法执行完成后,再检查execute方法的耗时是否超过预期,这种方法的弊端是必须等待execute方法执行完成才知道是否超时,assertTimeoutPreemptively方法也是用来检测代码执行是否超时的,但是避免了assertTimeout的必须等待execute执行完成的弊端,避免的方法是用一个新的线程来执行execute方法,下面是assertTimeoutPreemptively的源码:
public static void assertTimeoutPreemptively(Duration timeout, Executable executable) {
	AssertTimeout.assertTimeoutPreemptively(timeout, executable);
}
    @Test
    void timeoutExceededWithPreemptiveTermination() {
        log.info("开始timeoutExceededWithPreemptiveTermination");
        assertTimeoutPreemptively(ofSeconds(2), () -> {
            log.info("开始sleep");
            try{
                Thread.sleep(10000);
                log.info("sleep了10秒");
            } catch (InterruptedException e) {
                log.error("线程sleep被中断了", e);
            }
        });
    }


package com.bolingcavalry.assertassume.service.impl;
import lombok.extern.slf4j.Slf4j;
import org.junit.jupiter.api.DisplayName;
import org.junit.jupiter.api.Test;
import org.springframework.boot.test.context.SpringBootTest;
import static org.hamcrest.CoreMatchers.equalTo;
import static org.hamcrest.CoreMatchers.is;
import static org.hamcrest.MatcherAssert.assertThat;
@SpringBootTest
@Slf4j
public class HamcrestTest {
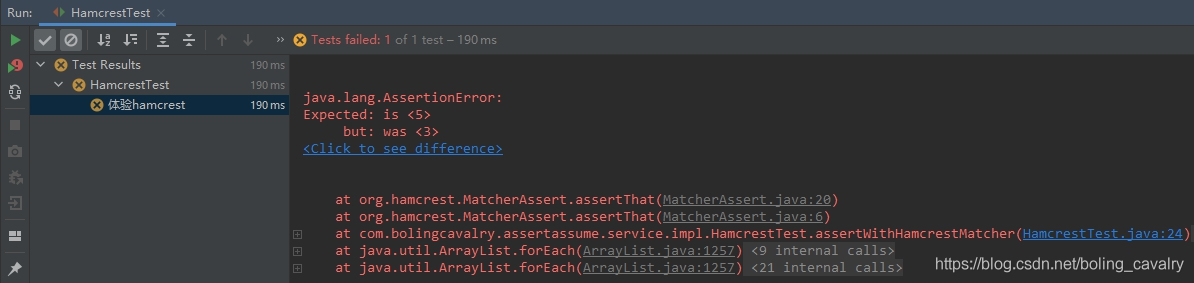
@Test
@DisplayName("体验hamcrest")
void assertWithHamcrestMatcher() {
assertThat(Math.addExact(1, 2), is(equalTo(5)));
}
}
微信搜索「程序员欣宸」,我是欣宸,期待与您一同畅游Java世界...
https://github.com/zq2599/blog_demos
原文:https://www.cnblogs.com/bolingcavalry/p/14434022.html