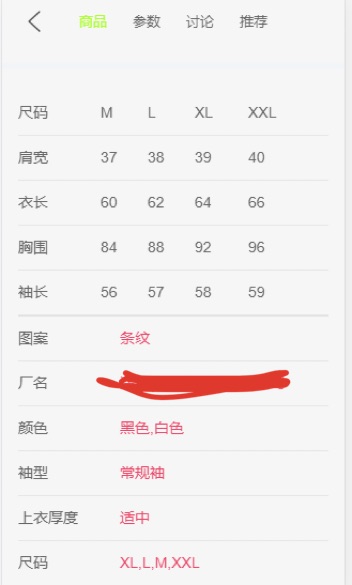
之后,在一系列图后,加入尺码、肩宽、衣长等详细信息。
首先,先在detail.js中导入一个类:
export class GoodsParam{
  constructor(info,rule) {
    this.image = info.images ? info.images[0] : ‘‘;
    this.infos = info.set;
    this.sizes = rule.tables;
  }
}
这里的image这样写,是因为接口处不是每一个商品都在尺寸这些详细信息这里有相应图片。
之后再在detail.vue中,初始化paramInfo,并将从接口处得到的数据传入paramInfo中。
data() {
    return {
      paramInfo:{ },
    }
  },
this.paramInfo = new GoodsParam(big.itemParams.info, big.itemParams.rule );
之后,建立了一个组件,并将paramInfo传入该组件中。并按照所需要显示的,代码如下。
<template>
  <div class="param-info" v-if="Object.keys(paramInfo).length !== 0">
    <table v-for="(table, index) in paramInfo.sizes"
           class="info-size" :key="index">
      <tr v-for="(tr, indey) in table" :key="indey">
        <td v-for="(td, indez) in tr" :key="indez">{{td}}</td>
      </tr>
    </table>
    <table class="info-param">
      <tr v-for="(info, index) in paramInfo.infos">
        <td class="info-param-key">{{info.key}}</td>
        <td class="param-value">{{info.value}}</td>
      </tr>
    </table>
    <div class="info-img" v-if="paramInfo.image.length !== 0">
      <img :src="paramInfo.image" >
    </div>
  </div>
</template>

<script>
export default {
name: "detailparaminfo",
  props:[‘paramInfo‘]
}
</script>

<style scoped>
.param-info {
  padding: 20px 15px;
  font-size: 14px;
  border-bottom: 5px solid #f2f5f8;
}

.param-info table {
  width: 100%;
  border-collapse: collapse;
}

.param-info table tr {
  height: 42px;
}

.param-info table tr td {
  border-bottom: 1px solid rgba(100,100,100,.1);
}

.info-param-key {
  /*当value的数据量比较大的时候, 会挤到key,所以给一个固定的宽度*/
  width: 95px;
}
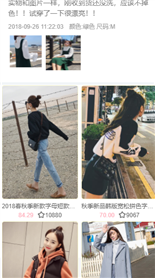
在尺寸图下方,即做了用户评价。

前面的网络请求过程以及从接口拿取来的数据传入组件的过程不再赘述,主要记录下关于这个组件的制作。
<template>
  <div v-if="Object.keys(commentInfo).length !== 0" class="comment-info">
    <div class="info-header">
      <div class="header-title">用户评价</div>
      <div class="header-more">
        更多
      </div>
    </div>
    <div class="info-user">
      <img :src="commentInfo.user.avatar" >
      <span>{{commentInfo.user.uname}}</span>
    </div>
    <div class="info-detail">
      <p>{{commentInfo.content}}</p>
      <div class="info-other">
        <span class="date">{{commentInfo.created|showDate}}</span>
        <span>{{commentInfo.style}}</span>
      </div>
      <div class="info-imgs">
        <img :src="item" v-for="(item, index) in commentInfo.images">
      </div>
    </div>
  </div>
</template>

<script>
import {formatDate} from "../../../src/components/common/utils/timejudge";

export default {
  name: "detailcommentinfo",
  props:["commentInfo"],
  filters: {
    showDate(value) {
      let date = new Date(value*1000);
      return formatDate(date, ‘yyyy-MM-dd hh:mm:ss‘)
    }
  }
}
</script>

<style scoped>
.comment-info {
  padding: 5px 12px;
  color: #333;
  border-bottom: 5px solid #f2f5f8;
}

.info-header {
  height: 50px;
  line-height: 50px;
  border-bottom: 1px solid rgba(0,0,0,.1);
}

.header-title {
  float: left;
  font-size: 15px;
}

.header-more {
  float: right;
  margin-right: 10px;
  font-size: 13px;
}

.info-user {
  padding: 10px 0 5px;
}

.info-user img {
  width: 42px;
  height: 42px;
  border-radius: 50%;
}

.info-user span {
  position: relative;
  font-size: 15px;
  top: -15px;
  margin-left: 10px;
}

.info-detail {
  padding: 0 5px 15px;
}

.info-detail p {
  font-size: 14px;
  color: #777;
  line-height: 1.5;
}

.info-detail .info-other {
  font-size: 12px;
  color: #999;
  margin-top: 10px;
}

.info-other .date {
  margin-right: 8px;
}

.info-imgs {
  margin-top: 10px;
}

.info-imgs img {
  width: 70px;
  height: 70px;
  margin-right: 5px;
}
</style>
拿接口的时候发现左下角的时间数据并不是按照年月日给的,而是时间戳(下图created即是)

为了使得,将该时间戳转换成年月日时间形式,我封装了一个函数来矫正时间戳。代码如下:
export function formatDate(date, fmt) {
  if (/(y+)/.test(fmt)) {
    fmt = fmt.replace(RegExp.$1, (date.getFullYear() + ‘‘).substr(4 - RegExp.$1.length));
  }
  let o = {
    ‘M+‘: date.getMonth() + 1,
    ‘d+‘: date.getDate(),
    ‘h+‘: date.getHours(),
    ‘m+‘: date.getMinutes(),
    ‘s+‘: date.getSeconds()
  };
  for (let k in o) {
    if (new RegExp(`(${k})`).test(fmt)) {
      let str = o[k] + ‘‘;
      fmt = fmt.replace(RegExp.$1, (RegExp.$1.length === 1) ? str : padLeftZero(str));
    }
  }
  return fmt;
};

function padLeftZero (str) {
  return (‘00‘ + str).substr(str.length);
};
之后再在此组件中使用一个过滤器即可实现。
之后,再做了推荐其他商品的组件。
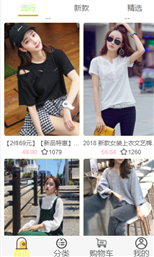
可以看到这个用户评价之后的模块其实是和主页的商品详情差不多的,那就可以把之前封装的这个组件进行一个复用了。网络请求与初始化并将数据传入recommends就不再赘述了。主要写下当时封装的两个组件吧。
goodslist组件代码
<template>
<div class="goodslist">
  <goodsitem v-for="(item,index) in goods" :goodsitem="item" :key="index">{{item}}</goodsitem>
</div>
</template>

<script>
import goodsitem from "./goodsitem";
export default {
  name: "goodslist",
  components:{goodsitem},
  props:{
    goods:{
      type:Array,
      default(){
        return[]
      }
    }
  }

}
</script>

<style scoped>
.goodslist{
  display: flex;
  flex-wrap:wrap;
  justify-content: space-around;
  padding: 1px;
}

</style>
goodsitem代码
<template>
<div class="goodsitem" @click="itemclick">
  <a>
  <img :src="showimage" @load="imageload" >
  <div class="goodsinfo">
    <p>{{goodsitem.title}}</p>
    <span class="price">{{goodsitem.price}}</span>
    <span class="collect">{{goodsitem.cfav}}</span>
  </div>
  </a>
</div>
</template>

<script>
export default {
name: "goodsitem",
  props:{
  goodsitem: {
    type:Object,
    default(){
      return{}
    }
  }
  },
  computed:{
  showimage(){
    return this.goodsitem.image || this.goodsitem.show.img
  }
  },
methods:{
  imageload(){
    this.$bus.$emit("itemimageload")
  },
  itemclick(){
    // console.log("----跳转到详情页");
    this.$router.push(‘./detail/‘+this.goodsitem.iid)
  }
}
}
</script>

<style scoped>
.goodsitem{
  padding-bottom: 40px;
  position: relative;
  width: 48%;
}
.goodsitem img{
  width: 100%;
  border-radius: 5px;
  border:1px solid lightgoldenrodyellow;
}
.goodsinfo{
  font-size: 12px;
  position: absolute;
  bottom: 5px;
  left: 0;
  right: 0;
  overflow: hidden;
  text-align: center;
}
.goodsinfo p{
  overflow: hidden;
  text-overflow:ellipsis;
  white-space: nowrap;
  margin-bottom: 5px;
}
.price{
  color:lightpink;
  margin-right: 20px;
}
.collect{
  position: relative;
}
.collect::before{
  content: ‘‘;
  position: absolute;
  left: -15px;
  top:-1px;
  width: 14px;
  height: 14px;
background:url("../../../assets/img/collect.png") 0 0/14px 14px;
}
</style>
这里直接写了一个computed来实现这个组件在推荐中使用。在showimage中做一个或判断,然后将showimage与<img>绑定即可。
之后,再在detail.vue中,将该组件标签写入<scroll>里面,并将goods与recommends进行绑定即可。
<goodslist :goods="recommends"></goodslist>
原文:https://www.cnblogs.com/ljylearnsmore/p/14297573.html