7.4.1 Nightingale介绍
Nightingale是一套衍生自Open-Falcon的分布式互联网监控解决方案,相比open-fallcon有很大的改进提升,部署更简单、灵活易用、稳定高效,支持混合云、支持k8s容器、夜莺也不只是监控,还有一部分CMDB的能力、自动化运维的能力,也可以基于夜莺开发自己的运维平台。
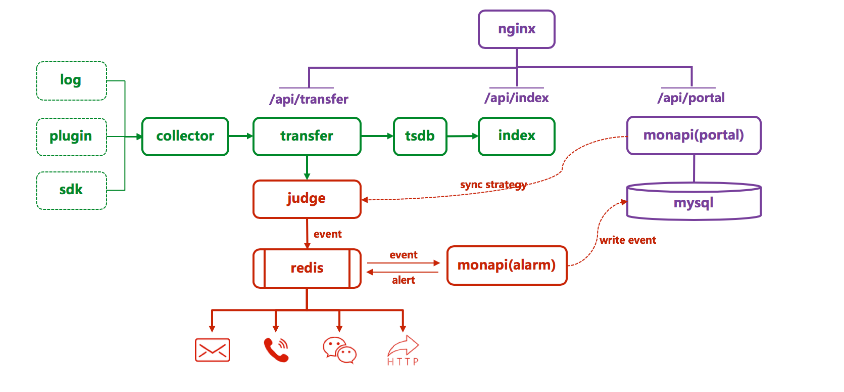
collector即agent,可以采集机器常见指标,支持日志监控,支持插件机制,支持业务通过接口直接上报数据
transfer提供rpc接口接收collector上报的数据,然后通过一致性哈希,将数据转发给多台tsdb和多台judge
tsdb即原来的graph组件,用于存储历史数据,支持配置为双写模式提升系统容灾能力,tsdb会把监控数据转发一份给index
index是索引模块,替换原来的mysql方案,在内存里构建索引,便于后续数据检索,性能大幅提升
judge是告警引擎,从monapi(portal)同步监控策略,然后对接收到的数据做告警判断,如满足阈值,则生成告警事件推到redis
monapi(alarm)从redis读取judge生成的事件,进行二次处理,补充一些元信息,生成告警消息,重新推回redis
各发送组件,比如mail-sender、sms-sender等,从redis读取告警消息,发送告警,抽出各类sender是为了后续定制方便
monapi集成了原来多个模块的功能,提供接口给js调用,api前缀为/api/portal,数据查询走transfer,干掉了原来的query组件,api前缀为/api/transfer,索引查询的api前缀/api/index,于是,前面搭建nginx,即可通过不同location将请求转发到不同后端
数据库使用mysql,主要存储的内容包括:用户信息、团队信息、树节点信息、告警策略、监控大盘、屏蔽策略、采集策略、部分组件心跳信息等
7.4.2 Nightingale部署使用
一 环境准备:
安装centos7.6系统,2核4G内存40G盘,最小化安装
设置好网络和防火墙 网络需要能访问外网
ip 192.168.1.106
关闭防火墙
setenforce 0
systemctl stop firewalld
systemctl disable firewalld
sed -i ‘s/enforcing/disabled/g‘ /etc/sysconfig/selinux
设置yum源
cd /etc/yum.repos.d/
yum install vim unzip lrzsz wget net-tools -y
wget http://mirrors.aliyun.com/repo/Centos-7.repo
wget http://mirrors.aliyun.com/repo/epel-7.repo
wget http://repo.mysql.com/mysql57-community-release-el7-8.noarch.rpm
rpm -ivh mysql57-community-release-el7-8.noarch.rpm
yum -y install epel-release
yum -y install https://rpms.remirepo.net/enterprise/remi-release-7.rpm
yum -y install yum-utils
yum-config-manager --enable remi
二 安装nginx1.16、redis6、mysql5.7
安装nginx
[root@centos7 ~]# yum install nginx -y
[root@centos7 ~]# systemctl start nginx
[root@centos7 ~]# systemctl enable nginx
安装mysql
[root@centos7 ~]# yum -y install mysql-community-server
[root@centos7 ~]# systemctl start mysqld
[root@centos7 ~]# systemctl enable mysqld
[root@centos7 ~]# cat /var/log/mysqld.log|grep password
[root@centos7 ~]# 2021-01-11T09:58:45.329108Z 1 [Note] A temporary password is generated for root@localhost: WtJsQ-oOh93Z
[root@centos7 ~]# mysql -u root -p
mysql> ALTER USER ‘root‘@‘localhost‘ IDENTIFIED BY ‘Super@2020‘;
mysql> grant all privileges on *.* to ‘root‘@‘%‘ IDENTIFIED BY ‘Super@2020‘;
mysql> flush privileges;
mysql> exit
安装redis
[root@centos7 ~]# yum install redis -y
[root@centos7 ~]# systemctl enable redis
[root@centos7 ~]# systemctl start redis
[root@centos7 ~]# netstat -lnupt
Active Internet connections (only servers)
Proto Recv-Q Send-Q Local Address Foreign Address State PID/Program name
tcp 0 0 127.0.0.1:6379 0.0.0.0:* LISTEN 26341/redis-server
tcp 0 0 0.0.0.0:80 0.0.0.0:* LISTEN 25310/nginx: master
tcp6 0 0 :::3306 :::* LISTEN 26151/mysqld
三 下载服务包
mkdir -p /home/n9e
cd /home/n9e
wget http://116.85.64.82/n9e.tar.gz
tar zxvf n9e.tar.gz
初始化数据库
修改mysql.yml的账号密码 vi /home/n9e/etc/mysql.yml
---
rdb:
addr: "root:Super@2020@tcp(127.0.0.1:3306)/n9e_rdb?charset=utf8&parseTime=True&loc=Asia%2FShanghai"
max: 16
idle: 4
debug: false
ams:
addr: "root:Super@2020@tcp(127.0.0.1:3306)/n9e_ams?charset=utf8&parseTime=True&loc=Asia%2FShanghai"
max: 16
idle: 4
debug: false
job:
addr: "root:Super@2020@tcp(127.0.0.1:3306)/n9e_job?charset=utf8&parseTime=True&loc=Asia%2FShanghai"
max: 16
idle: 4
debug: false
mon:
addr: "root:Super@2020@tcp(127.0.0.1:3306)/n9e_mon?charset=utf8&parseTime=True&loc=Asia%2FShanghai"
max: 16
idle: 4
debug: false
hbs:
addr: "root:Super@2020@tcp(127.0.0.1:3306)/n9e_hbs?charset=utf8&parseTime=True&loc=Asia%2FShanghai"
max: 16
idle: 4
debug: false
导入初始化数据
cd /home/n9e/sql
mysql -u root -pSuper@2020 < n9e_ams.sql
mysql -u root -pSuper@2020 < n9e_hbs.sql
mysql -u root -pSuper@2020 < n9e_job.sql
mysql -u root -pSuper@2020 < n9e_mon.sql
mysql -u root -pSuper@2020 < n9e_rdb.sql
检查redis服务
默认redis6379端口,无密码
cat /etc/redis.conf |grep -v ^#|grep -v ^$
如有必要修改配置可以用下面命令
cd /home/n9e/etc
grep redis -r .
下载静态资源
cd /home/n9e/
wget http://116.85.64.82/pub.tar.gz
tar zxf pub.tar.gz
nginx配置
替换默认配置文件
cp /home/n9e/etc/nginx.conf /etc/nginx/nginx.conf
systemctl restart nginx
检查identity.yml文件shell命令能否正常
cat /home/n9e/etc/identity.yml
# 用来做心跳,给服务端上报本机ip
ip:
specify: ""
shell: ifconfig `route|grep ‘^default‘|awk ‘{print $NF}‘`|grep inet|awk ‘{print $2}‘|head -n 1|awk -F‘:‘ ‘{print $NF}‘
# MON、JOB, judge, prober 的客户端拿来做本机标识
ident:
specify: ""
shell: ifconfig `route|grep ‘^default‘|awk ‘{print $NF}‘`|grep inet|awk ‘{print $2}‘|head -n 1|awk -F‘:‘ ‘{print $NF}‘
使用shell 命令在主机上测试命令是否有正常返回ip地址。
检查agent.yml的shell命令是否正常
cat /home/n9e/etc/agent.yml
sn: dmidecode -s system-serial-number | tail -n 1
fields:
cpu: cat /proc/cpuinfo | grep processor | wc -l
mem: cat /proc/meminfo | grep MemTotal | awk ‘{printf "%dGi", $2/1024/1024}‘
disk: df -m | grep ‘/dev/‘ | grep -v ‘/var/lib‘ | grep -v tmpfs | awk ‘{sum += $2};END{printf "%dGi", sum/1024}‘
启动mysql nginx redis
systemctl start mysqld
systemctl start redis
systemctl start nginx
启动 监控组件服务
cd /home/n9e
./control start all
netstat -lnupt 查看组件端口
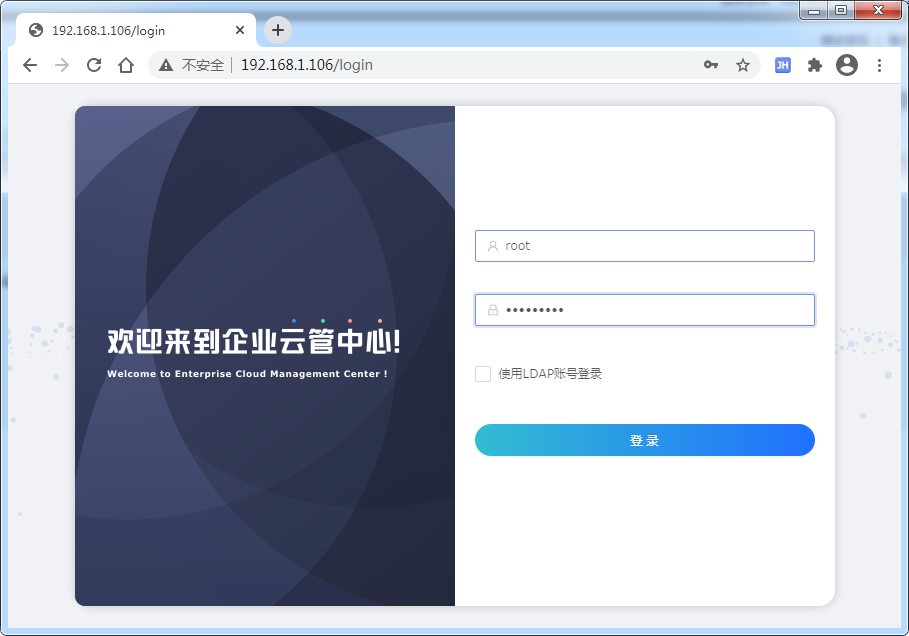
登录 web
http://192.168.1.106
账号 root,密码 root.2020
页面使用请参考
视频1 https://s3-gz01.didistatic.com/n9e-pub/video/n9e-usage-001.mp4
视频2 https://s3-gz01.didistatic.com/n9e-pub/video/n9e-usage-002.mp4
开源文档 https://gitee.com/cnperl/Nightingale
老版本2.7的安装使用文档 https://www.cqops.club/监控/n9e/开源监控平台夜莺安装与配置/index.html
原文:https://www.cnblogs.com/superleedo/p/14235072.html