打开配置文件/config/index.js,添加如下配置项
// 配置代理的位置, 大概在14行左右
proxyTable: {
    ‘/api‘:{
        // 最终完整的请求地址  http://localhost:3000/api/...
        target:‘http://localhost:3000‘
    }
},
重启开发服务器
npm run dev
npm i vuex -S
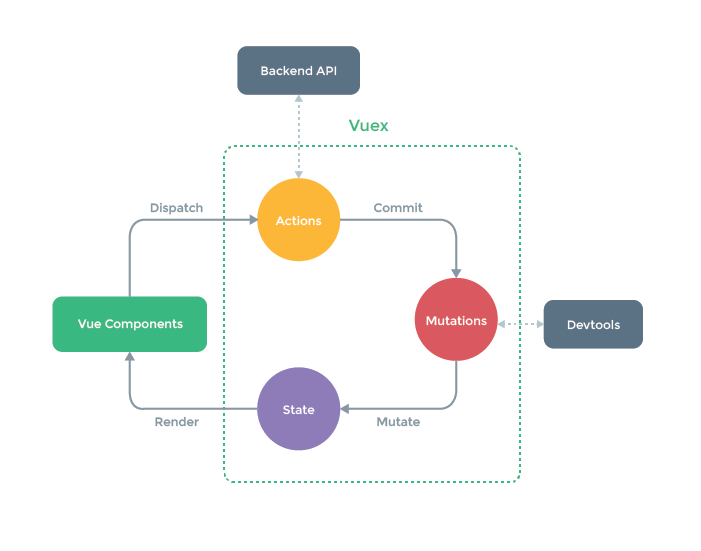
state: 相当组件内部data, 存储状态数据
const store=new Vuex.Store({
    // 存储数据
    state:{
        brandList:[
            {
                id:2,
                name:‘奔驰‘,
                ctime:new Date().toLocaleDateString()
            },
            {
                id:1,
                name:‘比亚迪‘,
                ctime:new Date().toLocaleDateString()
            }
        ]
    }
})
// 组件中调用
this.$store.state.brandList
mutations: 存储的是和state状态数据操作相关的同步方法
const store=new Vuex.Store({
	 // 存储数据操作方法(同步)
    mutations:{
        // 品牌初始化
        brandInit(state,list){
            state.brandList=list;
        },
        // 删除品牌
        // state:  系统自动注入的参数, 代表的是state状态数据,
        // id: 额外参数
        brandDel(state,id){
            // 根据id查找索引
            const index=state.brandList.findIndex(item=>item.id===id);
            // 通过索引删除数组元素
            state.brandList.splice(index,1);
        },
        // 品牌添加
        brandAdd(state,name){
            const id=state.brandList.length>0?state.brandList[0].id+1:1;
            const obj={
                id,
                name,
                ctime:new Date().toLocaleDateString()
            }
            // 将构造好的品牌对象插入品牌数组开头
            state.brandList.unshift(obj);
        }
    }
})
// 组件中调用
this.$store.commit(brandInit,[{id:1,name:‘奔驰‘,ctime:new Date().toLocaleDateString()}])
actions: 存储的是和数据请求相关的异步方法
// 导入axios
import axios from ‘axios‘;
// 全局配置基础域名
axios.defaults.baseURL=‘http://localhost:3333‘;

const store=new Vuex.Store({
	// 存储和数据请求相关的异步方法
    actions:{
        // 获取品牌列表
        // context: 系统自动注入的参数, 该对象上包含:commit, dispatch, state,getters
        getBrandList(context){
            axios.get(‘/brandList‘).then(res=>{
                if(res.data.code===200){
                    // 调用mutations数据同步方法
                    context.commit(‘brandInit‘,res.data.list);
                }
            })
        }
    },
})
// 组件中调用
this.$store.dispatch(‘getBrandList‘)
getters: 相当于组件中的cmoputed计算属性
const store=new Vuex.Store({

    // 类似于计算属性
    getters:{
        // state: 系统自动注入的参数, 代表的就是state中存储的状态数据
        brandCount(state){
            // console.log(state,‘brandCount‘);
            // 一定要有返回值
            return state.brandList.length;
        }
    }

});
// 组件中调用
this.$store.getters.brandCount
modules: 对state状态数据以及操作方法按功能模块进行分组, 目的是提高代码的可维护性
// 导入子模块
import brand from ‘./brand‘;
const store=new Vuex.Store({
    // 子模块
    modules:{
        // 测试子模块
        a:{
            // 启用单独的命名空间
            namespaced:true,
            // 子模块中, statex必须使用函数的方式
            state(){
                return {

                }
            },
            mutations:{},
            actions:{
                // context: 系统自动注入的参数
                // params: 额外参数
                testAction(conext,params){
                    console.log(‘a/testAction‘,params);
                }
            },
            getters:{}
        },
        brand
    }
});
导入
/store/index.js
// 1-导入vuex
import Vue from ‘vue‘;
import Vuex from ‘vuex‘;
注册插件
/store/index.js
// 2-注册插件
Vue.use(Vuex);
创建数据存储对
/store/index.js
// 3-创建数据存储对象
const store=new Vuex.Store({
    // 存储数据
    state:{
        brandList:[
            {
                id:2,
                name:‘奔驰‘,
                ctime:new Date().toLocaleDateString()
            },
            {
                id:1,
                name:‘比亚迪‘,
                ctime:new Date().toLocaleDateString()
            }
        ]
    },
    // 存储数据操作方法(同步)
    mutations:{},
    // 类似于计算属性
    getters:{},
    // 存储和数据请求相关的异步方法
    actions:{}

});
导出数据存储对象
/store/index.js
// 4-导出数据存储对象
export default store;
将store数据存储对象挂载到vue实例上
/main.js
// 导入store数据存储对象
import store from ‘./store‘
new Vue({
  el: ‘#app‘,
  // 挂载数据存储对象
  store,
  components: { App },
  template: ‘<App/>‘
})
在组件中使用
this.$store
mapMutations: 将vuex中维护的mutations方法映射到组件中, 方便直接调用
// 导入辅助方法
import { mapMutations } from ‘vuex‘;
export default{
    methods: {
        // 将vuex中的mutations 方法映射成组件的methods
        ...mapMutations([‘brandInit‘,‘brandDel‘,‘brandAdd‘]),
        // 启用子模块后
        ...mapMutations(‘brand‘,[‘brandInit‘,‘brandDel‘,‘brandAdd‘]),
    }
}
// 调用
this.brandInit()
mapState: 将vuex中维护state状态数据映射到组件中, 方便直接调用
// 导入辅助方法
import { mapState } from ‘vuex‘;
export default{
    computed:{
        // 将vuex中的state状态数据映射成组件的computed计算属性
        ...mapState([‘brandList‘]),
        // 启用子模块后
        ...mapState({brandList:state=>state.brand.brandList}),
    }
}
// 调用
this.brandList
mapGetters: 将vuex中维护getters状态数据映射到组件中, 方便直接调用
// 导入辅助方法
import { mapGetters } from ‘vuex‘;
export default{
    computed:{
        // 将vuex中的getters方法映射成组件的computed计算属性
        ...mapGetters([‘brandCount‘]),
        // 启用子模块后
        ...mapGetters(‘brand‘,[‘brandCount‘]),
    }
}
// 调用
this.brandCount
mapActions: 将vuex中维护的action异步数据请求方法映射到组件内部, 方便调用
// 导入辅助方法
import { mapActions } from ‘vuex‘;
export default{
    methods: {
        // 将vuex中的actions 方法映射成组件的methods
        ...mapActions([‘getBrandList‘]),
        // 启用子模块后
        ...mapActions(‘brand‘,[‘getBrandList‘]),
    }
}
// 调用
this.getBrandList();
// context.dispatch(‘模块名/action方法名‘,‘额外数据‘,{root:true});
// {root:true}: 告诉dispatch()方法, 当前action是其他模块的
context.dispatch(‘a/testAction‘,{name:‘zs‘,age:20},{root:true});
export default{
    actions: {
         getBrandList(context) {
              axios.get(‘http://localhost:3333/brandList‘).then(res => {
                if (res.data.code === 200) {
                  // 调用mutations数据同步方法
                  context.commit(‘brandInit‘, res.data.list);
                }
              })
              // 测试: 在brand子模块中, 调用a模块中的testAction异步方法
              // context.dispatch(‘模块名/action方法名‘,‘额外数据‘,{root:true});
              context.dispatch(‘a/testAction‘, {name: ‘zs‘,age: 20}, {root: true});
        }
    }
}
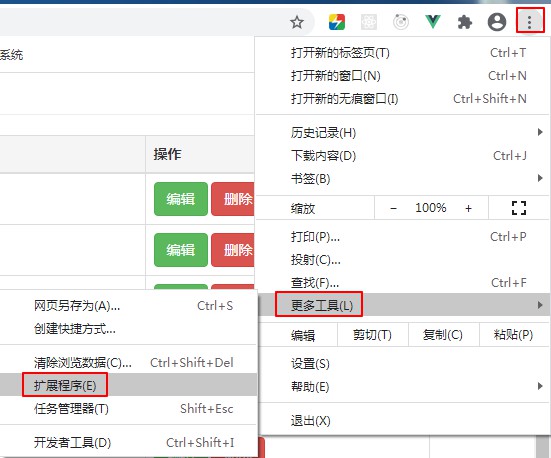
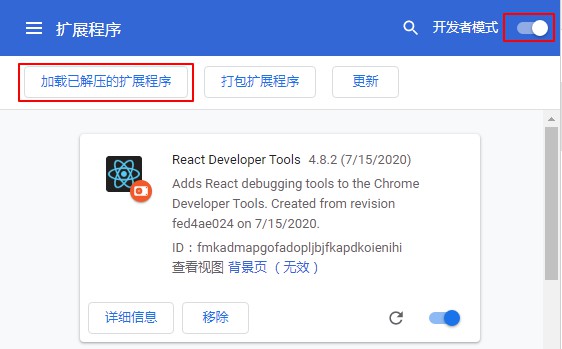
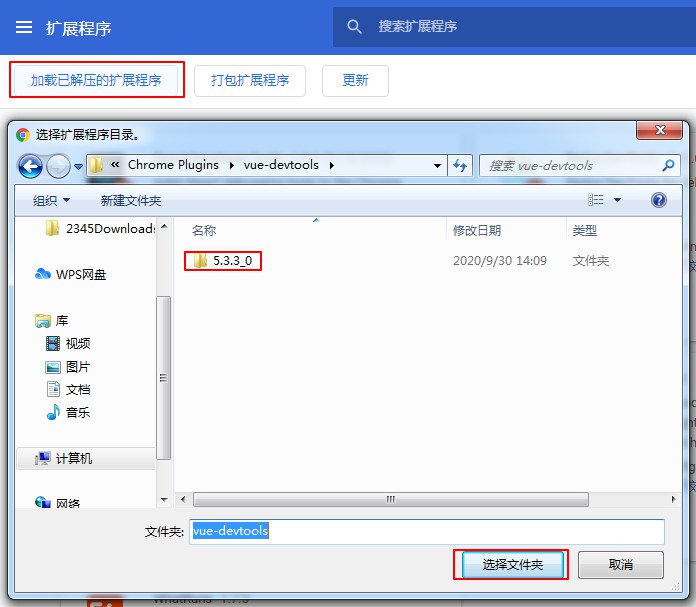
vue-cli 脚手架提供的一个路径别名, 目的是帮助我们快速实现路径拼接src这层目录在线安装: 登录谷歌应用商店, 搜索关键词vue-devtools
离线安装
下载brand-api-server.zip
解压
进入项目根目录, 安装依赖
npm i
导入数据库备份文件
修改项目配置文件(数据库配置)
/db/index.js
// 配置文件
const sqlConfig={
  host: ‘localhost‘,
  database: ‘brand_db‘,
  user: ‘root‘,
  port:3306,
  password: ‘root‘,			// mysql数据库的密码
  // 开启执行多条Sql语句的功能
  multipleStatements: true
}
启动数据接口服务器
npm run start
// 或者
npm run dev
通过浏览器测试数据接口是否启动
http://localhost:3333
Vue vue-cli实现跨域 vuex状态管理 vue-cli提供的@ vue-devtools调试工具
原文:https://www.cnblogs.com/bnzw/p/14038947.html