ShardingSphere定位为关系型数据库中间件,ShardingSphere包含三个核心的模块Sharding-JDBC、Sharding-Proxy和Sharding-Sidecar。简单介绍一下Sharding-JDBC这个模块:Sharding-JDBC可以理解为可以实现分库分表功能的增强型JDBC,并且可以兼容任何基于Java的ORM框架,比如我们平时用到的mybatis,JPA,Hibernate都能兼容。
这篇博客单纯介绍ShardingSphere与SpringBoot的搭建过程,代码均经过测试。如果想对一些概念,原理与功能进行了解,可以查看官方文档,现在文档支持中英文两种语言。
官方文档地址:https://shardingsphere.apache.org/document/current/cn/overview/
官方github地址:https://github.com/apache/incubator-shardingsphere.git
把全部代码贴上来不切实际,所以本文记录一些关键性的代码,如果需要查看全部的项目信息可以去github浏览。ShardingSphere+SpringBoot的搭建案例已上传至github。
ShardingSphere+SpringBoot案例:https://github.com/mengxin1018/springboot-shardingsphere.git
<dependency>
    <groupId>org.apache.shardingsphere</groupId>
    <artifactId>sharding-jdbc-spring-boot-starter</artifactId>
    <version>4.0.0-RC1</version>
</dependency>
#数据分片配置

spring:
  main:
    # 允许重新定义bean
    allow-bean-definition-overriding: true
  shardingsphere:
    props:
      #sql显示
      sql.show: true
    # 数据源
    datasource:
      names: shardings01,shardings02
      shardings01:
        #数据库连接池类名称
        type: com.alibaba.druid.pool.DruidDataSource
        #数据库驱动类名
        driver-class-name: com.mysql.cj.jdbc.Driver
        #数据库url连接
        url: jdbc:mysql://localhost:3306/shardings01
        #数据库用户名
        username: root
        #数据库密码
        password: root
      shardings02:
        type: com.alibaba.druid.pool.DruidDataSource
        driver-class-name: com.mysql.cj.jdbc.Driver
        url: jdbc:mysql://localhost:3306/shardings02
        username: root
        password: root
    sharding:
      # 设置分库策略
      default-database-strategy:
        # 行表达式分库策略
        inline:
          # 分片列名称
          sharding-column: status
          # 分片算法行表达式
          algorithm-expression: shardings0$->{(status % 2)+1}
      binding-tables: t_goods
      tables:
        # 表分片设置
        t_goods:
          actual-data-nodes: shardings0$->{1..2}.t_goods$->{0..1}
          table-strategy:
            # 行表达式分片策略
            inline:
              # 分片列名称
              sharding-column: goods_id
              # 分片算法行表达式
              algorithm-expression: t_goods$->{goods_id % 2}
          key-generator:
            # 自增列名称
            column: goods_id
            # 默认自增列值生成器类型
            type: SNOWFLAKE
            # 自增列值生成器属性配置
            props:
              worker.id: 5
              max.tolerate.time.difference.milliseconds: 1000
#数据分片+读写分离配置

spring:
  main:
    # 允许重新定义bean
    allow-bean-definition-overriding: true
  shardingsphere:
    props:
      #sql显示
      sql.show: true
      #是否在启动时检查分表元数据一致性
      check.table.metadata.enabled: true
    # 数据源
    datasource:
      names: shardings01,shardings02,shardings01s1,shardings01s2,shardings02s1,shardings02s2
      shardings01:
        type: com.alibaba.druid.pool.DruidDataSource
        driver-class-name: com.mysql.cj.jdbc.Driver
        url: jdbc:mysql://localhost:3306/shardings01
        username: root
        password: root
      shardings02:
        type: com.alibaba.druid.pool.DruidDataSource
        driver-class-name: com.mysql.cj.jdbc.Driver
        url: jdbc:mysql://localhost:3306/shardings02
        username: root
        password: root
      shardings01s1:
        type: com.alibaba.druid.pool.DruidDataSource
        driver-class-name: com.mysql.cj.jdbc.Driver
        url: jdbc:mysql://localhost:3306/shardings01_s1
        username: root
        password: root
      shardings01s2:
        type: com.alibaba.druid.pool.DruidDataSource
        driver-class-name: com.mysql.cj.jdbc.Driver
        url: jdbc:mysql://localhost:3306/shardings01_s2
        username: root
        password: root
      shardings02s1:
        type: com.alibaba.druid.pool.DruidDataSource
        driver-class-name: com.mysql.cj.jdbc.Driver
        url: jdbc:mysql://localhost:3306/shardings02_s1
        username: root
        password: root
      shardings02s2:
        type: com.alibaba.druid.pool.DruidDataSource
        driver-class-name: com.mysql.cj.jdbc.Driver
        url: jdbc:mysql://localhost:3306/shardings01_s2
        username: root
        password: root
    sharding:
      # 设置分库策略
      default-database-strategy:
        # 行表达式分库策略
        inline:
          # 分片列名称
          sharding-column: status
          # 分片算法行表达式
          algorithm-expression: shardings0$->{(status % 2)+1}
      binding-tables: t_goods
      tables:
        t_goods:
          actual-data-nodes: shardings0$->{1..2}.t_goods$->{0..1}
          table-strategy:
            #复合分片策略
            complex:
              sharding-columns: goods_id
              #复合分片策略实现类
              algorithm-class-name: com.shardingsphere.config.ComplexKeyShardingImpl
          key-generator:
            # 自增列名称
            column: goods_id
            type: SNOWFLAKE
            props:
              worker.id: 5
              max.tolerate.time.difference.milliseconds: 1000
      # 读写分离规则
      master-slave-rules:
        #数据源名称
        shardings01:
          #主库数据源名称
          master-data-source-name: shardings01
          #从库负载均衡算法类型
          load-balance-algorithm-type: ROUND_ROBIN
          #从库数据源名称列表
          slave-data-source-names: shardings01s1,shardings01s2
        shardings02:
          master-data-source-name: shardings02
          load-balance-algorithm-type: ROUND_ROBIN
          slave-data-source-names: shardings02s1,shardings02s2
2.2.2复合分片策略实现类
public class ComplexKeyShardingImpl implements ComplexKeysShardingAlgorithm<Long> {

    public final static int GOODS_TABLE_LENGTH = 2;

    @Override
    public Collection<String> doSharding(Collection<String> availableTargetNames, ComplexKeysShardingValue<Long> shardingValue) {
        Long goodsId = Long.valueOf(shardingValue.getColumnNameAndShardingValuesMap().get("goods_id").toArray()[0].toString());
        for (String s : availableTargetNames) {
            int hash = this.getHash(goodsId);
            if(s.endsWith(hash + "")){
                List<String> list = new ArrayList<>();
                list.add(s);
                return list;
            }
        }
        throw new UnsupportedOperationException();
    }

    public int getHash(Long key){
        return key.hashCode()&(GOODS_TABLE_LENGTH-1);
    }
}
@Data
@Component
public class Goods {

    private Long goodsId;

    private Integer goodsType;

    private String goodsName;

    private Integer status;

    private String price;

    private Date editTime;
}
4.1mapper接口
public interface GoodsMapper {

    /**
     * 新增商品
     * @param user
     */
    public void addGoods(Goods user);

}
4.2mapper实现
<?xml version="1.0" encoding="UTF-8"?>
<!DOCTYPE mapper PUBLIC "-//mybatis.org//DTD Mapper 3.0//EN"
"http://mybatis.org/dtd/mybatis-3-mapper.dtd">
<mapper namespace="com.shardingsphere.mapper.GoodsMapper">

    <insert id="addGoods"
        parameterType="com.shardingsphere.domin.Goods">
        insert into
        t_goods(goods_name,goods_type,status,price,edit_time)
        values(#{goodsName},#{goodsType},#{status},#{price},#{editTime})
    </insert>

</mapper>
5.service接口及其实现类
5.1service接口
public interface GoodsService {

    public void addGoods(Map<String,Object> param);

}
5.2service实现类
@Service
public class GoodsServiceImpl implements GoodsService {

    @Autowired
    private GoodsMapper goodsMapper;

    @Override
    public void addGoods(Map<String, Object> param) {
        String name = InputMapValidateUtil.getString(param, "name");
        String price = InputMapValidateUtil.getString(param, "price");
        Integer status = InputMapValidateUtil.getIntValue(param, "status", 0);
        Integer Type = InputMapValidateUtil.getIntValue(param, "type", 0);

        Goods goods = new Goods();
        goods.setEditTime(new Date());
        goods.setGoodsName(name);
        goods.setGoodsType(Type);
        goods.setPrice(price);
        goods.setStatus(status);

        goodsMapper.addGoods(goods);
    }

}
6.1测试类
public class GoodsServiceImplTest extends BaseUnitTest {

    @Autowired
    private GoodsService goodsService;

    @Test
    public void addUserTest() {
        try {
            for (int i = 0; i < 20; i++) {
                Map<String, Object> goodsMap = new HashMap<>();
                goodsMap.put("name", "aaa58565");
                goodsMap.put("type", 1);
                goodsMap.put("status", Math.random()*10+1);
                goodsMap.put("price", "10");
                goodsService.addGoods(goodsMap);
            }
        } catch (Exception e) {
            e.printStackTrace();
        }
    }
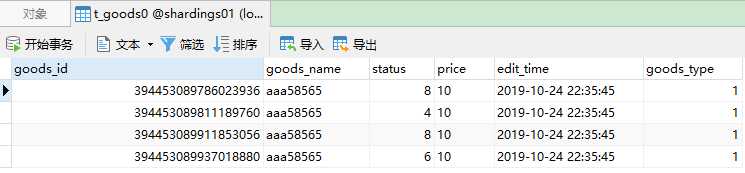
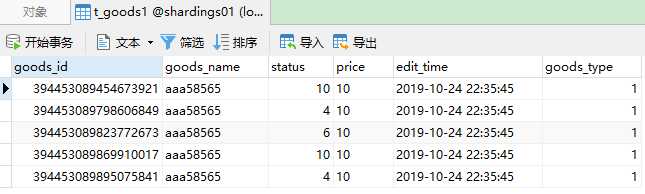
6.2测试结果
SpringBoot整合分库分表利器ShardingSphere
原文:https://www.cnblogs.com/47Gamer/p/13892538.html