1 systemctl stop firewalld.service      #关闭防火墙
2 systemctl disable firewalld.service      #关闭开机自启
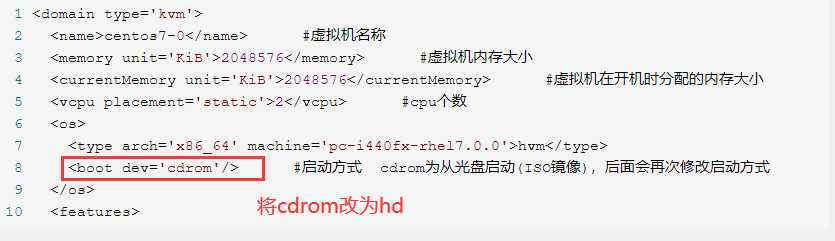
 1 <domain type=‘kvm‘>
 2   <name>centos7-0</name>      #虚拟机名称
 3   <memory unit=‘KiB‘>2048576</memory>      #虚拟机内存大小
 4   <currentMemory unit=‘KiB‘>2048576</currentMemory>      #虚拟机在开机时分配的内存大小
 5   <vcpu placement=‘static‘>2</vcpu>      #cpu个数
 6   <os>
 7     <type arch=‘x86_64‘ machine=‘pc-i440fx-rhel7.0.0‘>hvm</type>
 8     <boot dev=‘cdrom‘/>      #启动方式  cdrom为从光盘启动(ISO镜像),后面会再次修改启动方式
 9   </os>
10   <features>
11     <acpi/>
12     <apic/>
13   </features>
14   <cpu mode=‘custom‘ match=‘exact‘>
15     <model fallback=‘allow‘>Nehalem</model>
16   </cpu>
17   <clock offset=‘localtime‘/>
18   <on_poweroff>destroy</on_poweroff>
19   <on_reboot>restart</on_reboot>
20   <on_crash>restart</on_crash>
21   <devices>
22     <emulator>/usr/libexec/qemu-kvm</emulator>
23     <disk type=‘file‘ device=‘disk‘>
24       <driver name=‘qemu‘ type=‘qcow2‘/>
25       <source file=‘/opt/image/centos7-0.qcow2‘/>      #虚拟硬盘
26       <target dev=‘hda‘ bus=‘ide‘/>
27     </disk>
28     <disk type=‘file‘ device=‘cdrom‘>
29     <source file=‘/mnt/ISO/CentOS-7-x86_64-DVD-1810.iso‘/>      #ISO镜像路径
30     <target dev=‘hdb‘ bus=‘ide‘/>
31     </disk>
32     <interface type=‘bridge‘>      #网络模式为桥接
33       <source network=‘virbr0‘ bridge=‘virbr0‘/>      #此处要和自己虚拟交换机的配置对应
34     </interface>
35     <input type=‘tablet‘ bus=‘usb‘/>
36     <input type=‘mouse‘ bus=‘ps2‘/>
37     <input type=‘keyboard‘ bus=‘ps2‘/>
38     <graphics type=‘vnc‘ port=‘5905‘ autopart=‘no‘ listen=‘0.0.0.0‘ keymap=‘en-us‘/>  #5905为端口号
39   </devices>
40 </domain>
qemu-img create -f qcow2 /opt/image/centos7-0.qcow2 20G #此处的路径与上方xml文件中的硬盘路径一致
virsh define centos7-0.xml    #定义虚拟机
virsh start centos7-0    #启动虚拟机
virsh list --all

virsh shutdown centos7-0    #将虚拟机关机
// 关机后先查看一下虚拟机的状态,如果还是运行态,则进行强制关机
// virsh destroy centos7-0
virsh undefine centos7-0    #取消定义
virsh define centos7-0.xml
virsh start centos7-0
原文:https://www.cnblogs.com/zhimao/p/13709173.html