1.流程
1)启动服务器,加载如下所示配置文件web.xml,然后控制器对象DispatcherServlet对象被创建,在创建该对象的时候,还会加载如下所示的pringmvc.xml。
web.xml:
<!--配置前端控制器-->
  <servlet>
    <servlet-name>dispatcherServlet</servlet-name>
    <servlet-class>org.springframework.web.servlet.DispatcherServlet</servlet-class>
    <init-param>
      <param-name>contextConfigLocation</param-name>
      <param-value>classpath:springmvc.xml</param-value>
    </init-param>
    <load-on-startup>1</load-on-startup>
  </servlet>
  <servlet-mapping>
    <servlet-name>dispatcherServlet</servlet-name>
    <url-pattern>/</url-pattern>
  </servlet-mapping>
pringmvc.xml:
<?xml version="1.0" encoding="UTF-8"?>
<beans xmlns="http://www.springframework.org/schema/beans"
       xmlns:xsi="http://www.w3.org/2001/XMLSchema-instance"
       xmlns:context="http://www.springframework.org/schema/context"
       xmlns:aop="http://www.springframework.org/schema/aop"
       xmlns:tx="http://www.springframework.org/schema/tx"
       xmlns:mvc="http://www.springframework.org/schema/mvc"
       xsi:schemaLocation="http://www.springframework.org/schema/beans http://www.springframework.org/schema/beans/spring-beans.xsd
                            http://www.springframework.org/schema/context http://www.springframework.org/schema/context/spring-context.xsd
                            http://www.springframework.org/schema/aop http://www.springframework.org/schema/aop/spring-aop.xsd
                            http://www.springframework.org/schema/tx http://www.springframework.org/schema/tx/spring-tx.xsd
                            http://www.springframework.org/schema/mvc http://www.springframework.org/schema/mvc/spring-mvc.xsd">

    <!--开启注解扫描-->
    <context:component-scan base-package="com.controller"></context:component-scan>

    <!--视图解析器-->
    <bean id="internalResourceView" class="org.springframework.web.servlet.view.InternalResourceViewResolver">
        <property name="prefix" value="/WEB-INF/pages/"></property>
        <property name="suffix" value=".jsp"></property>
    </bean>

    <!--开启SpingMVC框架注解的支持-->
    <mvc:annotation-driven/>

</beans>
2)加载springmvc.xml后,会开启注解扫描,创建控制器对象(HelloController对象),和解析器对象。同时开启SpringMVC框架注解的支持,让控制器对象中的RequestMapping注解生效。
//控制器类
@Controller
public class HelloController {

    @RequestMapping(path="/hello")
    public String sayHello(){
        System.out.println("Hello SpringMVC");
        return   "success";
    }
}
3)发送http请求,后台处理请求:
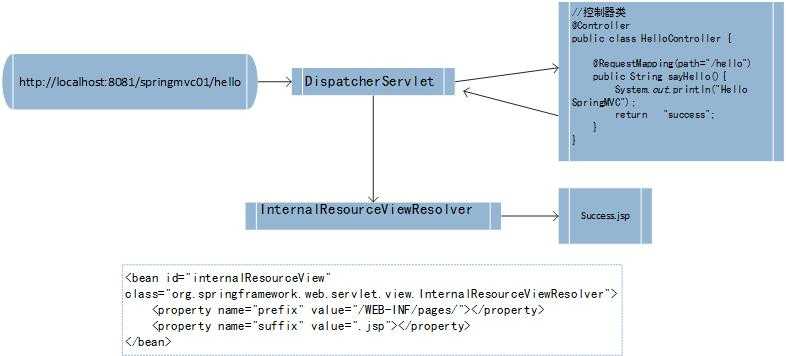
2. 涉及的组件
前端控制器(DispatcherServlet):相当于MVC模式的C,是整个流程控制的中心,由它调用其他组件处理用户请求,其存在降低了组建之间的耦合性。
处理器映射器(HandlerMapping):找到目标方法(即Handler,处理器)。SpringMVC提供了不同的映射器实现不同的映射方式。例如:配置文件方式、实现接口方式、注解方式。
处理器适配器(HandlerAdapter):执行目标方法(即执行处理器)。
视图解析器(View Resolver):负责将处理结果生成view视图。
3.<mvc:annotation-driven>说明
在SpringMVC的各个组件中,处理器映射器、处理器适配器、视图解析器称为SpringMVC三大组件。
使用<mvc:annotation-driven>可以自动加载处理器映射器和处理器适配器。
4.RequestMapping注解
1)使用说明:用于建立请求URL和请求处理方法之间的对应关系。可以用在类上和方法上。例如:类上为@RequestMapping(path="/user")。方法上为@RequestMapping(path="/hello"),表示请求URL必须包含/user/hello才能访问到方法。
@RequestMapping(path="/hello")
2)属性:
path/value:映射的URL路径
method:用于限定请求的方法类型,如果请求的方法类型不符合,就不能调用处理器
params:用于限定请求的参数名,如果参数不匹配则无法调用处理器。它还支持参数key和value的双重限定,即key和value必须都一样。
@RequestMapping(path="/testRequestMapping",params = {"username=zfx"})
heads:用于指定请求头必须包含的属性。
原文:https://www.cnblogs.com/A-PP-Z-droplet/p/13681554.html