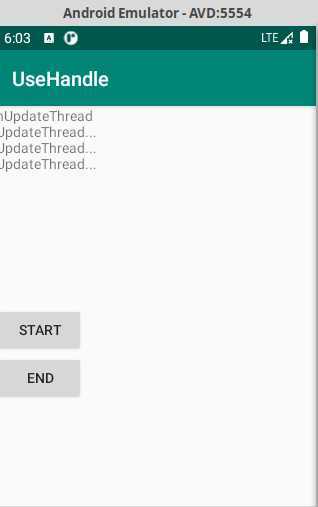
Handler使用例1
这个例子是最简单的介绍handler使用的,是将handler绑定到它所建立的线程中.
本次实验完成的功能是:单击Start按钮,程序会开始启动线程,并且线程程序完成后延时1s会继续启动该线程,每次线程的run函数中完成对界面输出nUpdateThread...文字,不停的运行下去,当单击End按钮时,该线程就会停止,如果继续单击Start,则文字又开始输出了。
MainActivity
package com.example.usehandle;

import androidx.appcompat.app.AppCompatActivity;

import android.os.Bundle;
import android.os.Handler;
import android.view.View;
import android.widget.Button;
import android.widget.TextView;

public class MainActivity extends AppCompatActivity {

    private TextView text_view = null;
    private Button start = null;
    private Button end = null;

    //使用handler时首先要创建一个handler
    Handler handler = new Handler();
    Runnable update_thread = new Runnable()
    {
        public void run()
        {
            //线程每次执行时输出"UpdateThread..."文字,且自动换行
            //textview的append功能,不会覆盖前面的内容
            text_view.append("\nUpdateThread...");
            //延时1s后又将线程加入到线程队列中
            handler.postDelayed(update_thread, 1000);

        }
    };

    public void onCreate(Bundle savedInstanceState) {
        super.onCreate(savedInstanceState);
        setContentView(R.layout.activity_main);

        text_view = findViewById(R.id.text_view);
        end = findViewById(R.id.end);
        start = findViewById(R.id.start);

        start.setOnClickListener(new View.OnClickListener() {
            public void onClick(View view) {
                handler.post(update_thread);
            }
        });

        end.setOnClickListener(new View.OnClickListener() {
            @Override
            public void onClick(View view) {
                handler.removeCallbacks(update_thread);
            }
        });

    }

}
activity_main
<?xml version="1.0" encoding="utf-8"?>
<LinearLayout xmlns:android="http://schemas.android.com/apk/res/android"
    xmlns:app="http://schemas.android.com/apk/res-auto"
    xmlns:tools="http://schemas.android.com/tools"
    android:layout_width="match_parent"
    android:layout_height="match_parent"
    tools:context=".MainActivity"
    android:orientation="vertical">

    <TextView
        android:id="@+id/text_view"
        android:layout_width="wrap_content"
        android:layout_height="200dip"
        android:text="nUpdateThread"
        tools:context=".MainActivity" />
    <Button
        android:id="@+id/start"
        android:layout_width="wrap_content"
        android:layout_height="wrap_content"
        android:text="start" />
    <Button
        android:id="@+id/end"
        android:layout_width="wrap_content"
        android:layout_height="wrap_content"
        android:text="end" />

</LinearLayout>
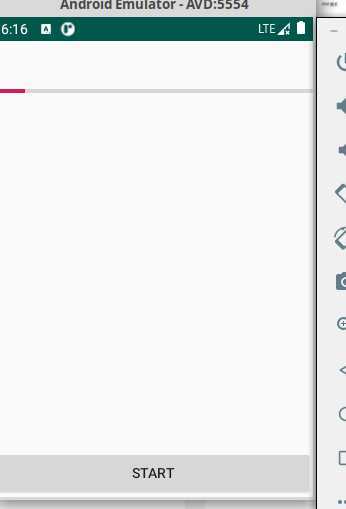
Handler使用例2
这个例子比刚才那个例子稍微复杂些。因为这个例子中用到了handler的消息队列机制,即通过handler中一个线程向消息队列中用sendMessage方法发送消息,发送的消息当然可以用来传递参数。在handler中用handleMessage来处理消息,处理方法是获得消息队列中的消息参数,用这些参数来完成另外一些功能。
本实验实现的是当开始按钮按下时,会启动一个线程,并绑定到handler中,该线程发送带有参数的message到handler的消息队列中,消息队列的另一端获取该消息,并且用该消息的参数来更新进度条。
MainActivity
package com.example.usehandle;
import android.app.Activity;
import android.os.Bundle;
import android.os.Handler;
import android.os.Message;
import android.view.Menu;
import android.view.View;
import android.view.View.OnClickListener;
import android.widget.Button;
import android.widget.ProgressBar;

import com.example.usehandle.R;

public class MainActivity extends Activity {

    private ProgressBar progress_bar = null;
    private Button start = null;

    @Override
    public void onCreate(Bundle savedInstanceState) {
        super.onCreate(savedInstanceState);
        setContentView(R.layout.activity_main);
        progress_bar = findViewById(R.id.progress_bar);
        start = findViewById(R.id.start);

        start.setOnClickListener(new OnClickListener() {
            public void onClick(View view) {
                //让进度条显示出来
                progress_bar.setVisibility(View.VISIBLE);
                //将线程加入到handler的线程队列中
                update_progress_bar.post(update_thread);
            }
        });
    }


    //创建一个handler,内部完成处理消息方法
    Handler update_progress_bar = new Handler()
    {
        public void handleMessage(Message msg) {
            //显示进度条
            progress_bar.setProgress(msg.arg1);
            //重新把进程加入到进程队列中
            update_progress_bar.post(update_thread);
        }
    };//不加这个分号则不能自动添加代码

    Runnable update_thread = new Runnable()
    {
        int i = 0;
        public void run() {
            i += 10;
            //首先获得一个消息结构
            Message msg = update_progress_bar.obtainMessage();
            //给消息结构的arg1参数赋值
            msg.arg1 = i;
            //延时1s,java中的try+catch用来排错处理
            try {
                Thread.sleep(1000);
            } catch (InterruptedException e) {
                e.printStackTrace();
            }
            //把消息发送到消息队列中
            update_progress_bar.sendMessage(msg);
            if(i == 100)
                //把线程从线程队列中移除
                update_progress_bar.removeCallbacks(update_thread);
        }
    };
}
activity_main
<RelativeLayout xmlns:android="http://schemas.android.com/apk/res/android"
xmlns:tools="http://schemas.android.com/tools"
android:layout_width="match_parent"
android:layout_height="match_parent" >
<Button
    android:id="@+id/start"
    android:layout_width="fill_parent"
    android:layout_height="wrap_content"
    android:layout_alignParentBottom="true"
    android:text="start"
    />
<ProgressBar
    android:id="@+id/progress_bar"
    android:layout_width="fill_parent"
    android:layout_height="100dip"
    android:layout_alignParentTop="true"
    style="?android:attr/progressBarStyleHorizontal"
    android:visibility="gone"
    />

</RelativeLayout>
原文:https://www.cnblogs.com/wcyMiracle/p/13386890.html