<property>
 <name>hive.fetch.task.conversion</name>
 <value>more</value>
 <description>
 Expects one of [none, minimal, more].
 Some select queries can be converted to single FETCH task minimizing
latency.
 Currently the query should be single sourced not having any subquery and
should not have
 any aggregations or distincts (which incurs RS), lateral views and joins.
 0. none : disable hive.fetch.task.conversion
 1. minimal : SELECT STAR, FILTER on partition columns, LIMIT only
 2. more : SELECT, FILTER, LIMIT only (support TABLESAMPLE and virtual
columns)
 </description>
 </property>
hive (default)> set hive.fetch.task.conversion=none;
hive (default)> select * from emp;
hive (default)> select ename from emp;
hive (default)> select ename from emp limit 3;
hive (default)> set hive.fetch.task.conversion=more;
hive (default)> select * from emp;
hive (default)> select ename from emp;
hive (default)> select ename from emp limit 3;
set hive.exec.mode.local.auto=true; //开启本地 mr
//设置 local mr 的最大输入数据量,当输入数据量小于这个值时采用 local mr 的方式,默认
为 134217728,即 128M
set hive.exec.mode.local.auto.inputbytes.max=50000000;
//设置 local mr 的最大输入文件个数,当输入文件个数小于这个值时采用 local mr 的方式,默
认为 4
set hive.exec.mode.local.auto.input.files.max=10;
hive (default)> set hive.exec.mode.local.auto=true;
hive (default)> select * from emp cluster by deptno;
Time taken: 1.328 seconds, Fetched: 14 row(s)
hive (default)> set hive.exec.mode.local.auto=false;
hive (default)> select * from emp cluster by deptno;
Time taken: 20.09 seconds, Fetched: 14 row(s)
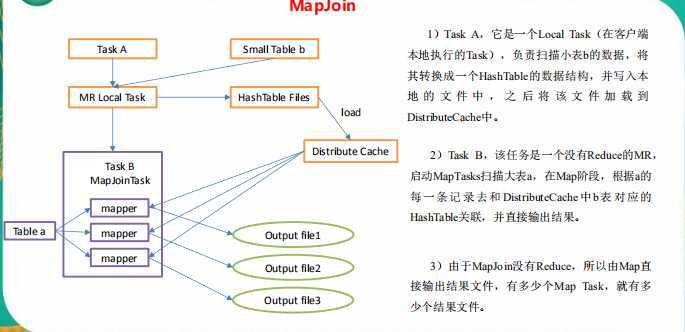
// 创建大表
create table bigtable(id bigint, time bigint, uid string, keyword string,
url_rank int, click_num int, click_url string) row format delimited fields
terminated by ‘\t‘;
// 创建小表
create table smalltable(id bigint, time bigint, uid string, keyword
string, url_rank int, click_num int, click_url string) row format delimited
fields terminated by ‘\t‘;
// 创建 join 后表的语句
create table jointable(id bigint, time bigint, uid string, keyword
string, url_rank int, click_num int, click_url string) row format delimited
fields terminated by ‘\t‘;
hive (default)> load data local inpath ‘/opt/module/datas/bigtable‘ into table
bigtable;
hive (default)>load data local inpath ‘/opt/module/datas/smalltable‘ into table
smalltable;
set hive.auto.convert.join = false;
insert overwrite table jointable
select b.id, b.time, b.uid, b.keyword, b.url_rank, b.click_num, b.click_url
from smalltable s
left join bigtable b
on b.id = s.id;
insert overwrite table jointable
select b.id, b.time, b.uid, b.keyword, b.url_rank, b.click_num, b.click_url
from bigtable b
left join smalltable s
on s.id = b.id;
<property>
<name>mapreduce.jobhistory.address</name>
<value>hadoop102:10020</value>
</property>
<property>
 <name>mapreduce.jobhistory.webapp.address</name>
 <value>hadoop102:19888</value>
</property>
// 创建原始表
create table ori(id bigint, time bigint, uid string, keyword string, url_rank
int, click_num int, click_url string) row format delimited fields terminated by
‘\t‘;
// 创建空 id 表
create table nullidtable(id bigint, time bigint, uid string, keyword string,
url_rank int, click_num int, click_url string) row format delimited fields
terminated by ‘\t‘;
// 创建 join 后表的语句
create table jointable(id bigint, time bigint, uid string, keyword string,
url_rank int, click_num int, click_url string) row format delimited fields
terminated by ‘\t‘;
hive (default)> load data local inpath ‘/opt/module/datas/ori‘ into table ori;
hive (default)> insert overwrite table jointable select n.* from (select * from
nullidtable where id is not null ) n left join ori o on n.id = o.id;
insert overwrite table jointable
select n.* from nullidtable n left join ori b on n.id = b.id;
insert overwrite table jointable
select n.* from nullidtable n full join ori o on
case when n.id is null then concat(‘hive‘, rand()) else n.id end = o.id;

set hive.auto.convert.join = true; 默认为 true
set hive.mapjoin.smalltable.filesize=25000000;
set hive.auto.convert.join = true; 默认为 true
insert overwrite table jointable
select b.id, b.time, b.uid, b.keyword, b.url_rank, b.click_num, b.click_url
from smalltable s
join bigtable b
on s.id = b.id;
insert overwrite table jointable
select b.id, b.time, b.uid, b.keyword, b.url_rank, b.click_num, b.click_url
from bigtable b
join smalltable s
on s.id = b.id;
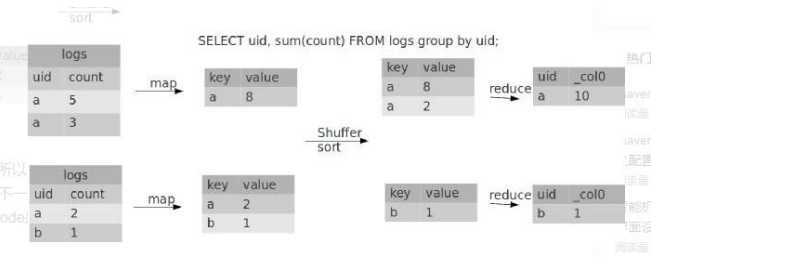
set hive.map.aggr = true
set hive.groupby.mapaggr.checkinterval = 100000
set hive.groupby.skewindata = true
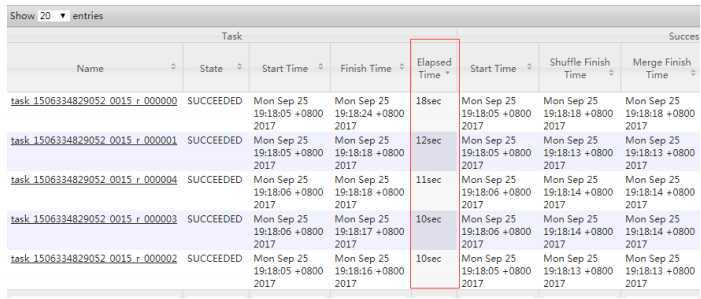
hive (default)> select deptno from emp group by deptno;
Stage-Stage-1: Map: 1 Reduce: 5 Cumulative CPU: 23.68 sec HDFS Read: 19987
HDFS Write: 9 SUCCESS
Total MapReduce CPU Time Spent: 23 seconds 680 msec
OK
deptno
10
20
30
hive (default)> set hive.groupby.skewindata = true;
hive (default)> select deptno from emp group by deptno;
Stage-Stage-1: Map: 1 Reduce: 5 Cumulative CPU: 28.53 sec HDFS Read: 18209
HDFS Write: 534 SUCCESS
Stage-Stage-2: Map: 1 Reduce: 5 Cumulative CPU: 38.32 sec HDFS Read: 15014
HDFS Write: 9 SUCCESS
Total MapReduce CPU Time Spent: 1 minutes 6 seconds 850 msec
OK
deptno
10
20
30
hive (default)> create table bigtable(id bigint, time bigint, uid string, keyword
string, url_rank int, click_num int, click_url string) row format delimited
fields terminated by ‘\t‘;
hive (default)> load data local inpath ‘/opt/module/datas/bigtable‘ into table
bigtable;
set mapreduce.job.reduces = 5;
hive (default)> select count(distinct id) from bigtable;
Stage-Stage-1: Map: 1 Reduce: 1 Cumulative CPU: 7.12 sec HDFS Read: 120741990
HDFS Write: 7 SUCCESS
Total MapReduce CPU Time Spent: 7 seconds 120 msec
OK
c0
100001
Time taken: 23.607 seconds, Fetched: 1 row(s)
hive (default)> select count(id) from (select id from bigtable group by id) a;
Stage-Stage-1: Map: 1 Reduce: 5 Cumulative CPU: 17.53 sec HDFS Read: 120752703
HDFS Write: 580 SUCCESS
Stage-Stage-2: Map: 1 Reduce: 1 Cumulative CPU: 4.29 sec HDFS Read: 9409 HDFS
Write: 7 SUCCESS
Total MapReduce CPU Time Spent: 21 seconds 820 msec
OK
_c0
100001
Time taken: 50.795 seconds, Fetched: 1 row(s)
hive (default)> select o.id from bigtable b
join ori o on o.id = b.id
where o.id <= 10;
hive (default)> select b.id from bigtable b
join (select id from ori where id <= 10 ) o on b.id = o.id;
hive.exec.dynamic.partition.mode=nonstrict
hive.exec.max.dynamic.partitions=1000
hive.exec.max.dynamic.partitions.pernode=100
hive.exec.max.created.files=100000
hive.error.on.empty.partition=false
hive (default)> create table dept_partition(id int, name string) partitioned
by (location int) row format delimited fields terminated by ‘\t‘;
set hive.exec.dynamic.partition.mode = nonstrict;
hive (default)> insert into table dept_partition partition(location) select deptno, dname, loc from dept;
hive (default)> show partitions dept_partition;
原文:https://www.cnblogs.com/qiu-hua/p/13373782.html