1、安装maven
yum install maven
2、修改目录 /usr/share/maven/conf 下的配置,使用阿里云镜像加速
<mirror>
  <id>alimaven</id>
  <name>aliyun maven</name>
  <url>http://maven.aliyun.com/nexus/content/groups/public/</url>
  <mirrorOf>central</mirrorOf>
</mirror>
3、安装 Nexus ( Installing Sonatype Nexus Repository OSS on CentOS 7)
wget https://download.sonatype.com/nexus/3/latest-unix.tar.gz
解压:
tar -xvzf latest-unix.tar.gz
解压后出现两个文件夹
latest-unix 主要用到这个文件夹
sonatype-work 保存所有配置文件的信息(不用动)
启动nexus
进入 cd latest-unix/bin
./nexus start
如果启动报错
****************************************
WARNING - NOT RECOMMENDED TO RUN AS ROOT
****************************************
If you insist running as root, then set the environment variable RUN_AS_USER=root before running this script.
原因:当前是root用户,需要配置一下:
进入 cd latest-unix/bin
vim nexus
命令模式下搜索(按 /查找) RUN
把#RUN_AS_USER= 改成RUN_AS_USER=root
启动成功
****************************************
WARNING - NOT RECOMMENDED TO RUN AS ROOT
****************************************
Starting Nexus OSS...
Started Nexus OSS.
Public Repositories 对应的地址 http://IP地址:8081/nexus/content/groups/public/ 我们的仓库地址
默认的用户名和密码时 admin:admin123
4、修改本地开发环境maven setting.xml 配置
在<mirros>标签中添加:
 <mirror>
      <id>nexus</id>
      <mirrorOf>*</mirrorOf>
      <name>nexus maven</name>
        <!--<url>http://xiaoshang.ydcfo.com:8081/repository/maven-public/</url>-->
        <url>http://your ip:8081/nexus/content/groups/public/</url>
    </mirror>
在<servers>标签中添加:
 <server>
          <id>nexus-ne</id>
          <username>yungui.zheng</username>
          <password>nx-engine2018</password>
        </server>
		<server>
        <id>nexus-releases</id>
        <username>admin</username>
        <password>admin123</password>
    </server>

    <server>
        <id>nexus-snapshots</id>
        <username>admin</username>
        <password>admin123</password>
    </server>

    <server>
        <id>nexus-thirdparty</id>
        <username>admin</username>
        <password>admin123</password>
    </server>
5、在POM中添加发布地址
<distributionManagement>
    <repository>
        <id>nexus-releases</id>
        <name>Nexus Release Repository</name>
        <url>http:/ip:8081/nexus/content/repositories/releases/</url>
    </repository>
    <snapshotRepository>
        <id>nexus-snapshots</id>
        <name>Nexus Snapshot Repository</name>
        <url>http://ip:8081/nexus/content/repositories/snapshots/</url>
    </snapshotRepository>
</distributionManagement>
6、在IDEA下的LifeCycle下面点击deploy发布到仓库
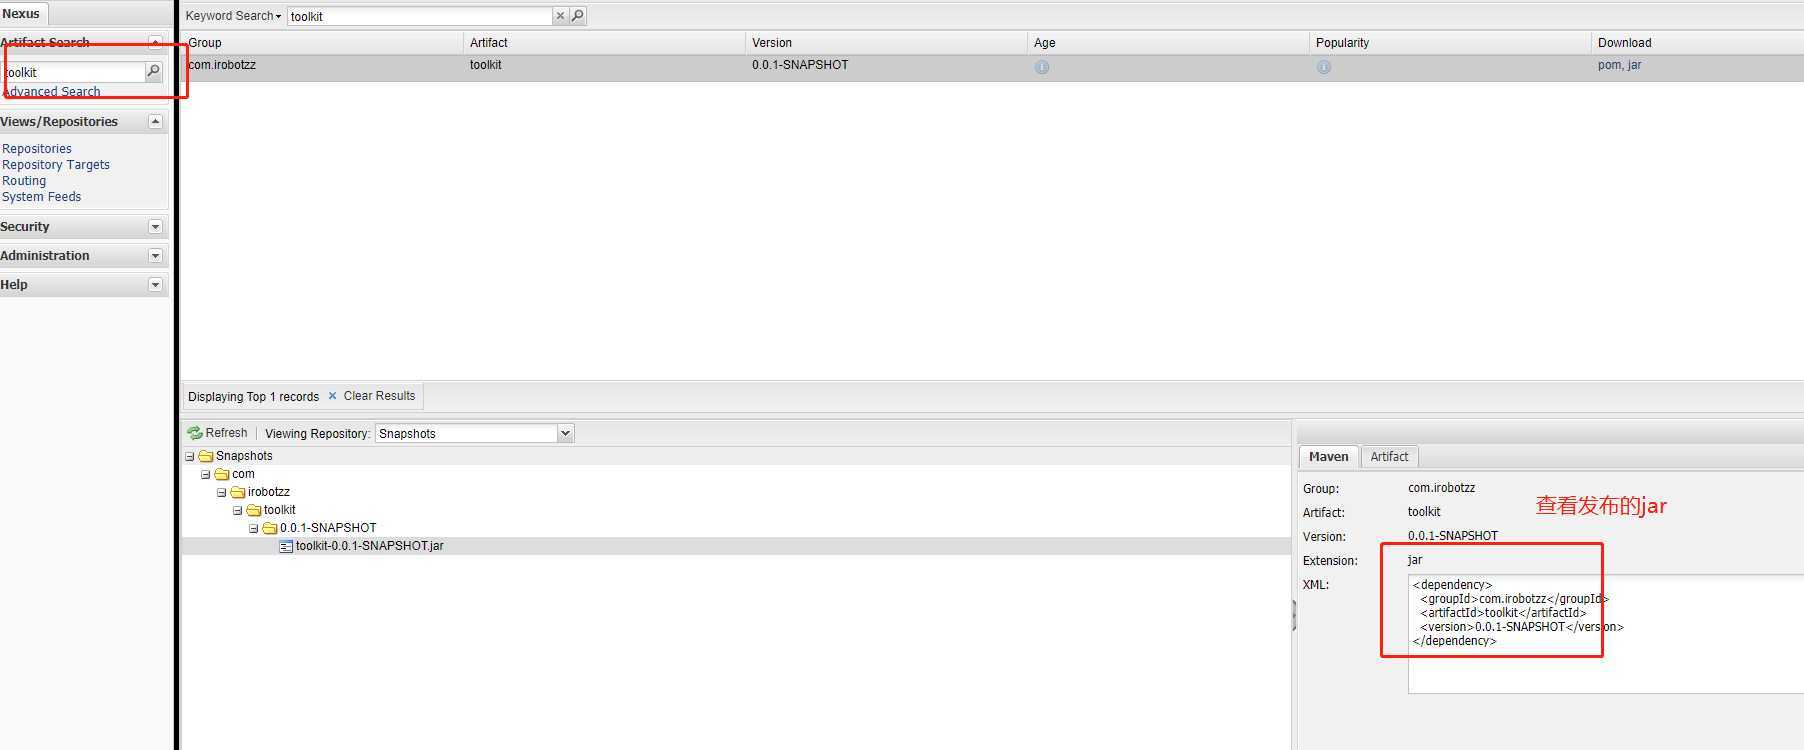
7、查看发布的jar,搜索就可以看到依赖坐标
参考:
https://www.fosslinux.com/27838/installing-sonatype-nexus-repository-oss-on-centos-7.htm
https://blog.csdn.net/weixin_42719412/article/details/100672794
原文:https://www.cnblogs.com/irobotzz/p/13268450.html