时长:55min
主要是注解装饰功能的一个完善。提供条件注解装配,即@Conditional注解使用。
其实,它是对是否进行bean装配的一个条件限制,如果条件返回true,刚允许装配。否则,不允许。
下面通过示例代码来,说明条件装配的应用。
首先,创建一个springboot项目。然后创建配置类:
package com.wf.demo.springbootdemo.condition;

import org.springframework.context.annotation.Bean;
import org.springframework.context.annotation.Conditional;
import org.springframework.context.annotation.Configuration;

/**
 * @ClassName SpringConfiguration
 * @Description 统一的配置类
 * @Author wf
 * @Date 2020/7/6 18:09
 * @Version 1.0
 */
@Configuration
public class SpringConfiguration {
    /**
     * 在某个环境下不装载
     * 或不满足某个条件不装载
     * 或者已经装载过了,不要重复装载
     * @return
     */
    @Conditional(MyCondition.class)
    @Bean
    public DemoService demoService(){
        return new DemoService();
    }
}
说明:
配置类中,通过@Bean进行bean装配。然而加上@Conditional注解,就能实现条件装配。
@Conditional注解,传参为Condition接口子类Class对象,可以传参多个子类对象,多个对象之间是且的关系。
package com.wf.demo.springbootdemo.condition;

import org.springframework.context.annotation.Condition;
import org.springframework.context.annotation.ConditionContext;
import org.springframework.core.type.AnnotatedTypeMetadata;

/**
 * @ClassName MyCondition
 * @Description 实现条件子类
 * @Author wf
 * @Date 2020/7/6 18:14
 * @Version 1.0
 */
public class MyCondition implements Condition {
    @Override
    public boolean matches(ConditionContext conditionContext, AnnotatedTypeMetadata annotatedTypeMetadata) {
        //TODO 这里可以写对应的判断逻辑
        return false;
    }
}
说明:
子类中实现match方法,进行条件判断,如果返回false,则不允许bean装配。
package com.wf.demo.springbootdemo.condition;

/**
 * @ClassName DemoService
 * @Description service bean类
 * @Author wf
 * @Date 2020/7/6 18:10
 * @Version 1.0
 */
public class DemoService {
}
package com.wf.demo.springbootdemo.condition;

import org.springframework.context.ApplicationContext;
import org.springframework.context.annotation.AnnotationConfigApplicationContext;

/**
 * @ClassName ConditionMain
 * @Description 测试类
 * @Author wf
 * @Date 2020/7/6 18:17
 * @Version 1.0
 */
public class ConditionMain {
    public static void main(String[] args) {
        ApplicationContext context = new AnnotationConfigApplicationContext(SpringConfiguration.class);
        DemoService bean = context.getBean(DemoService.class);
        System.out.println(bean);
    }
}
测试结果如下:
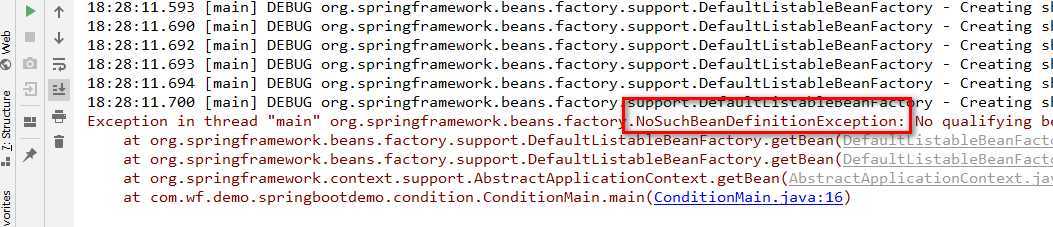
结果抛出异常,因为条件返回false,不允许装配。
下面修改match方法,返回true,如下所示:

再次运行测试,成功装配,如下所示:

引入@Indexed注解。是用来提升性能的。当项目文件目录很多时,扫描@Component,@Service。。。这些注解时,
就会很耗时,而@Indexed注解,可以提升注解扫描的性能。
总结:
spring的注解驱动的发展,是为了bean装配更加简单。
下面通过springboot中整合redis来说明,注解驱动的简便性。
 <!--整合redis-->
        <dependency>
            <groupId>org.springframework.boot</groupId>
            <artifactId>spring-boot-starter-data-redis</artifactId>
        </dependency>
版本由springboot-parent来管理。
在生产中会有专门的redis服务安装redis服务。而学习环境下,一般是在虚拟机上安装redis应用服务器。
package com.wf.demo.springbootdemo.web;

import com.wf.demo.springbootdemo.dao.pojo.User;
import com.wf.demo.springbootdemo.service.IUserService;
import org.springframework.beans.factory.annotation.Autowired;
import org.springframework.beans.factory.annotation.Value;
import org.springframework.data.redis.core.RedisTemplate;
import org.springframework.web.bind.annotation.GetMapping;
import org.springframework.web.bind.annotation.RestController;

/**
 * @ClassName HelloController
 * @Description 测试controller
 * @Author wf
 * @Date 2020/7/6 11:27
 * @Version 1.0
 */
@RestController
public class HelloController {
    @Autowired
    private RedisTemplate<String,String> redisTemplate;

    //配置文件注入
//    @Value("Mic")
//    private String name;
    @Autowired
    private IUserService userService;

    @GetMapping("hello")
    public String test(){
        User user = new User();
        user.setId(18);
        user.setName("MIc");
        userService.insert(user);
        return "success";
    }

    @GetMapping("/say")
    public String say(){
        return redisTemplate.opsForValue().get("name");
    }
}
说明:
springboot已经为了我们使用redis封装了客户端工具类RedisTemplate。
只有使用它的api即可。
spring.redis.host=192.168.216.128
#redis.port=6379默认
只需要启动main,浏览器端访问controller接口即可。
说明:
我们可以看到,springboot整合redis是如此之简单。
这里RedisTemplate实例,能够直接引用,说明spring IOC容器中已经完成bean的装配。
但是,我们是没有做这部分工作的,而是由springboot进行了装配。
》xml配置
》@Configuration注解装配
》@Enable装配
现在,springboot提供了自动装配的功能。
自动装配的原理是什么?是如何实现的呢?
主要有两种:
ImportSelector:
Registator
所谓动态装载,即根据上下文,或某些条件去装载一些配置类。
下面通过代码示例,来说明springboot实现批量扫描配置类的原理。
所谓批量扫描,就是一次性扫描所有jar包中的配置类。示例代码中以分包的形式,来模拟不同jar包的扫描。
原文:https://www.cnblogs.com/wfdespace/p/13256570.html