对于entity实体对象类,冠以@Configuration修饰。
@Configuration
public class User {
    private String ID;
    private String name;

    public String getID() {
        return ID;
    }

    public void setID(String ID) {
        this.ID = ID;
    }

    public String getName() {
        return name;
    }

    public void setName(String name) {
        this.name = name;
    }

    @Override
    public String toString() {
        return "User{" +
                "ID=‘" + ID + ‘\‘‘ +
                ", name=‘" + name + ‘\‘‘ +
                ‘}‘;
    }

    public User(){
    }
    public User(String ID, String name) {
        this.ID = ID;
        this.name = name;
    }
}
此时,可以直接调用@AutoWired注入对象。
	@Autowired
    private User user;
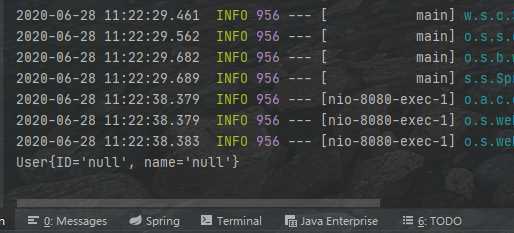
并将user对象输入,得到
取消修饰于User类的@Configuration方法,而对构造类使用@Import注解。
@RestController
@RequestMapping("/hello")
@Import(User.class)
public class HelloController {

    @Autowired
    private User user;

    @RequestMapping("/hello")
    public String hello(){
        System.out.println(user);
        return "hello world!";
    }
}
虽然intellij IDEA开发环境静态检查会出错,但执行程序依然可以成功。
这是对1.1.1的一种改进
创建配置类BeanConfigure
@Configuration
public class BeanConfigure {

    @Bean
    public User getUser(){
        return new User(“123456”,“seekwind”);
    }
}
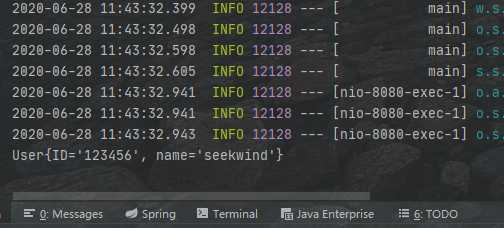
此时依然可以成功注入。
也可以在BeanConfigure类中配置多个类。
@Configuration
public class BeanConfigure {

    @Bean
    public User getUser(){
        return new User("123456","seekwind");
    }

    @Bean
    public Administrator(){
        return new Administrator("root","root");
    }
}
通过这种方法注入的对象是单例的。可以在@Bean后追加注解实现多例。
	@Bean
	@Scope("prototype")
    public User getUser(){
        return new User("123456","seekwind");
    }
终端输出两个对象不同
user == user1 ? false
在resource文件下创建spring.xml文件.
<?xml version="1.0" encoding="UTF-8"?>
<beans xmlns="http://www.springframework.org/schema/beans"
       xmlns:xsi="http://www.w3.org/2001/XMLSchema-instance"
       xsi:schemaLocation="http://www.springframework.org/schema/beans http://www.springframework.org/schema/beans/spring-beans.xsd">
    <bean id="User" class="seekwind.springboot_demo1.entity.User"></bean>
</beans>
调用类使用@ImportResource("xml文件名")修饰.
@RestController
@RequestMapping("/hello")
@ImportResource("spring.xml")
public class HelloController {

    @Autowired
    private User user;

    @RequestMapping("/hello")
    public String hello(){
        System.out.println(user);
        return "hello world!";
    }
}
依然可以注入成功。
在application.properties文件中加入
name=seekwind
需要注入的变量用@Value注解修饰
@Value("${name}")
private String name;
下面表格罗列出普通变量、日期、数组集合、Map的注入方式
| 变量类型 | 配置文件写法 | java注解写法 |
|---|---|---|
| 普通变量(基本数据类型,String等) | name=seekwind | @Value("${name}") |
| 日期(Data) | data=2012/12/12 12:12:12 | @Value("${data}") |
| 数组集合 | array=1,2,3,4,5 | @Value("${array}") |
| Map | map={"admin":"seekwind","user":"chen"} | @Value{"#{${map}}"} |
增加pom.xml依赖
		<dependency>
            <groupId>org.springframework.boot</groupId>
            <artifactId>spring-boot-configuration-processor</artifactId>
        </dependency>
以User类的注入为例
@Component
@ConfigurationProperties(prefix = "user")
public class User{
 	private String ID;
    private String name;
}
user.ID=123456
user.name=seekwin
原文:https://www.cnblogs.com/seek-wind/p/13206399.html