一、多线程详解
1、什么是线程
线程是一个操作系统概念。操作系统负责这个线程的创建、挂起、运行、阻塞和终结操作。而操作系统创建线程、切换线程状态、终结线程都要进行CPU调度——这是一个耗费时间和系统资源的事情。
2、线程生命周期
Java当中,线程通常都有五种状态,创建、就绪、运行、阻塞和死亡:
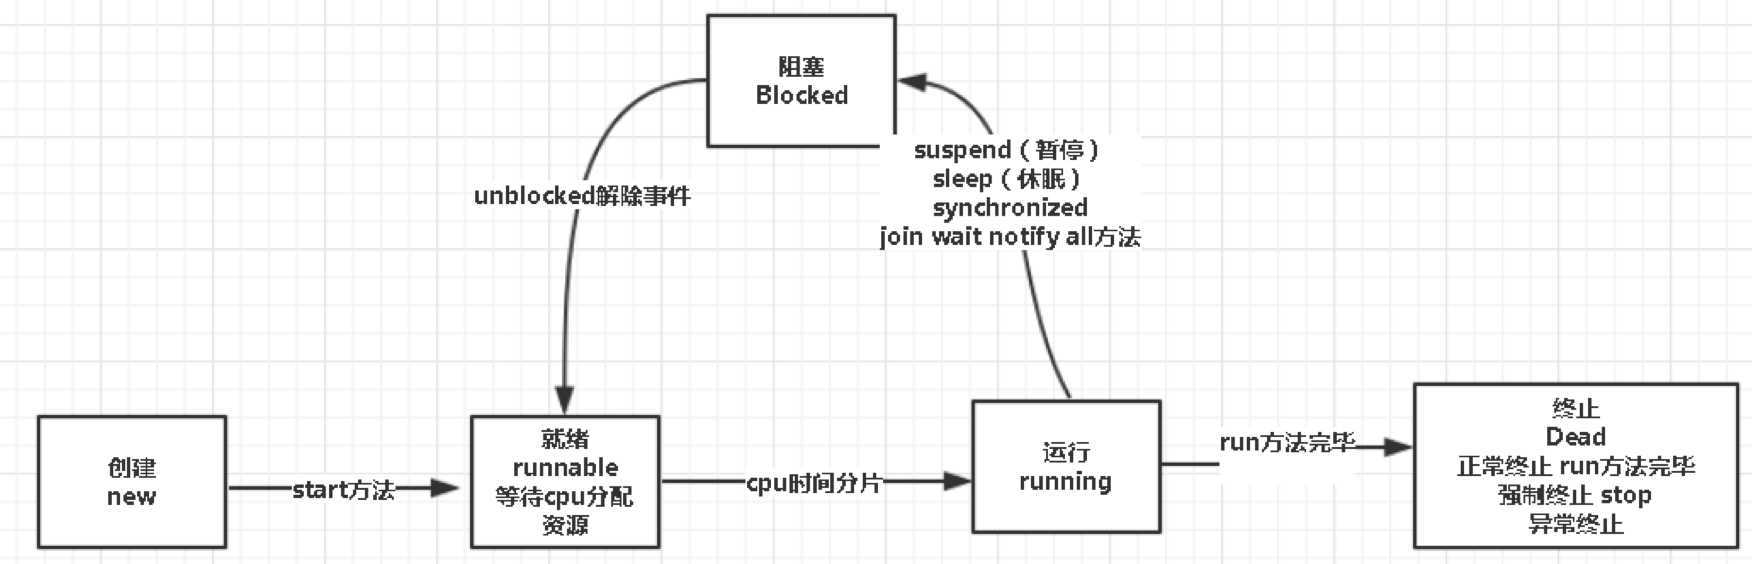
可以用过jstack 或者idea debug快照显示状态,常见名词大致意思为:
3、线程状态描述
要区分 BLOCKED 和 WATING 的区别, 一个是在临界点外面等待进入, 一个是在理解点里面wait等待别人notify, 线程调用了join方法 join了另外的线程的时候, 也会进入WAITING状态, 等待被他join的线程执行结束。核心区别就是BLOCKED没拿到锁,WAITING拿到了锁。
4、线程优先级Priority
线程的优先级是将该线程的重要性传给了调度器、cpu处理线程顺序有一定的不确定,但是调度器会倾向于优先权高的先执行。
5、线程实现方式
线程有三种实现方式:Thread、Runnable、Callable。
Thread实现方式代码如下:
public class Thread01 extends Thread {

   @Override
   public void run() {
      System.out.println("Thread 方式创建线程");
   }

   public static void main(String[] args) throws InterruptedException {
      new Thread01().start();//多线程
   }
}
Runnable实现方式:
public class Runnable01 implements  Runnable {
   @Override
   public void run() {
      System.out.println("Runnable方式创建线程");
   }

   public static void main(String[] args) {
      new Thread(new Runnable01()).start();
   }
}
Callable实现方式:
public class Callable01 implements Callable<String> {
   @Override
   public String call() throws Exception {
      System.out.println("Callable方式创建线程");
      return "Callable";
   }

   public static void main(String[] args) throws ExecutionException, InterruptedException {
      FutureTask task=new FutureTask(new Callable01());//有参 赋值 成员属性
      new Thread(task).start();
      System.out.println( task.get());;
   }
}
6、Thread和Runnable的联系与区别
public class Thread implements Runnable {
    //  省略
    @Override
    public void run() {
        if (target != null) {
            target.run();
        }
    }
    //  省略
}
综上所述:Thread和Runnable的实质是继承关系,没有可比性。无论使用Runnable还是Thread,都会new Thread,然后执行run方法。用法上,如果有复杂的线程操作需求,那就选择继承Thread,如果只是简单的执行一个任务,那就实现runnable。
7、Callable原理是什么
Callable 1.5引入,具有返回值,并且支持泛型:
public interface Callable<V> {
    V call() throws Exception;
}
返回加入泛型既可以返回Object,也可以让调用限定类型,更灵活。Callble相关源码如下:
public interface Future<V> {
    boolean cancel(boolean mayInterruptIfRunning);
    boolean isCancelled();
    boolean isDone();
    V get() throws InterruptedException, ExecutionException;
    V get(long timeout, TimeUnit unit)
        throws InterruptedException, ExecutionException, TimeoutException;
}

public interface RunnableFuture<V> extends Runnable, Future<V> {
    void run();
}

public class FutureTask<V> implements RunnableFuture<V> {

private Callable<V> callable;
    public void run() {
        if (state != NEW ||
            !RUNNER.compareAndSet(this, null, Thread.currentThread()))
            return;
        try {
            Callable<V> c = callable;
            if (c != null && state == NEW) {
                V result;
                boolean ran;
                try {
                    result = c.call();
                    ran = true;
                } catch (Throwable ex) {
                    result = null;
                    ran = false;
                    setException(ex);
                }
                if (ran)
                    set(result);
            }
        } finally {
            // runner must be non-null until state is settled to
            // prevent concurrent calls to run()
            runner = null;
            // state must be re-read after nulling runner to prevent
            // leaked interrupts
            int s = state;
            if (s >= INTERRUPTING)
                handlePossibleCancellationInterrupt(s);
        }
    }
}
我们在使用以下代码构建task时,实际上在FutureTask类的构造方法就给自己的属性callable进行了赋值。
FutureTask task=new FutureTask(new Callable01());
而可以看到FutureTask实际上也是一个Runnable的具体实现,因此可以使用以下方法进行task执行(和Runnable的使用方式一致):
new Thread(task).start();
调用start方法,实际上就是调用Runnable的run方法,因此调用了FutureTask的run方法,然后这个新起的线程采用方法调用方式调用了具体Callable实现类的call方法,并将返回值进行set,因此我们可以通过task.get()方法获取执行结果。
8、和使用线程池有什么不一样
看以下代码:
public class ThreadPkTest {
    public static void main(String[] args) throws InterruptedException {
        Long start= System.currentTimeMillis();
        final List<Integer> l=new ArrayList<Integer>();
        final Random random=new Random();
        for(int i=0;i<10000;i++){
            Thread thread=new Thread(){
                public void run(){
                    l.add(random.nextInt());
                }
            };
            thread.start();
            thread.join();
        }
        System.out.println("直接创建线程执行时间:"+(System.currentTimeMillis()-start));
        System.out.println("size:"+l.size());

        start= System.currentTimeMillis();
        final List<Integer> list=new ArrayList<Integer>();
        ExecutorService executorService= Executors.newSingleThreadExecutor();for(int i=0;i<10000;i++){
            executorService.execute(new Runnable() {
                @Override
                public void run() {
                    list.add(random.nextInt());
                }
            });
        }
        executorService.shutdown();
        executorService.awaitTermination(1, TimeUnit.DAYS);
        System.out.println("线程池执行时间:"+(System.currentTimeMillis()-start));
        System.out.println("size:"+list.size());

    }
}
执行结果如下:
直接创建线程执行时间:1601
size:10000
线程池执行时间:33
size:10000
由此可以对比线程池效率要高出很多,是什么原因呢?大致有这么几点:
那我们接下来就核心进行线程池的研究。
二、线程池代码详解
1、线程池使用示例
首先我们来看下如何使用线程池,线程持有submit以及execute两种写法,代码如下:
public class ThreadPool01 {
    public static void main(String[] args) {
        ExecutorService executorService = Executors.newCachedThreadPool();
        executorService.submit(()->   System.out.println("Submit方式执行optimized"));
        executorService.submit(new Runnable() {
            @Override
            public void run() {

                System.out.println("Submit方式执行");
            }
        });
        executorService.execute(()-> System.out.println("Execute方式执行optimized"));
        executorService.execute(new Runnable() {
            @Override
            public void run() {

                System.out.println("Execute方式执行");
            }
        });
        executorService.shutdown();
    }
}
2、线程池类、接口
然后我们来看看线程池有哪些类与接口,核心如图所示:
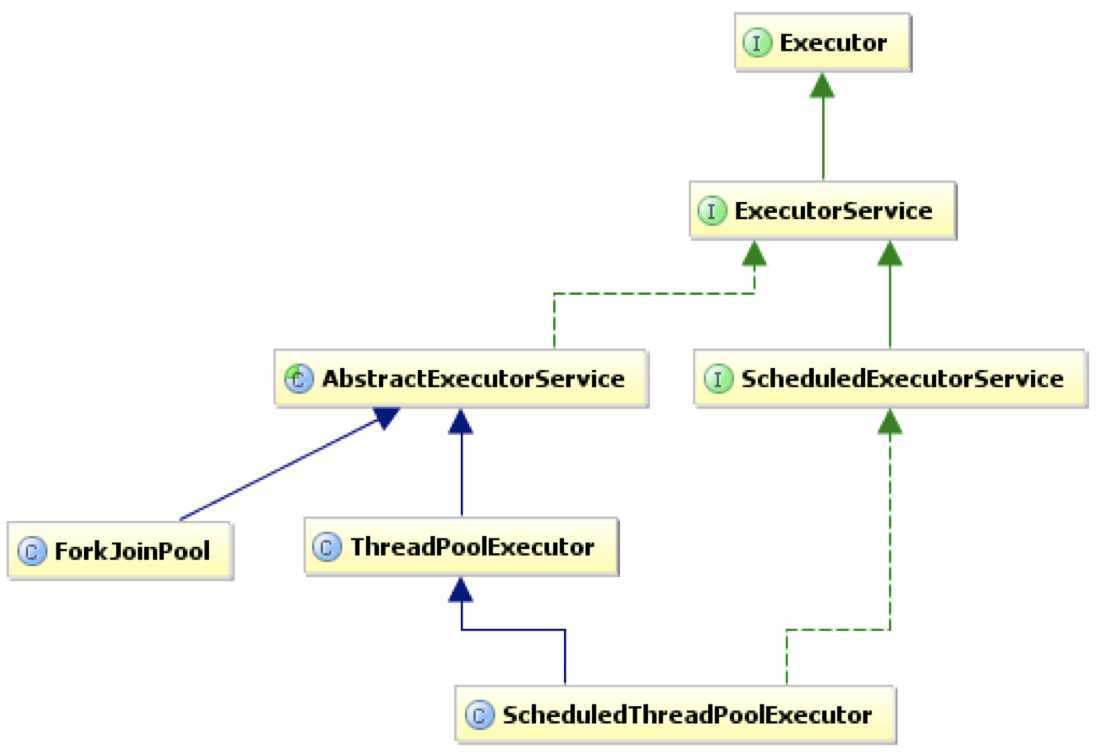
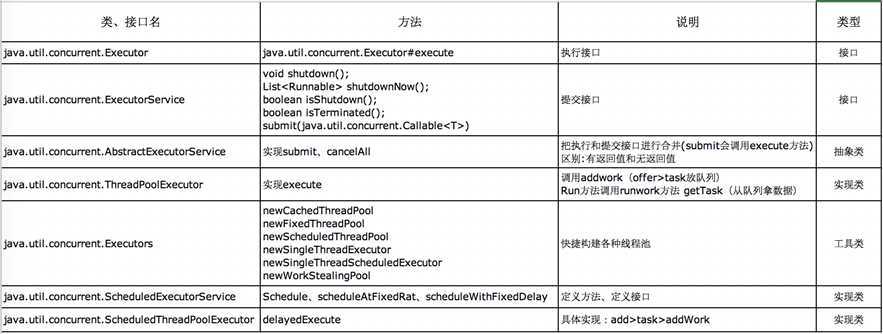
如图所示,有这么一些重要的接口与类,如下表所示:
3、线程池执行流程
3.1、初始化ThreadPoolExecutor
不管我们是通过Executors工具类快速初始化线程池,还是手动配置线程池参数,我们第一不都是初始化线程池:
ExecutorService executorService = Executors.newCachedThreadPool();    //快速构建
ExecutorService es = new ThreadPoolExecutor(5, 5,              //手动构建
                0L, TimeUnit.MILLISECONDS,
                new SynchronousQueue<Runnable>(),
                Executors.defaultThreadFactory())
参数详情如下:
public ThreadPoolExecutor(
        int corePoolSize,    //核心线程数大小 - 10
        int maximumPoolSize,   //最大线程数 - 100
        long keepAliveTime,   //非核心线程存活时间
        TimeUnit unit,   //时间单位
        BlockingQueue<Runnable> workQueue,   //存放任务的阻塞队列
        ThreadFactory threadFactory,   //创建线程的工厂
       RejectedExecutionHandler handler    //拒绝策略
)
3.2、调用execute、submit执行
我们知道有两种方式,分别是submit和execute,但是底层核心都是调用execute,无非是submit有返回,execute无返回。代码如下:
    public <T> Future<T> submit(Runnable task, T result) {
        if (task == null) throw new NullPointerException();
        RunnableFuture<T> ftask = newTaskFor(task, result);
        execute(ftask);
        return ftask;
    }
但是其实execute和submit还有点不同,就是task类型不一样,submit类型是FutureTask,而execute的task类型是线程池运行的run方法所属类的类型。
3.3、核心、非核心线程协作原理
如execute方法中的代码所示:
public void execute(Runnable command) {
        if (command == null)
            throw new NullPointerException();
        int c = ctl.get();
        if (workerCountOf(c) < corePoolSize) {
            if (addWorker(command, true))
                return;
            c = ctl.get();
        }
        if (isRunning(c) && workQueue.offer(command)) {
            int recheck = ctl.get();
            if (! isRunning(recheck) && remove(command))
                reject(command);
            else if (workerCountOf(recheck) == 0)
                addWorker(null, false);
        }
        else if (!addWorker(command, false))
            reject(command);
    }
如上四处代码,如下图所示四种不同规则所示:
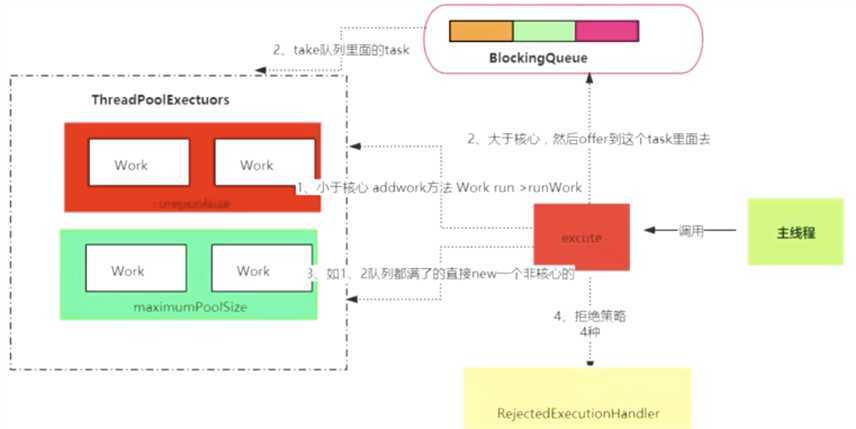
所以当一个任务通过execute(Runnable)方法添加到线程池时:
综上所述:处理任务的优先级为:核心线程corePoolSize、任务队列workQueue、最大线程maximumPoolSize,如果三者都满了,使用handler处理被拒绝的任务。
3.4、创建Worker对象addWorker
Worker是一个实现了Runnable接口的类,Worker的执行最终会调用我们提交的任务中的run()方法。
private final class Worker extends AbstractQueuedSynchronizer implements Runnable {}
创建Worker对象代码如下:
    private boolean addWorker(Runnable firstTask, boolean core) {
        retry:
        for (int c = ctl.get();;) {
            // Check if queue empty only if necessary.
            if (runStateAtLeast(c, SHUTDOWN)
                && (runStateAtLeast(c, STOP)
                    || firstTask != null
                    || workQueue.isEmpty()))
                return false;

            for (;;) {
                if (workerCountOf(c)
                    >= ((core ? corePoolSize : maximumPoolSize) & COUNT_MASK))
                    return false;
                if (compareAndIncrementWorkerCount(c))
                    break retry;
                c = ctl.get();  // Re-read ctl
                if (runStateAtLeast(c, SHUTDOWN))
                    continue retry;
                // else CAS failed due to workerCount change; retry inner loop
            }
        }

        boolean workerStarted = false;
        boolean workerAdded = false;
        Worker w = null;
        try {
            w = new Worker(firstTask);
            final Thread t = w.thread;
            if (t != null) {
                final ReentrantLock mainLock = this.mainLock;
                mainLock.lock();
                try {
                    // Recheck while holding lock.
                    // Back out on ThreadFactory failure or if
                    // shut down before lock acquired.
                    int c = ctl.get();

                    if (isRunning(c) ||
                        (runStateLessThan(c, STOP) && firstTask == null)) {
                        if (t.isAlive()) // precheck that t is startable
                            throw new IllegalThreadStateException();
                        workers.add(w);
                        int s = workers.size();
                        if (s > largestPoolSize)
                            largestPoolSize = s;
                        workerAdded = true;
                    }
                } finally {
                    mainLock.unlock();
                }
                if (workerAdded) {
                    t.start();        //此处会调用Worker这个Thread包装类的start方法,start方法会调用run方法,run方法会调用runWorker方法。
                    workerStarted = true;
                }
            }
        } finally {
            if (! workerStarted)
                addWorkerFailed(w);
        }
        return workerStarted;
    }
3.5、启动worker对象
启动worker对象如下代码所示:
final void runWorker(Worker w) {
        Thread wt = Thread.currentThread();
        Runnable task = w.firstTask;
        w.firstTask = null;
        w.unlock(); // allow interrupts
        boolean completedAbruptly = true;
        try {
            while (task != null || (task = getTask()) != null) {
                w.lock();
                // If pool is stopping, ensure thread is interrupted;
                // if not, ensure thread is not interrupted.  This
                // requires a recheck in second case to deal with
                // shutdownNow race while clearing interrupt
                if ((runStateAtLeast(ctl.get(), STOP) ||
                     (Thread.interrupted() &&
                      runStateAtLeast(ctl.get(), STOP))) &&
                    !wt.isInterrupted())
                    wt.interrupt();
                try {
                    beforeExecute(wt, task);
                    try {
                        task.run();
                        afterExecute(task, null);
                    } catch (Throwable ex) {
                        afterExecute(task, ex);
                        throw ex;
                    }
                } finally {
                    task = null;
                    w.completedTasks++;
                    w.unlock();
                }
            }
            completedAbruptly = false;
        } finally {
            processWorkerExit(w, completedAbruptly);
        }
    }
Worker启动后,会执行我们提交的任务的run()方法,执行完成后会调用finally中的 processWorkerExit 方法。
private void processWorkerExit(Worker w, boolean completedAbruptly) {
        if (completedAbruptly) // If abrupt, then workerCount wasn‘t adjusted
            decrementWorkerCount();

        final ReentrantLock mainLock = this.mainLock;
        mainLock.lock();
        try {
            completedTaskCount += w.completedTasks;
            workers.remove(w);
        } finally {
            mainLock.unlock();
        }

        tryTerminate();

        int c = ctl.get();
        if (runStateLessThan(c, STOP)) {
            if (!completedAbruptly) {
                int min = allowCoreThreadTimeOut ? 0 : corePoolSize;
                if (min == 0 && ! workQueue.isEmpty())
                    min = 1;
                if (workerCountOf(c) >= min)
                    return; // replacement not needed
            }
            addWorker(null, false);
        }
    }
由此可知,调用循环进入到了3.4。
4、什么是Worker
6、Java中提供的几种快捷线程池
原文:https://www.cnblogs.com/jing99/p/12670974.html