在ios开发中要实现好像新浪微博那样转换主题,理论上要通过3种模式,基本思路如下:
1.创建一个单例的主题管理器:ThemeManager类
2.单例模式里面的,全局共享方法

+(ThemeManager*)shareInstance
{
    static ThemeManager*themeManager;


    static dispatch_once_t onceToken;
   dispatch_once(&onceToken, ^{
        themeManager = [[self alloc] init];
    });

    return themeManager;
}
-(id)init
{
    self=[super init];

    if (self) {
        //获取根目录的路径

        NSString*path=[[NSBundle mainBundle]pathForResource:@"theme" ofType:@"plist"];

        self.themePlist=[NSDictionary dictionaryWithContentsOfFile:path];

        self.themeName=nil;
    }

    return self;

}
初始化方法解析一下
加载一个主题的目录:
NSString*path=[[NSBundle mainBundle]pathForResource:@"theme" ofType:@"plist"];
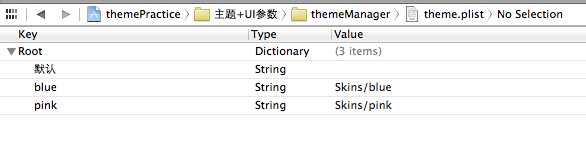
PS:那个.plist文件包含了主题路劲的设定:比如
蓝色主题:就有对应主题路径:Skin/bule
粉红色主题,就有Skin/pink
在这两个路径都包含了两个主题所拥有的所以图片,而且每个图片名字是相同的,只是路径不一样
3.跟着在类里面定义属性跟方法
@property(copy,nonatomic)NSString*themeName; //主题具体路径,会重写setting方法

@property(strong,nonatomic)NSDictionary*themePlist; //包含主题的名字,具体的路径,跟上图一样

@property(strong,nonatomic)NSDictionary *fontColorPlist; //包含颜色的名字,跟路径


//单例

+(ThemeManager*)shareInstance;

//根据对应的相片名,返回正确主题下的照片

-(UIImage*)getThemeImage:(NSString*)imageName;

//RGB字符串

-(UIColor*)getThemeFontColor:(NSString*)colorName;
4,一个私用方法:-(NSString*)getThemePath //来获取具体主题路径
-(NSString*)getThemePath
{
    //如果默认就选择根目录的图片

    if (self.themeName==nil) {
        NSString *resourcePath = [[NSBundle mainBundle] resourcePath];
        return resourcePath;
        //根目录都长这样
    }

    NSString*name=[_themePlist valueForKey:_themeName];
    NSString*resourcePath=[[NSBundle mainBundle]resourcePath];

  // NSURL*url=[NSBundle mainBundle]URLForResource:<#(NSString *)#> withExtension:<#(NSString *)#>

    NSString*themePath=[resourcePath stringByAppendingString:name];

    return themePath;


}
5,- (UIImage *)getThemeImage:(NSString *)imageName
这个方法来根据使用者所输入的名字来返回正确主题下图片
用法:UIImage*newImage=[ThemeManager shardInstance]getThemeImage:@"NavigationBarImg"] //返回对应导航栏的图片,就那么简单
//返回当前主题下的图片
- (UIImage *)getThemeImage:(NSString *)imageName {
    if (imageName.length == 0) {
        return nil;
    }

    //获取主题目录
    NSString *themePath = [self getThemePath];
    //imageName在当前主题的路径
    NSString *imagePath = [themePath stringByAppendingPathComponent:imageName];

    UIImage *image = [UIImage imageWithContentsOfFile:imagePath];

    return image;
}
下面,离开这个管理类
1.我们需要改变主题的UI元素一般是UIButton,UILabel
2.所以创建一个UIButton的子类
3.然后在子类设置通知机制来接受通知,即系当通知中心的值改变了,就相应地调用子类下接受通知的方法
-(id)init
{
    self=[super init];
    if (self) {
        [[NSNotificationCenter defaultCenter]addObserver:self selector:@selector(themeNotification:) name:kThemeDidChangeNofication object:nil];


    }
    return self;
}
#pragma mark - NSNotification action
//切换主题的通知
- (void)themeNotification:(NSNotification *)notification {
    [self loadThemeImage];
}
[self loadThemeImage]这个方法会重新刷新所有图片,下面有定义
4.定义基本属性跟初始化方法
//Normal状态下的图片名称
@property(nonatomic,copy)NSString *imageName;
//高亮状态下的图片名称
@property(nonatomic,copy)NSString *highligtImageName;

//Normal状态下的背景图片名称
@property(nonatomic,copy)NSString *backgroundImageName;
//高亮状态下的背景图片名称
@property(nonatomic,copy)NSString *backgroundHighligtImageName;

- (id)initWithImage:(NSString *)imageName highlighted:(NSString *)highligtImageName;

- (id)initWithBackground:(NSString *)backgroundImageName
   highlightedBackground:(NSString *)backgroundHighligtImageName;
5.重写setting方法、必须的
会发现,里面有个 [self loadThemeImage];,这个是加载相应路径的图片
#pragma mark - setter  设置图片名后,重新加载该图片名对应的图片
- (void)setImageName:(NSString *)imageName {
    if (_imageName != imageName) {

        _imageName = imageName;
    }
    //重新加载图片
    [self loadThemeImage];
}

- (void)setHighligtImageName:(NSString *)highligtImageName {
    if (_highligtImageName != highligtImageName) {

        _highligtImageName = highligtImageName;

    }

    //重新加载图片
    [self loadThemeImage];
}

- (void)setBackgroundImageName:(NSString *)backgroundImageName {
    if (_backgroundImageName != backgroundImageName) {

        _backgroundImageName = [backgroundImageName copy];
    }

    //重新加载图片
    [self loadThemeImage];
}

- (void)setBackgroundHighligtImageName:(NSString *)backgroundHighligtImageName {
    if (_backgroundHighligtImageName != backgroundHighligtImageName) {

        _backgroundHighligtImageName = [backgroundHighligtImageName copy];
    }

    //重新加载图片
    [self loadThemeImage];
}
6,加载图片方法
-(void)loadThemeImage
{
    ThemeManager*themeManager=[ThemeManager shareInstance];

    UIImage *image = [themeManager getThemeImage:_imageName];
    UIImage *highligtImage = [themeManager getThemeImage:_highligtImageName];

    [self setImage:image forState:UIControlStateNormal];
    [self setImage:highligtImage forState:UIControlStateHighlighted];


    UIImage *backImage = [themeManager getThemeImage:_backgroundImageName];
    UIImage *backHighligtImage = [themeManager getThemeImage:_backgroundHighligtImageName];

    [self setBackgroundImage:backImage forState:UIControlStateNormal];
    [self setBackgroundImage:backHighligtImage forState:UIControlStateHighlighted];//4个重置

}
7,初始化方法重写
-(id)initWithImage:(NSString *)imageName highlighted:(NSString *)highligtImageName
{
    self=[self init];

    if (self) {
        self.imageName=imageName;
        self.highligtImageName=highligtImageName;
    }

    return self;

}
-(id)initWithBackground:(NSString *)backgroundImageName highlightedBackground:(NSString *)backgroundHighligtImageName
{
    self = [self init];
    if (self) {
        self.backgroundImageName = backgroundImageName;
        self.backgroundHighligtImageName = backgroundHighligtImageName;
    }
    return self;


}
// self.backgroundImageName = backgroundImageName;,这些引用方法会调用setting
8,用法
ThemeButton *newButton=[ThemeButton alloc]initWithBackground:(NSString *)backgroundImageName highlightedBackground:(NSString *)backgroundHighligtImageName
背景图,高亮图是具体名字
ios开发教程,从主题管理中学会用基本的通知模式,单例模式跟工厂模式
原文:http://www.cnblogs.com/MrIOS/p/3553605.html