简介
特色功能:
安装
### 使用 npm 或 yarn 安装
npm install driver.js
yarn add driver.js
使用
### 1.导入
main.js 中导入文件
import Driver from ‘driver.js‘
import ‘driver.js/dist/driver.min.css‘
### 2.将方法写入原型
main.js 中
Vue.prototype.$driver = new Driver({
  doneBtnText: ‘完成‘, // Text on the final button
  closeBtnText: ‘关闭‘, // Text on the close button for this step
  stageBackground: ‘#fff‘, // Background color for the staged behind highlighted element
  nextBtnText: ‘下一步‘, // Next button text for this step
  prevBtnText: ‘上一步‘, // Previous button text for this step
})
### 3.配置引导节点(新建文件driver.js)
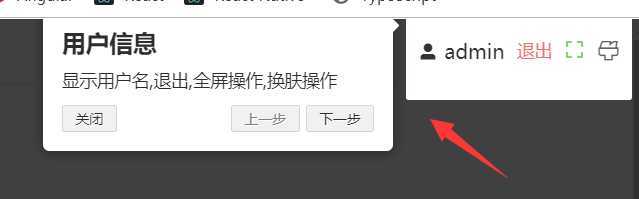
export default [
    {
        element: ‘#userInfo‘,
        popover: {
            title: ‘用户信息‘,
            description: ‘显示用户名,退出,全屏操作,换肤操作‘,
            position: ‘left‘,
        }
    },
    {
        element: ‘#grid‘,
        popover: {
            title: ‘收缩,面包屑‘,
            description: ‘点击开关导航栏,面包屑展示‘,
            position: ‘right‘,
        }
    },
    {
        element: ‘#tagGroup‘,
        popover: {
            title: ‘tag标签‘,
            description: ‘记录打开页面‘,
            position: ‘bottom‘,
        }
    },
    {
         element: ‘#mainInfo‘,
        popover: {
            title: ‘内容区‘,
            description: ‘显示页面内容‘,
            position: ‘left‘,
        }
    },
    {
        element: ‘#nav‘,
        popover: {
            title: ‘导航区‘,
            description: ‘导航功能展示‘,
            position: ‘right‘,
        }
    },
]
### 4.需要引导的页面中导入节点配置文件
import driverStep from "@/utils/driver";
### 5.需要引导的页面中定义引导函数
    start() {
      this.$nextTick(() => {
        this.$driver.defineSteps(driverStep);
        this.$driver.start();
      });
    }
### 6.调用函数
效果
特此声明:如需转载请注明出处,如有疑问请及时提出以便于改正,如有侵权,联系删除,谢谢
原文:https://www.cnblogs.com/CGWTQ/p/12357586.html