fabric是一个Python的库,同时它也是一个命令行工具。使用fabric提供的命令行工具,可以很方便地执行应用部署和系统管理等操作。
fabric依赖于paramiko进行ssh交互,fabric的设计思路是通过几个API接口来完成所有的部署,因此fabric对系统管理操作进行了简单的封装,比如执行命令,上传文件,并行操作和异常处理等。
|
1
2
3
|
#安装# fabric3支持python3pip3 install fabric3 |
由于fabric比较特殊它还是一个命令行工具,可以通过help进行命令的了解
|
1
2
3
4
5
6
7
8
9
10
11
12
13
14
15
16
|
pyvip@Vip:~/utils$ fab --helpUsage: fab [options] <command>[:arg1,arg2=val2,host=foo,hosts=‘h1;h2‘,...] ...Options: -h, --help show this help message and exit -d NAME, --display=NAME print detailed info about command NAME -F FORMAT, --list-format=FORMAT formats --list, choices: short, normal, nested -I, --initial-password-prompt Force password prompt up-front --initial-sudo-password-prompt Force sudo password prompt up-front -l, --list print list of possible commands and exit --set=KEY=VALUE,... comma separated KEY=VALUE pairs to set Fab env vars…… |
错误的提示
|
1
2
3
4
5
6
7
8
9
10
11
12
13
14
15
16
17
|
# fab -helpTraceback (most recent call last): File "/usr/local/python3/bin/fab", line 11, in <module> load_entry_point(‘Fabric==1.14.0‘, ‘console_scripts‘, ‘fab‘)() File "/usr/local/python3/lib/python3.6/site-packages/pkg_resources/__init__.py", line 480, in load_entry_point return get_distribution(dist).load_entry_point(group, name) File "/usr/local/python3/lib/python3.6/site-packages/pkg_resources/__init__.py", line 2693, in load_entry_point return ep.load() File "/usr/local/python3/lib/python3.6/site-packages/pkg_resources/__init__.py", line 2324, in load return self.resolve() File "/usr/local/python3/lib/python3.6/site-packages/pkg_resources/__init__.py", line 2330, in resolve module = __import__(self.module_name, fromlist=[‘__name__‘], level=0) File "/usr/local/python3/lib/python3.6/site-packages/fabric/main.py", line 13, in <module> from operator import isMappingTypeImportError: cannot import name ‘isMappingType‘# 说明你使用的python版本可fabric版本不同,python3 安装时使用的是fabric3 |
fabric的典型使用方式就是,创建一个Python文件,该文件包含一到多个函数,然后使用fab命令调用这些函数。这些函数在fabric中成为task,下面是一个例子
|
1
2
3
4
5
6
7
8
9
10
11
12
13
14
15
16
17
18
19
20
21
22
23
24
25
26
27
28
29
|
from fabric.api import *from fabric.contrib.console import confirmfrom fabric.utils import abortfrom fabric.colors import *env.hosts = [‘192.168.5.128‘]env.port = 22env.user = ‘root‘env.password = ‘mysql123‘def hostname(): run(‘hostname‘)def ls(path=‘.‘): run(‘ls {0}‘.format(path))def tail(path=‘/etc/pas‘, line=10): run(‘tail -n {0} {1}‘.format(line, path))def hello(): with settings(hide(‘everything‘),warn_only=True): # 关闭显示 result = run(‘anetstat -lntup|grep -w 25‘) print(result) # 命令执行的结果 print(result.return_code) # 返回码,0表示正确执行,1表示错误 print(result.failed) |
PS:fab命令执行时,默认引用一个名为fabfile.py的文件,我们也可以通过-f来进行指定(文件名不能为abc.py,会冲突).
这里使用了三个fabric的封装:
|
1
2
3
4
5
6
7
8
9
10
11
12
13
14
15
16
17
18
19
20
21
22
23
24
25
26
27
28
29
30
31
32
33
34
35
36
|
1、获取任务列表pyvip@Vip:~/utils$ fab -f fab_utils.py --listAvailable commands: hello hostname ls tailpyvip@Vip:~/utils$ fab -f fab_utils.py --listAvailable commands: hello hostname ls tail# 2、执行hostname函数pyvip@Vip:~/utils$ fab -f fab_utils.py hostname[192.168.5.128] Executing task ‘hostname‘[192.168.5.128] run: hostname[192.168.5.128] out: china[192.168.5.128] out:Done.Disconnecting from 192.168.5.128... done.# 3、多个参数的情况pyvip@Vip:~/utils$ fab -f fab_utils.py ls:/[192.168.5.128] Executing task ‘ls‘[192.168.5.128] run: ls /[192.168.5.128] out: bin boot data dev etc home lib lib64 lost+found media misc mnt net opt proc root sbin selinux srv sys tmp usr var[192.168.5.128] out:Done.Disconnecting from 192.168.5.128... done. |
需要注意的是:
fab命令作为fabric程序的入口提供了,丰富的参数调用.
|
1
2
3
4
5
6
7
8
9
10
|
# -l:查看task列表# -f:指定fab的入口文件,默认是fabfile.py# -g:指定网管设备,比如堡垒机环境下,填写堡垒机的IP# -H:在命令行指定目标服务器,用逗号分隔多个服务器# -P:以并行方式运行任务,默认为串行# -R:以角色区分不同的服务# -t:连接超时的时间,以秒为单位# -w:命令执行失败时的警告,默认是终止任务# -- Fabric参数,其他包含fabric脚本的中的参数的快捷操作,比如--user,--port,或者直接跟要执行的Linux命令 |
如下例子,不写一行代码获取所有主机的ip地址
|
1
2
3
4
5
6
7
8
9
10
11
12
13
14
15
|
pyvip@Vip:~/utils$ fab -H 192.168.5.128 --port 22 --user=‘root‘ --password=‘mysql123‘ -- ‘ip a ‘[192.168.5.128] Executing task ‘<remainder>‘[192.168.5.128] run: ip a[192.168.5.128] out: 1: lo: <LOOPBACK,UP,LOWER_UP> mtu 16436 qdisc noqueue state UNKNOWN[192.168.5.128] out: link/loopback 00:00:00:00:00:00 brd 00:00:00:00:00:00[192.168.5.128] out: inet 127.0.0.1/8 scope host lo[192.168.5.128] out: inet6 ::1/128 scope host[192.168.5.128] out: valid_lft forever preferred_lft forever[192.168.5.128] out: 2: eth0: <BROADCAST,MULTICAST,UP,LOWER_UP> mtu 1500 qdisc pfifo_fast state UP qlen 1000[192.168.5.128] out: link/ether 00:0c:29:96:0a:a0 brd ff:ff:ff:ff:ff:ff[192.168.5.128] out: inet 192.168.5.128/24 brd 192.168.5.255 scope global eth0[192.168.5.128] out: inet6 fe80::20c:29ff:fe96:aa0/64 scope link[192.168.5.128] out: valid_lft forever preferred_lft forever[192.168.5.128] out: 3: pan0: <BROADCAST,MULTICAST> mtu 1500 qdisc noop state DOWN[192.168.5.128] out: link/ether 7a:4d:51:6c:c2:cd brd ff:ff:ff:ff:ff:ff |
介绍fabric中的env对象,以及其他的比如执行命令模块,上传文件等。
env是一个全局唯一的字典,保存了Fabric所有的配置,在Fabric的实现中,他是一个_AttributeDict()对象,之所以封装成_AttributeDict()对象,是覆盖了__getattr__和__setattr__,使我们可以使用“对象.属性=值”的方式,操作字典。
我们可以通过源码的方式,查看env的配置参数,或者使用如下方式查看:
|
1
2
3
4
5
6
7
8
9
10
11
12
13
14
15
16
17
18
19
20
21
22
23
24
25
26
27
28
29
30
31
32
33
34
35
36
37
38
39
40
41
42
43
|
import jsonfrom fabric.api import envprint(json.dumps(env, indent=3))def hell(name=‘world‘): print(‘hello %s‘ % name)-----------------------------------------------结果pyvip@Vip:~/utils$ fab -f fab_utils.py -l{ "show": null, "": true, "sudo_user": null, "default_port": "22", "key_filename": null, "path": "", "hosts": [ "192.168.5.128" ], "host_string": null, "ok_ret_codes": [ 0 ], "always_use_pty": true, "fabfile": "fab_utils.py", "echo_stdin": true, "again_prompt": "Sorry, try again.", "command": null, "forward_agent": false, "command_prefixes": [], "cwd": "", "connection_attempts": 1, "linewise": false, "gateway": null, "use_exceptions_for": { "network": false…… |
常用的env配置如下:
针对不同主机不同密码的情况,可以使用如下的方式:
|
1
2
3
4
5
6
7
8
9
|
env.hosts = [ ‘root@192.168.10.201:22‘, ‘root@192.168.10.202:22‘, ‘root@192.168.10.203:22‘]env.passwords = { ‘root@192.168.10.201:22‘:‘123456201‘, ‘root@192.168.10.202:22‘:‘123456202‘, ‘root@192.168.10.203:22‘:‘123456203‘ |
run():在远程服务器上执行Linux命令,还有一个重要的参数pty,如果我们执行命令以后需要有一个常驻的服务进程,那么就需要设置pty=False,避免因为Fabric退出导致进程的退出
|
1
|
run(‘service mysqld start‘,pty=False) |
PS:执行完毕会返回输出的信息,我们可以定义变量接受,同时这个返回信息有一个方法return_code,当返回的是正确执行的结果时code为0,否则不为0
|
1
2
3
4
5
6
|
def hello(): with settings(hide(‘everything‘),warn_only=True): # 关闭显示 result = run(‘anetstat -lntup|grep -w 25‘) print(result) # 命令执行的结果 print(result.return_code) # 返回码,0表示正确执行,1表示错误 |
结果
|
1
2
3
4
5
6
7
|
[192.168.5.128] Executing task ‘hello‘/bin/bash: anetstat: command not found1TrueDone.Disconnecting from 192.168.5.128... done. |
sudo():与run类似,使用管理员权限在远程服务器上执行shell命令,还有一个重要的参数pty,如果我们执行命令以后需要有一个常驻的服务进程,那么就需要设置pty=False,避免因为Fabric退出导致进程的退出。
local():用以执行本地命令,返回要执行的命令,local是对Python的Subprocess模块的封装,更负载的功能可以直接使用Subprocess模块,包含capture参数,默认为False,表示subprocess输出的信息进行显示,如果不想显示,那么指定capture=True即可
|
1
2
3
4
5
6
7
8
9
|
ef test(): result = local(‘make test‘,capture=True) print(result) print(result.failed) print(result.succeeded) # 返回执行的命令# 如果执行失败那么 result.failed 为True# 如果执行成功那么 result.succeeded 为True |
get():从远程服务器上获取文件,通过remote_path参数声明从何处下载,通过local_path表示下载到何处。remote_path支持通配符。
|
1
|
get(remote_path=‘/etc/passwd‘,local_path=‘/tmp/passwd‘) |
put():将本地的文件上传到远程服务器,参数与get相似,此外,还可以通过mode参数执行远程文件的权限配置。
|
1
|
get(remote_path=‘/etc/passwd‘,local_path=‘/tmp/passwd‘) |
reboot():重启远程服务器,可以通过wait参数设置等待几秒钟重启
|
1
2
|
reboot(wait=30) |
propmt():用以在Fabric执行任务的过程中与管理员进行交互,类似于python的input
|
1
2
|
key = prompt(‘Please specify process nice level:‘,key=‘nice‘,validate=int)# 会返回采集到的key |
env中存储的是全局配置,有时候我们并不希望修改全局配置参数,只希望临时修改部分配置,例如:修改当前工作目录,修改日志输出级别等。
在fabric中我们可以通过上下文管理器临时修改参数配置,而不会影响全局配置。当程序进入上下文管理器的作用域时,临时修改就会起作用;当程序离开上下文管理器时,临时修改就会消失。
cd():切换远程目录
|
1
2
3
4
|
def change(dir=‘/tmp‘): with cd(dir): run(‘pwd‘) # /tmp run(‘pwd‘) # /root |
lcd():切换本地目录
path():配置远程服务器PATH环境变量,只对当前会话有效,不会影响远程服务器的其他操作,path的修改支持多种模式
|
1
2
3
4
|
def addpath(): with path(‘/tmp‘,‘prepend‘): run("echo $PATH") run("echo $PATH") |
prefix():前缀,它接受一个命令作为参数,表示在其内部执行的代码块,都要先执行prefix的命令参数。
|
1
2
3
4
5
6
7
8
9
|
def testprefix(): with cd(‘/tmp‘): with prefix(‘echo 123‘): run(‘echo 456‘) run(‘echo 789‘) # 转换为Linux命令为:cd /tmp && echo ‘123‘ && echo ‘456‘cd /tmp && echo ‘123‘ && echo ‘789‘ |
shell_env():设置shell脚本的环境变量
|
1
2
3
4
5
6
7
|
def setenv(): with shell_env(HTTP_PROXY=‘1.1.1.1‘): run(‘echo $HTTP_PROXY‘) run(‘echo $HTTP_PROXY‘) # 等同于shell中的exportexport HTTP_PROXY=‘1.1.1.1‘ |
settings():通用配置,用于临时覆盖env变量
|
1
2
3
4
|
def who(): with settings(user=‘dev‘): # 临时修改用户名为dev run(‘who‘) run(‘who‘) |
remote_tunnel():通过SSH的端口转发建立的链接
|
1
2
|
with remote_tunnel(3306): run(‘mysql -uroot -p password‘) |
hide():用于隐藏指定类型的输出信息,hide定义的可选类型有7种
为了方便使用,fabric对以上其中类型做了进一步的封装
show():与hide相反,表示显示指定类型的输出
|
1
2
3
4
5
6
|
def hello(): with settings(show(‘everything‘),warn_only=True): # 显示所有 result = run(‘netstat -lntup|grep‘) print(‘1=‘+result) # 命令执行的结果 print(‘2=‘+str(result.return_code)) # 返回码,0表示正确执行,1表示错误 print(‘3=‘+str(result.failed)) |
结果
|
1
2
3
4
5
6
7
8
9
10
11
12
13
14
15
16
17
18
19
|
pyvip@Vip:~/utils$ fab -f fab_utils.py hello[192.168.5.128] Executing task ‘hello‘[192.168.5.128] run: netstat -lntup|grep[192.168.5.128] out: 用法: grep [选项]... PATTERN [FILE]...[192.168.5.128] out: 试用‘grep --help’来获得更多信息。[192.168.5.128] out:Warning: run() received nonzero return code 2 while executing ‘netstat -lntup|grep‘!NoneType1=用法: grep [选项]... PATTERN [FILE]...试用‘grep --help’来获得更多信息。2=23=TrueDone. |
quiet():隐藏全部输出,仅在执行错误的时候发出告警信息,功能等同于 with settings(hide(‘everything‘),warn_only=True) .
|
1
2
|
# 比如创建目录的时候,如果目录存在,默认情况下Fabric会报错退出,我们是允许这种错误的,所以针对这种错误,我们进行如下设置,使fabric只打出告警信息而不会中断执行。with settings(warn_only=True) |
Fabric提供的命令一般都是执行某一个具体的操作,提供的上下文管理器一般都是用于临时修改配置参数,而fabric提供的装饰器,既不是执行具体的操作,也不是修改参数,而是控制如何执行这些操作,在那些服务器上执行这些操作,fabric的装饰器与人物执行紧密相关。下面从几个方面来进行说明
task就是fabric需要在远程服务器上执行的函数,在fabric中有3中方法定义一个task
|
1
2
3
4
5
6
7
8
9
10
11
|
from fabric.api import * env.user=‘root‘env.password=‘mysql123‘ @taskdef hello(): run(‘echo hello‘) def world(): run(‘echo world‘) |
PS:默认情况下,fabfile中的所有函数对象都是一个task,但是如果我们使用了task装饰器,显示的定义了一个task,那么,其他没有通过task装饰器装饰的函数将不会被认为是一个task。
为了方便我们的使用,fabric提供了非常灵活的方式指定对哪些远程服务器执行操作,根据我们前面的知识,我们知道有两种方式:通过env.hosts来执行,或者在fab执行命令的时候使用-H参数,除此之外,还有以下需要注意的地方
|
1
2
3
4
5
6
7
8
9
10
11
12
13
14
15
16
17
18
19
20
21
|
from fabric.api import * env.hosts = [ ‘root@192.168.10.201:22‘, ‘root@192.168.10.202:22‘, ‘root@192.168.10.203:22‘]env.passwords = { ‘root@192.168.10.201:22‘:‘123456201‘, ‘root@192.168.10.202:22‘:‘123456202‘, ‘root@192.168.10.203:22‘:‘123456203‘} @hosts(‘root@192.168.10.201:22‘)@taskdef hello(): run(‘ifconfig br0‘) # 命令行的方式:fab hello:hosts="root@192.168.10.201;root@192.168.10.202" |
role是对服务器进行分类的手段,通过role可以定义服务器的角色,以便对不同的服务器执行不同的操作,Role逻辑上将服务器进行了分类,分类以后,我们可以对某一类服务器指定一个role名即可。进行task任务时,对role进行控制。
|
1
2
3
4
5
6
7
8
9
10
11
12
13
14
15
16
17
18
19
20
21
22
23
24
|
# role在env.roledefs中进行定义env.roledefs = { ‘web‘:[‘root@192.168.10.201‘,‘192.168.10.202‘] # role名称为:web ‘db‘:[‘root@192.168.10.203‘,] # role名称为:db} 当我们定义好role以后,我们就可以通过roles装饰器来指定在哪些role上运行task。from fabric.api import * env.roledefs = { ‘web‘:[‘root@192.168.10.201:22‘,‘root@192.168.10.202:22‘,], ‘db‘:[‘root@192.168.10.203:22‘,]}env.passwords = { ‘root@192.168.10.201:22‘:‘123456201‘, ‘root@192.168.10.202:22‘:‘123456202‘, ‘root@192.168.10.203:22‘:‘123456203‘} @roles(‘db‘) # 只对role为db的主机进行操作@taskdef hello(): run(‘ifconfig br0‘) |
注意:hosts装饰器可以和roles装饰器一起使用(全集),看起来容易造成混乱,不建议混搭。
fabric执行任务的步骤如下:
PS:关于并行模式:
前面介绍了task,hosts,roles和parallel装饰器,此外还有两个装饰器比较常用
fabric中还有其他的一些好用的函数
fabric提供了一个execute函数,用来对task进行封装。它最大的好处就是可以将一个大的任务拆解为很多小任务,每个小任务互相独立,互不干扰
|
1
2
3
4
5
6
7
8
9
10
11
12
13
14
15
16
17
18
19
20
21
22
23
24
|
from fabric.api import * env.roledefs = { ‘web‘:[‘root@192.168.10.201:22‘,‘root@192.168.10.202:22‘,], ‘db‘:[‘root@192.168.10.203:22‘,]}env.passwords = { ‘root@192.168.10.201:22‘:‘123456201‘, ‘root@192.168.10.202:22‘:‘123456202‘, ‘root@192.168.10.203:22‘:‘123456203‘} @roles(‘db‘)def hello(): run(‘echo hello‘) @roles(‘web‘)def world(): run(‘echo world‘) @taskdef helloworld(): execute(hello) execute(world) |
# 函数helloworld作为入口,分别调用两个task,对不同的主机进行操作
包含一些辅助行的功能函数,这些函数位于fabric.utils下,常用的函数如下:
|
1
2
3
4
5
6
|
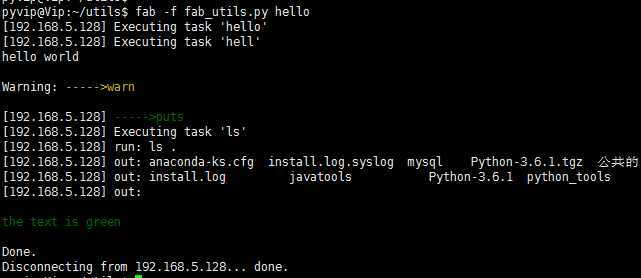
def helloworld(): execute(hello) abort(‘----->abort‘) # 执行到这里时,直接退出 warn(‘----->warn‘) # 会发出提示信息,不会退出 puts(‘----->puts‘) # 会打印括号中的信息 execute(world) |
fabric为了让输出日志更具有可读性,对命令行中断的颜色输出进行了封装,使用print打印带有不同颜色的文本,这些颜色包含在fabric.colors中。像warn,puts打印输出的,也可以直接渲染颜色
|
1
2
3
4
5
6
7
8
9
10
11
12
13
|
def ls(path=‘.‘): run(‘ls {0}‘.format(path))def hello(): execute(hell) # task任务hell warn(yellow(‘----->warn‘)) # 会发出提示信息,不会退出 puts(green(‘----->puts‘)) # 会打印括号中的信息 execute(ls) # task任务ls print(green(‘the text is green‘)) # 单纯的渲染文字:def hell(name=‘world‘): print(‘hello %s‘ % name) |
有时候我们在某一步执行错误,会给用户提示,是否继续执行时,confirm就非常有用了,它包含在 fabric.contrib.console中
|
1
2
3
4
5
6
7
8
9
|
def testconfirm(): result = confirm(‘Continue Anyway?‘) print(result) # 会提示输入y/n# y 时 result为True# n 时 result为False |
下载一个redis的包和fabfile.py放在同级目录即可,不同目录需要修改包的位置,这里使用的是redis-4.0.9版本。
|
1
2
3
4
5
6
7
8
9
10
11
12
13
14
15
16
17
18
19
20
21
22
23
24
25
26
27
28
29
30
31
32
33
34
35
36
37
38
39
40
41
42
43
44
45
46
47
48
49
50
51
52
53
54
55
56
57
58
|
#!/usr/bin/env python3from fabric.api import *from fabric.contrib.console import confirmfrom fabric.utils import abortfrom fabric.colors import * env.hosts = [‘192.168.10.202‘,]env.user = ‘root‘env.password = ‘123456202‘ @runs_once@taskdef test(): with settings(warn_only=True): local(‘tar xf redis-4.0.9.tar.gz‘) with lcd(‘redis-4.0.9‘): result = local(‘make test‘,capture=True) if result.failed and not confirm(‘Test is Faild Continue Anyway?‘): abort(‘Aborting at user request.‘) with lcd(‘redis-4.0.9‘): local("make clean") local(‘tar zcvf redis-4.0.10.tar.gz redis-4.0.9‘) @taskdef deploy(): put(‘redis-4.0.10.tar.gz‘,‘/tmp/‘) with cd(‘/tmp‘): run(‘tar xf redis-4.0.10.tar.gz‘) with cd(‘redis-4.0.9‘): sudo(‘make install‘) @taskdef start_redis(): with settings(warn_only=True): result = run(‘netstat -lntup | grep -w redis-server‘) if result.return_code == 0: print(green(‘redis is started!‘)) else: run(‘set -m ; /usr/local/bin/redis-server &‘) # 用pty=False, fabric进程退不出来,不知道为啥,所以这里用set -m print(green(‘redis start Successful‘)) @taskdef clean_local_file(): local(‘rm -rf redis-4.0.10.tar.gz‘) @taskdef clean_file(): with cd(‘/tmp‘): sudo(‘rm -rf redis-4.0.9‘) sudo(‘rm -rf redis-4.0.10.tar.gz‘) @taskdef install(): execute(test) execute(deploy) execute(clean_file) execute(clean_local_file)<br><code class="python spaces hljs"> </code><code class="python plain hljs">execute(start_redis)</code> |
|
1
2
3
|
PS:关于set -m 的作用如下:"set -m" turns on job control, you can run processes in a separate process group.<br>理解:在一个独立的进程组里面运行我们的进程。 |
http://www.cnblogs.com/dachenzi/p/8695330.html
原文:https://www.cnblogs.com/ExMan/p/12463154.html