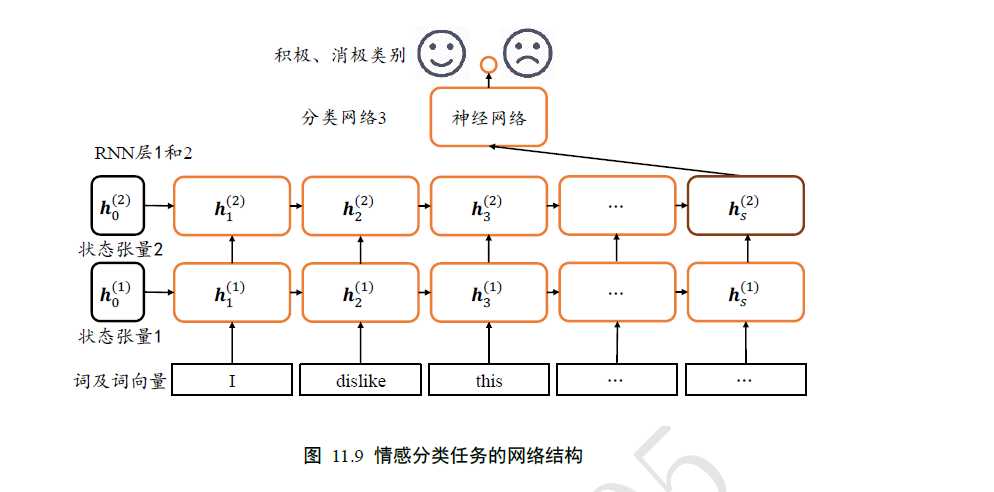
网络结构:
代码如下:
  1 # encoding: utf-8
  2 import tensorflow as tf
  3 from tensorflow import keras
  4 from tensorflow.keras import layers, losses, optimizers, Model
  5 # from exam_rnn import MyRNN  # (可以分离写)
  6
  7 batchsz = 128  # 批量大小
  8 total_words = 10000  # 词汇表大小N_vocab
  9 max_review_len = 80  # 句子最大长度s,大于的句子部分将截断,小于的将填充
 10 embedding_len = 100  # 词向量特征长度n
 11 # 加载IMDB 数据集,此处的数据采用数字编码,一个数字代表一个单词
 12 (x_train, y_train), (x_test, y_test) = keras.datasets.imdb.load_data(num_words=total_words)
 13 # 打印输入的形状,标签的形状
 14 print(x_train.shape, len(x_train[0]), y_train.shape)  # (25000,) 218 (25000,)
 15 print(x_test.shape, len(x_test[0]), y_test.shape)  # (25000,) 68 (25000,)
 16
 17 ‘‘‘# 查看编码
 18 # 数字编码表
 19 word_index = keras.datasets.imdb.get_word_index()
 20 # 打印出编码表的单词和对应的数字
 21 # for k,v in word_index.items():
 22 #     print(k,v)
 23
 24 # 前面4 个ID 是特殊位
 25 word_index = {k: (v + 3) for k, v in word_index.items()}
 26 word_index["<PAD>"] = 0  # 填充标志
 27 word_index["<START>"] = 1  # 起始标志
 28 word_index["<UNK>"] = 2  # 未知单词的标志
 29 word_index["<UNUSED>"] = 3
 30 # 翻转编码表
 31 reverse_word_index = dict([(value, key) for (key, value) in
 32                            word_index.items()])
 33
 34
 35 # 对于一个数字编码的句子,通过如下函数转换为字符串数据:
 36 def decode_review(text):
 37     return ‘ ‘.join([reverse_word_index.get(i, ‘?‘) for i in text])
 38
 39
 40 print(decode_review(x_train[0]))
 41 ‘‘‘
 42
 43 # 截断和填充句子,使得等长,此处长句子保留句子后面的部分,短句子在前面填充
 44 x_train = keras.preprocessing.sequence.pad_sequences(x_train, maxlen=max_review_len)
 45 x_test = keras.preprocessing.sequence.pad_sequences(x_test, maxlen=max_review_len)
 46
 47 # 构建数据集,打散,批量,并丢掉最后一个不够batchsz 的batch
 48 db_train = tf.data.Dataset.from_tensor_slices((x_train, y_train))
 49 db_train = db_train.shuffle(1000).batch(batchsz, drop_remainder=True)
 50 db_test = tf.data.Dataset.from_tensor_slices((x_test, y_test))
 51 db_test = db_test.batch(batchsz, drop_remainder=True)
 52
 53 print(‘x_train shape:‘, x_train.shape, tf.reduce_max(y_train), tf.reduce_min(y_train))
 54 # x_train shape: (25000, 80) tf.Tensor(1, shape=(), dtype=int64) tf.Tensor(0, shape=(), dtype=int64)
 55 print(‘x_test shape:‘, x_test.shape)
 56 # x_test shape: (25000, 80)
 57
 58
 59 class MyRNN(Model):
 60     # Cell 方式构建多层网络
 61     def __init__(self, units):
 62         super(MyRNN, self).__init__()
 63         # [b, 64],构建Cell 初始化状态向量,重复使用
 64         self.state0 = [tf.zeros([batchsz, units])]  # 128,64
 65         self.state1 = [tf.zeros([batchsz, units])]  # 128,64
 66         # 词向量编码 [b, 80] => [b, 80, 100]
 67         self.embedding = layers.Embedding(total_words, embedding_len, input_length=max_review_len)
 68         # 构建2 个Cell,使用dropout 技术防止过拟合
 69         self.rnn_cell0 = layers.SimpleRNNCell(units)# , dropout=0.5)
 70         self.rnn_cell1 = layers.SimpleRNNCell(units)#, dropout=0.5)
 71         # 构建分类网络,用于将CELL 的输出特征进行分类,2 分类
 72         # [b, 80, 100] => [b, 64] => [b, 1]
 73         self.outlayer = layers.Dense(1)
 74
 75     def call(self, inputs, training=None):
 76         x = inputs  # [128, 80]
 77         # 获取词向量: [128, 80] => [128, 80, 100]
 78         x = self.embedding(x)
 79         # 通过2 个RNN CELL,[128, 80, 100] => [128, 64]
 80         state0 = self.state0
 81         state1 = self.state1
 82         for word in tf.unstack(x, axis=1):  # word: [128, 100]
 83             out0, state0 = self.rnn_cell0(word, state0, training)
 84             out1, state1 = self.rnn_cell1(out0, state1, training)
 85
 86         # 末层最后一个输出作为分类网络的输入: [128, 64] => [128, 1]
 87         x = self.outlayer(out1)
 88         # 通过激活函数,p(y is pos|x)
 89         prob = tf.sigmoid(x)
 90         return prob
 91
 92
 93 def main():
 94     units = 64  # RNN 状态向量长度n
 95     epochs = 20  # 训练epochs
 96     model = MyRNN(units)  # 创建模型
 97     # 装配
 98     model.compile(optimizer=optimizers.Adam(0.001),
 99                   loss=losses.BinaryCrossentropy(), metrics=[‘accuracy‘],
100                   experimental_run_tf_function=False)
101     # 训练和验证
102     model.fit(db_train, epochs=epochs, validation_data=db_test)
103     # 测试
104     scores = model.evaluate(db_test)
105     print("Final test loss and accuracy :", scores)
106
107
108 if __name__ == ‘__main__‘:
109     main()
测试的误差和准确率:
Final test loss and accuracy : [1.3201157276447002, 0.80188304]
下一次更新:LSTM情感分类问题
tensorflow 2.0 学习 (十四)循环神经网络 IMDB数据集与RNN情感分类网络
原文:https://www.cnblogs.com/heze/p/12352983.html