webpack是一款模块加载器兼打包工具,它能把各种资源,例如JS(含JSX)、coffee、样式(含less/sass)、图片等都作为模块来使用和处理,它能有Grunt或Gulp所有基本功能。
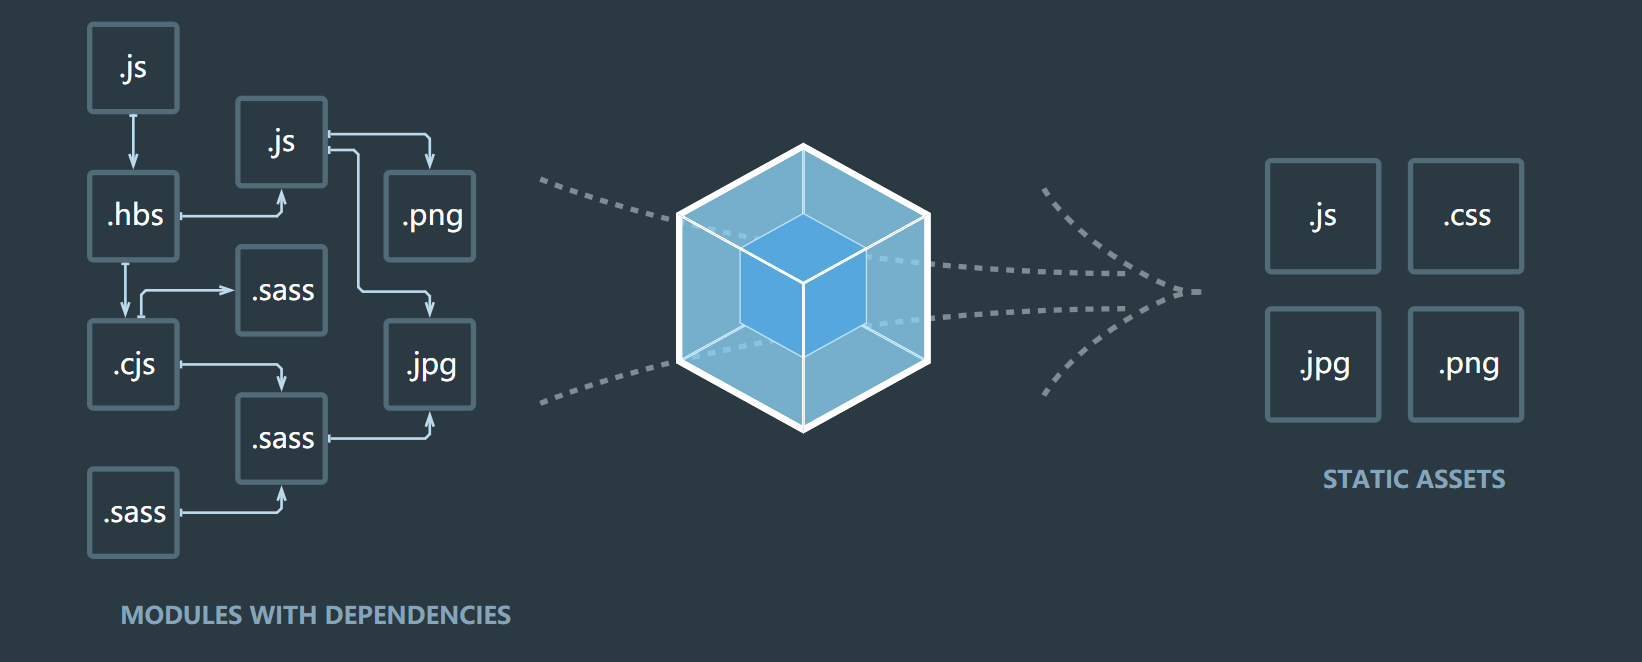
我们看下webpack官方文档给出的图,看上去就很高级对不对,看看他有啥好用的地方
反正就是十分厉害??,我也不叨叨叨继续吹了,开始学习webpack吧
自行在node官网,选择合适电脑的版本进行下载,并安装,通过node -v检查是否安装成功
npm install webpack webpack-cli --save
在项目的根目录中,运行上述命令,安装webpack脚手架
在项目的根目录中新建webpack的配置文件 webpack.config.js,并且初始化配置文件
module.exports = {
    mode:'development'  //选择模式,是开发模式,还是生产模式(production)
}修改package.json文件
"scripts": {
    "test": "echo \"Error: no test specified\" && exit 1",
    "dev": "webpack"
}创建文件夹,我这文件夹的名字叫demoWebpack,创建完之后在编辑器中打开,我这用的是VSCode,点击Terminal中new terminal,在TERMINAL中输入npm init -y,文件夹中就会多一个package.json文件
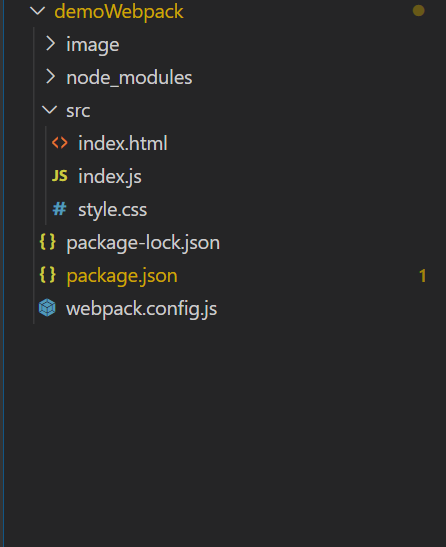
在项目中新建src文件夹,之后的源代码都会放在这
在src文件夹中,新建一个index.html作为首页,然后创建其他的css,js文件
再项目根目录下再创建image文件夹,用来存放图片
最后的项目结构是这个样子的
index.html(为了检验写的css和js都正确,所以我这先把他引入,看了下效果)
<!DOCTYPE html>
<html lang="en">
<head>
    <meta charset="UTF-8">
    <meta name="viewport" content="width=device-width, initial-scale=1.0">
    <title>Document</title>
    <link rel="stylesheet" href="style.css">
</head>

<body>
    <div>
        <div class="box1"></div>
        <img src="../image/1.jpeg" alt="" srcset="">
    </div>
    <script src="./index.js"></script>
</body>
</html>
index.js
(function(){
    let arr = [1,2,3,4,5];
    arr.forEach((item) => {
        console.log(item)
    })
})();
document.getElementsByTagName('div')[1].addEventListener('click', function () {
    console.log(this)
    this.className = 'box2'
})
style.css
.box1{
    width: 100px;
    height: 100px;
    background-color: yellowgreen;
}
.box2{
    transition: 2s;
    transform:translateX(300px) ;
    width: 100px;
    height: 100px;
    background-color: teal;
    border-radius: 50%;
}运行npm run dev,就会发现多出来个dist文件夹,里面有个main.js,这是我们就写了mode出来的文件
修改index.html引入js的代码
<script src="../dist/bundle.js"></script>webpack4.x版本中默认入口文件是src文件下的index.js,打包出口dist 文件夹下的 main.js,如果需要修改出入口,可以再webpack.config.js内进行修改
const Path = require('path')

module.exports = {
    mode:'development',  //选择模式,是开发模式,还是生产模式(produce)
    entry: Path.join(__dirname, './src/index.js'),//打包文件入口路径
    output: {
        path: Path.join(__dirname, './dist'),//输出文件存放路径
        filename: 'bundle.js'//输出文件名称
    },
}npm install webpack-dev-server --save
运行上述命令行安装支持项目自动打包的工具,修改package.json中的配置
"scripts": {
    "test": "echo \"Error: no test specified\" && exit 1",
    "dev": "webpack-dev-server"
}修改index.html引入js,css的代码(项目的src文件夹下,会有一个看不见的bundle.js文件)
<link rel="stylesheet" href="../src/style.css">
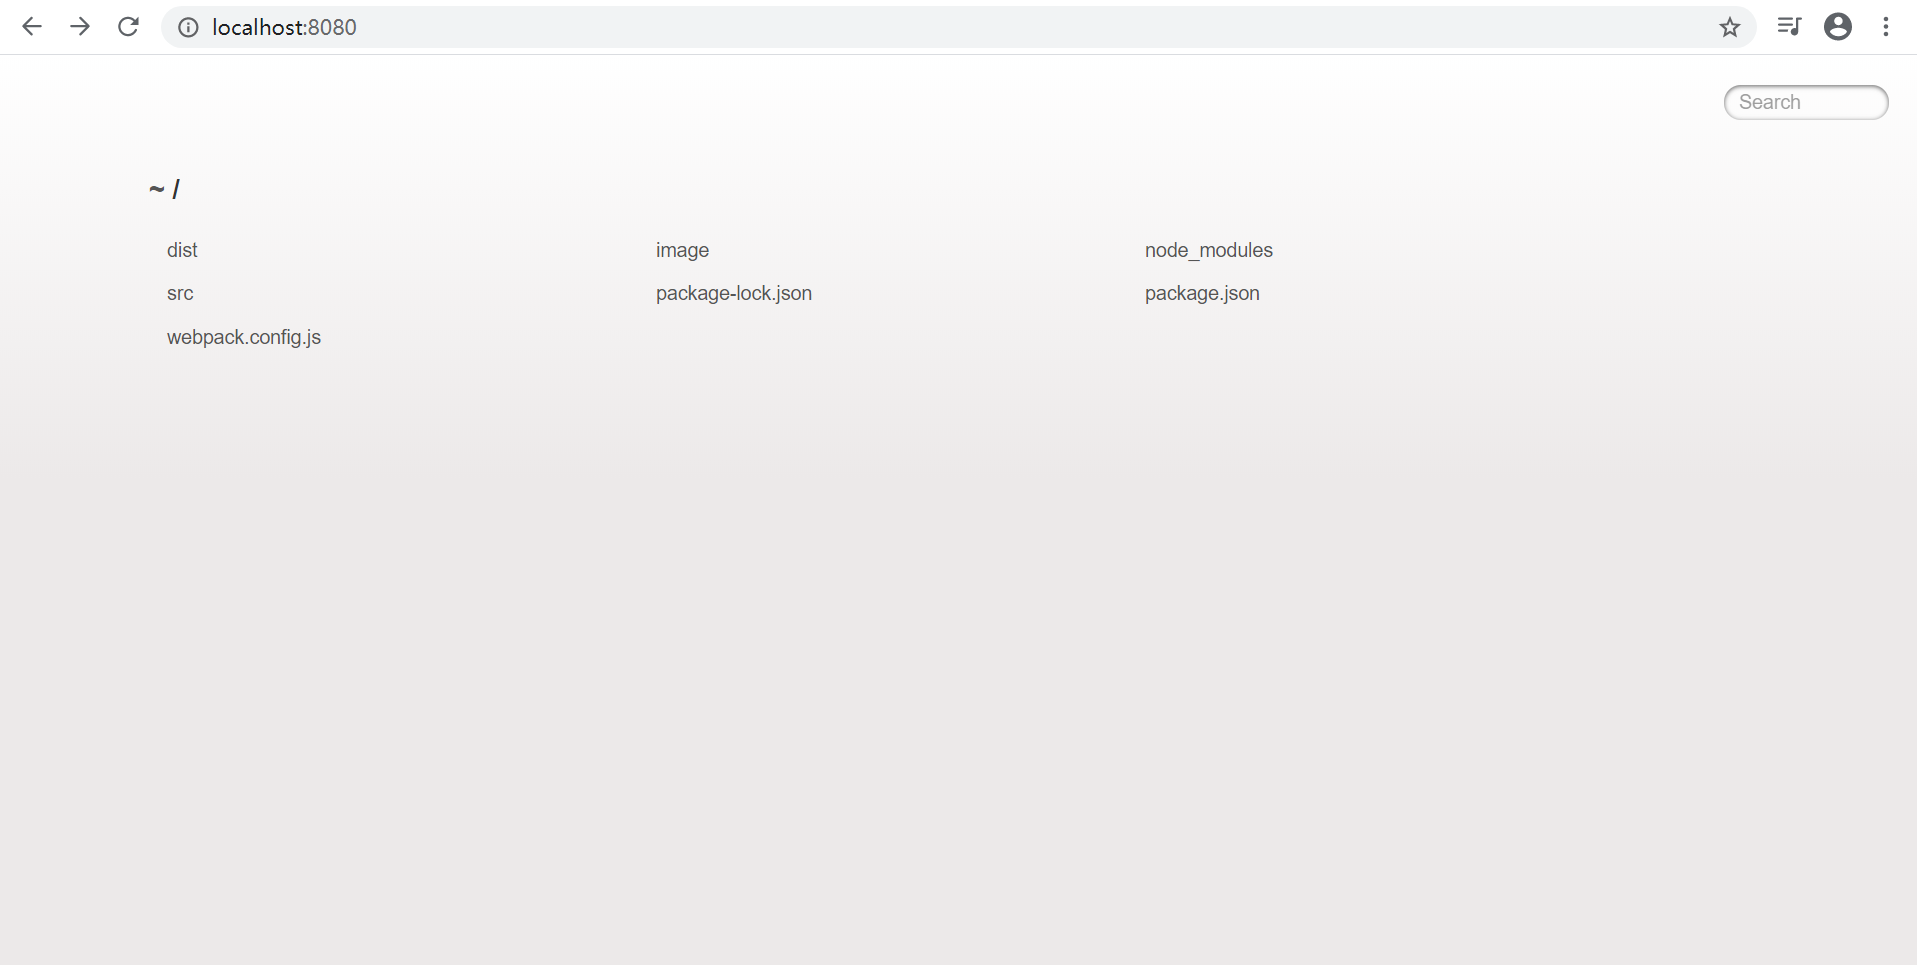
<script src="/bundle.js"></script>重新运行 npm run dev,打开 http://localhost:8080 你会看到整个项目的文件夹都显示在页面上了
进入src中的index.html页面,修改js文件,项目就会自动打包,都不需要刷新浏览器,自动就会出现最新效果
打开 http://localhost:8080/ 还需要点开src文件夹,着实鸡肋,最好我们打开http://localhost:8080/就能出现页面,那我们操作吧
npm install html-webpack-plugin --save
安装生成预览页面的插件,修改webpack.config.js文件
const HtmlWebpackPlugin = require('html-webpack-plugin')//插件用于生成预览页面
const htmlPlugin = new HtmlWebpackPlugin({
    template: './src/index.html',//指定要用到的模板文件
    filename: 'index.html' //指定生成的文件的名称,该文件存在于内存中,在目录中显示
})
module.exports = {
    plugins: [htmlPlugin], //plugins数组是webpack打包期间会用到的一些插件列表
}运行npm run dev,打开 http://localhost:8080 就会直接看到页面,如果想要运行之后在浏览器直接打开http://localhost:8080,需要配置一下package.json文件
"scripts": {
    "test": "echo \"Error: no test specified\" && exit 1",
    "dev": "webpack-dev-server --open",
},
--open 表示打包完自动打开浏览器页面
如果你还想指定ip地址和端口打开的话,就需要再配置中新增host和port,例如"dev": "webpack-dev-server --open --host 127.0.0.1 --port 8081",这就会打开http://127.0.0.1:8081/这个页面
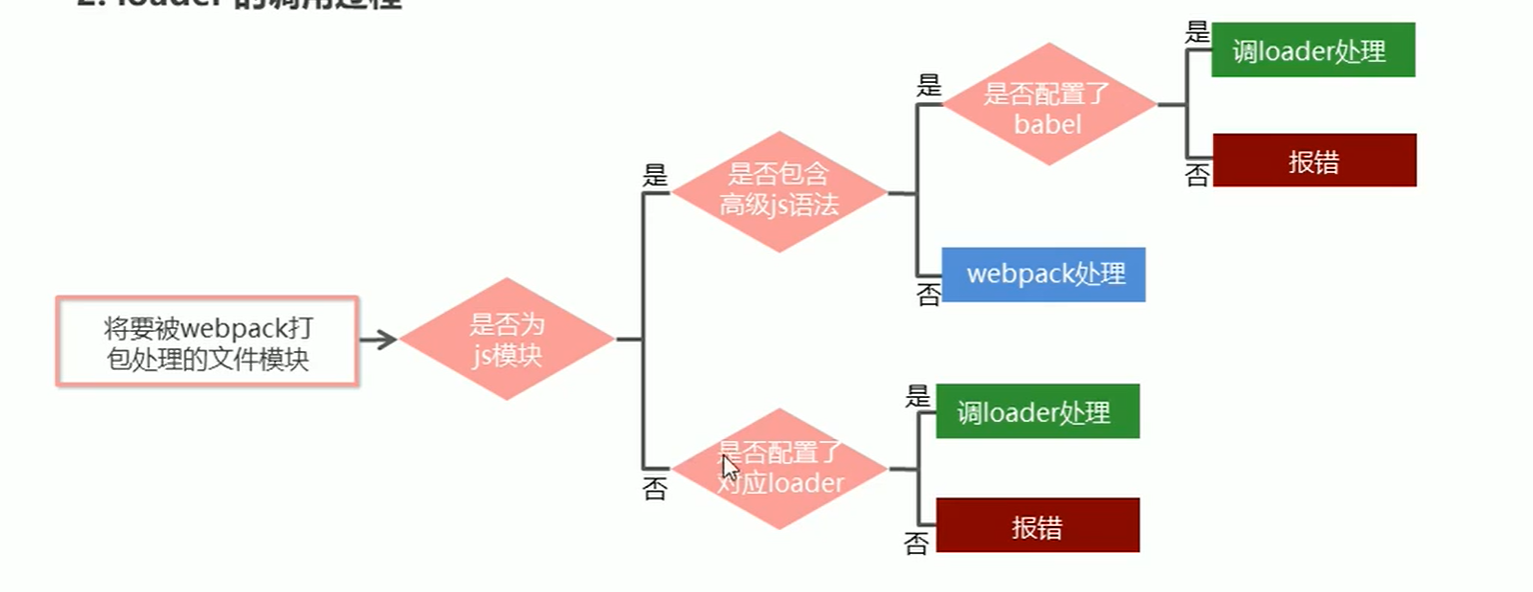
webpack默认只能打包.js结尾的文件,非.js结尾的模块webpack打包不了,需要调用相应的loader加载器才可以正常打包,我们看下loader打包的过程
我们现在不用页面引入css的方式来载入css样式,我们将css文件在index.js中import进去,保存后,你会发现,控制台立即就飘红了
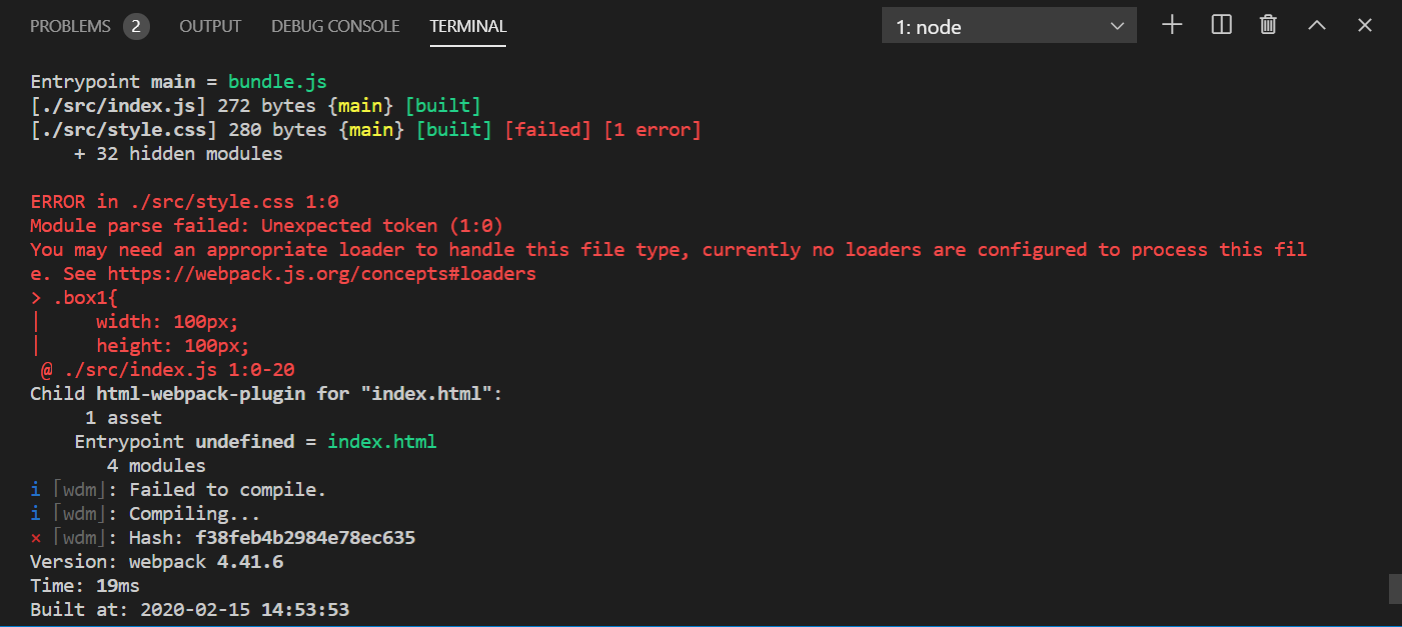
大概的意思就是,没有css的加载器,所以现在我们要安装css的loader
npm install style-loader css-loader --save
安装完成后,在webpack.config.js文件中,配置相应的规则
module: {//所有第三方文件模块匹配规则
     rules: [
        {
            test: /\.css$/,
            use: ['style-loader', 'css-loader']    //test表示匹配的文件类型,use表示需要调用的loader
        }
    ]
}修改index.js
import "./style.css"npm run dev,运行,之前的报错已经消失了,页面也出现了
打包处理less/sass文件也是类似的过程,我这就写一下less吧
npm install less-loader less --savewebpack.config.js添加相应的规则module: {//所有第三方文件模块匹配规则
rules: [
{
test: /\.less$/,
use: ['style-loader', 'css-loader','less-loader'] //test表示匹配的文件类型,use表示需要调用的loader
}
]
}all.less
body{
    background-color: pink;

    img{
        border-radius: 50%;
        width: 500px;
        height: 500px;
    }
}
index.js
import "./all.less";重新运行,就可以看到all.less中写的样式了,要用sass的话也是一样的步骤哦
安装对应加载器npm install postcss-loader autoprefixer --save
在根目录下创建postcss的配置文件postcss.config.js
const autoprefixer = require('autoprefixer')    //导入自动添加前缀的插件
module.exports = {
    plugins: [autoprefixer]  //挂载插件
}修改webpack.config.js
{
    test: /\.css$/,
    use: ['style-loader', 'css-loader','postcss-loader']    //test表示匹配的文件类型,use表示需要调用的loader
},重新运行npm run dex,就ok了
安装对应loader npm install url-loader file-loader --save
在webpack.config.js添加相应的规则
{
    test:/\.jpg|jpeg|png|gif|bmp|ttf|eot|svg|woff|woff2$/,
    use:['url-loader?limit=15000']
},我们把all.less body的背景颜色改成背景图片
body{
    background:url(../image/1.jpeg);
}重新运行npm run dex,ok
本来打算在index.js中写一些js的高级语法,比如说async+promise,class这类的东西,记得之前写的时候,是需要安装babel,不然会报错,但是,我今天试的时候,发现不用babel,竟然也不会报错了,真是神奇,但是为了避免,我这边可能有什么意外,导致不用安装babel就可以成功,所以还是把安装使用babel的步骤写出来,如果你写这种语法报错,可以按照这个教程来解决这个问题
npm install babel-loader @babel/core @babel/runtime --savenpm install @babel/preset-env @babel/plugin-transform-runtime @babel/plugin-proposal-class-properties --savebabel.config.jsmodule.exports = {
presets: ['@babel/preset-env'],
plugins: ['@babel/plugin-transform-runtime', '@babel/plugin-proposal-class-properties']
}在webpack.config.js添加相应的规则
{
test:/\.js$/,
use:['babel-loader'],
exclude:/node_modules/
},exclude:/node_modules/表示babel-loader不需要处理node_modules文件夹内的js文件
index.js修改如下
import "./style.css";
import "./all.less";
(function(){
let arr = [1,2,3,4,5];
arr.forEach((item) => {
console.log(item)
})
})();
document.getElementsByTagName('div')[1].addEventListener('click', function () {
console.log(this)
this.className = 'box2'
})
function hanleTime(){
return new Promise((resolve,reject) => {
setTimeout(() => {
resolve('我是个异步函数')
}, 2000);
})
}
async function asyncUtil(){
let result = await hanleTime()
console.log(result)
}
asyncUtil()
class Person {
//类的构造函数
constructor(name, age) {
this.name = name
this.age = age
}
//这个方法相当于构造函数Person2.prototype.showName = function () {}创建出来的方法
// showName(),供实例对象使用
showName() {
console.log(this.name, this.age)
}
//这个是Person类自身的方法,实例对象不能使用
static test() {
console.log('hahahahhah')
}
}
let person = new Person('Bob',23)
person.showName()运行就行了
安装 npm install vue-loader vue-template-compiler --save
配置webpack.config.js
const VueLoaderPlugin = require('vue-loader/lib/plugin')
module.exports = {
...
plugins: [new VueLoaderPlugin()]
{
test:/\.vue$/,
loader:'vue-loader'
}
]
}
}创建App.vue文件
<template>
<div>
<h1>我是vue组件</h1>
</div>
</template>
<script>
export default {
name:'App',
data(){
return{
}
}
}
</script>
<style scoped>
</style>index.js修改如下
import "./App.vue"安装 npm install vue --save
在src``文件夹下的index.js```文件中,引入vue,创建 vue 的实例对象,并指定要控制el区域,然后通过render函数渲染App根组件
//导入Vue构造函数
import Vue from "vue"
//导入App根组件
import App from "./App.vue"
const vm = new Vue({
//指定vm实例要控制的页面区域
el:"#app",
//通过render函数,把指定的组件渲染到el区域中
render:h => h(App)
})在index.html中添加id为app的盒子
<div id="app"></div>此时网页中就会出现“我是vue组件”这几个字
修改package.json
"scripts": {
"test": "echo \"Error: no test specified\" && exit 1",
"dev": "webpack-dev-server --open --host 127.0.0.1 --port 8081",
"build":"webpack -p"
},运行npm run build就可以打包了
好了,到这所有的步骤就都结束了,附上所有的代码
webpack.config.js
const Path = require('path')
const HtmlWebpackPlugin = require('html-webpack-plugin')//插件用于生成预览页面
const VueLoaderPlugin = require('vue-loader/lib/plugin')
const htmlPlugin = new HtmlWebpackPlugin({
template: './src/index.html',//指定要用到的模板文件
filename: 'index.html' //指定生成的文件的名称,该文件存在于内存中,在目录中显示
})
module.exports = {
mode: 'development', //选择模式,是开发模式,还是生产模式(produce)
entry: Path.join(__dirname, './src/index.js'),//打包文件入口路径
output: {
path: Path.join(__dirname, './dist'),//输出文件存放路径
filename: 'bundle.js'//输出文件名称
},
plugins: [htmlPlugin,new VueLoaderPlugin()], //plugins数组是webpack打包期间会用到的一些插件列表
//webpack只能打包.js文件,当需要打包其他非.js文件需要调用loader加载器进行打包
module: {//所有第三方文件模块匹配规则
rules: [
{
test: /\.css$/,
use: ['style-loader', 'css-loader','postcss-loader'] //test表示匹配的文件类型,use表示需要调用的loader
},
{
test: /\.less$/,
use: ['style-loader', 'css-loader','less-loader']
},
{
test:/\.jpg|jpeg|png|gif|bmp|ttf|eot|svg|woff|woff2$/,
use:['url-loader?limit=15000']
},
{
test:/\.js$/,
use:['babel-loader'],
exclude:/node_modules/
},
{
test:/\.vue$/,
loader:'vue-loader'
}
]
}
}index.js
import "./style.css";
import "./all.less";
(function(){
let arr = [1,2,3,4,5];
arr.forEach((item) => {
console.log(item)
})
})();
document.getElementsByTagName('div')[1].addEventListener('click', function () {
console.log(this)
this.className = 'box2'
})
function hanleTime(){
return new Promise((resolve,reject) => {
setTimeout(() => {
resolve('我是个异步函数')
}, 2000);
})
}
async function asyncUtil(){
let result = await hanleTime()
console.log(result)
}
asyncUtil()
class Person {
//类的构造函数
constructor(name, age) {
this.name = name
this.age = age
}
//这个方法相当于构造函数Person2.prototype.showName = function () {}创建出来的方法
// showName(),供实例对象使用
showName() {
console.log(this.name, this.age)
}
//这个是Person类自身的方法,实例对象不能使用
static test() {
console.log('hahahahhah')
}
}
let person = new Person('Bob',23)
person.showName()
//导入Vue构造函数
import Vue from "vue"
//导入App根组件
import App from "./App.vue"
const vm = new Vue({
//指定vm实例要控制的页面区域
el:"#app",
//通过render函数,把指定的组件渲染到el区域中
render:h => h(App)
})package.json
{
"name": "demoWebpack",
"version": "1.0.0",
"description": "",
"main": "index.js",
"scripts": {
"test": "echo \"Error: no test specified\" && exit 1",
"dev": "webpack-dev-server --open --host 127.0.0.1 --port 8081",
"build":"webpack -p"
},
"keywords": [],
"author": "",
"license": "ISC",
"dependencies": {
"@babel/core": "^7.8.4",
"@babel/plugin-proposal-class-properties": "^7.8.3",
"@babel/plugin-transform-runtime": "^7.8.3",
"@babel/preset-env": "^7.8.4",
"@babel/runtime": "^7.8.4",
"autoprefixer": "^9.7.4",
"babel-loader": "^8.0.6",
"css-loader": "^3.4.2",
"file-loader": "^5.0.2",
"html-webpack-plugin": "^3.2.0",
"less": "^3.11.1",
"less-loader": "^5.0.0",
"postcss-loader": "^3.0.0",
"style-loader": "^1.1.3",
"url-loader": "^3.0.0",
"vue": "^2.6.11",
"vue-loader": "^15.9.0",
"vue-template-compiler": "^2.6.11",
"webpack": "^4.41.6",
"webpack-cli": "^3.3.11",
"webpack-dev-server": "^3.10.3"
}
}App.vue
<template>
<div>
<h1>我是vue组件</h1>
</div>
</template>
<script>
export default {
name:'App',
data(){
return{
}
}
}
</script>
<style scoped>
</style>index.html
<!DOCTYPE html>
<html lang="en">
<head>
<meta charset="UTF-8">
<meta name="viewport" content="width=device-width, initial-scale=1.0">
<title>Document</title>
<link rel="stylesheet" href="../src/style.css">
</head>
<body>
<div>
<div class="box1"></div>
<img src="../image/1.jpeg" alt="" srcset="">
</div>
<script src="/bundle.js"></script>
<div id="app"></div>
</body>
</html>babel.config.js
module.exports = {
    presets: ['@babel/preset-env'],
    plugins: ['@babel/plugin-transform-runtime', '@babel/plugin-proposal-class-properties']
}postcss.config.js
const autoprefixer = require('autoprefixer')    //导入自动添加前缀的插件
module.exports = {
    plugins: [autoprefixer]  //挂载插件
}
all.less
body{
    background:url(../image/1.jpeg);

    img{
        border-radius: 50%;
        width: 500px;
        height: 500px;
    }
}
style.css
.box1{
    width: 100px;
    height: 100px;
    background-color: yellowgreen;
}
.box2{
    transition: 2s;
    transform:translateX(300px) ;
    width: 100px;
    height: 100px;
    background-color: teal;
    border-radius: 50%;
}通过上面的步骤,其实我们大致能了解了vue脚手架的做的工作,我们可以通过学习webpack,更加了解vue搭建的过程,如果写的有什么错误,欢迎指正
原文:https://www.cnblogs.com/jzhey/p/12307710.html