一、简化Java开发
Spring为了降低Java开发的复杂性,采用了以下四种策略
-
基于POJO的轻量级和最小侵入性编程;
-
通过依赖注入和面向接口实现松耦合;
-
基于切面和惯例进行声明式编程;
-
通过切面和模板减少样板式代码。
下面简单介绍一下这四种策略分别是什么:
1、激发POJO的潜能:
Spring竭力避免因自身的API而弄乱你的应用代码。Spring不会强迫你实现Spring规范的接口或继承Spring规范的类,相反,在基于Spring构建的应用中,它的类通常没有任何痕迹表明你使用了Spring。最坏的场景是,一个类或许会使用Spring注解,但它依旧是POJO
2、依赖注入:
任何一个有实际意义的应用(肯定比Hello World示例更复杂)都会由两个或者更多的类组成,这些类相互之间进行协作来完成特定的业务逻辑。按照传统的做法,每个对象负责管理与自己相互协作的对象(即它所依赖的对象)的引用,这将会导致高度耦合和难以测试的代码。通过DI,对象的依赖关系将由系统中负责协调各对象的第三方组件在创建对象的时候进行设定。对象无需自行创建或管理它们的依赖关系依赖关系将被自动注入到需要它们的对象当中去。
3、面向切面:
DI能够让相互协作的软件组件保持松散耦合,而面向切面编程(aspect-oriented programming,AOP)允许你把遍布应用各处的功能分离出来形成可重用的组件。面向切面编程往往被定义为促使软件系统实现关注点的分离一项技术。系统由许多不同的组件组成,每一个组件各负责一块特定功能。除了实现自身核心的功能之外,这些组件还经常承担着额外的职责。诸如日志、事务管理和安全这样的系统服务经常融入到自身具有核心业务逻辑的组件中去,这些系统服务通常被称为横切关注点,因为它们会跨越系统的多个组件。

4、使用模板消除样板式代码:
有过java开发经验的同学应该都知道在使用JDBC操作数据库时的步骤有多繁琐,下面我来看一下JDBC操作数据库的代码
|
1
2
3
4
5
6
7
8
9
10
11
12
13
14
15
16
17
18
19
20
21
22
23
24
25
26
27
28
29
30
31
32
33
34
35
36
37
38
39
40
41
42
43
44
45
46
47
48
49
50
51
52
53
|
import java.sql.Connection;import java.sql.DriverManager;import java.sql.ResultSet;import java.sql.SQLException;import java.sql.Statement;?public class Demo { public static void main(String[] args) { String url = "jdbc:mysql://localhost:3306/person"; String user = "root"; String pwd = "admin"; String sql = "select * from student"; Connection conn = null; Statement st = null; ResultSet rs = null; try { Class.forName("com.mysql.jdbc.Driver"); conn = DriverManager.getConnection(url,user,pwd); st = conn.createStatement(); //执行查询语句,另外也可以用execute(),代表执行任何SQL语句 rs = st.executeQuery(sql); while(rs.next()) { System.out.println(rs.getObject(1) + " " + rs.getObject(2) + " " + rs.getInt("birth")); } //分别捕获异常 } catch (ClassNotFoundException e) { e.printStackTrace(); } catch (SQLException e) { e.printStackTrace(); } finally { try { //判断资源是否存在 if(rs != null) { rs.close(); //显示的设置为空,提示gc回收 rs = null; } if(st != null) { st.close(); st = null; } if(conn != null) { conn.close(); conn = null; } } catch (SQLException e) { e.printStackTrace(); } } }} |
估计很少有读者能将这段代码一行一行的看完,因为实在是太长了。
JDBC不是产生样板式代码的唯一场景。在许多编程场景中往往都会导致类似的样板式代码,JMS、JNDI和使用REST服务通常也涉及大量的重复代码。Spring旨在通过模板封装来消除样板式代码。Spring的JdbcTemplate使得执行数据库操作时,避免传统的JDBC样板代码成为了可能。
二、容纳Bean
在基于Spring的应用中,你的应用对象生存于Spring容器(container)中。如下图所示,Spring容器负责创建对象,装配它们,配置它们并管理它们的整个生命周期,从生存到死亡(在这里,可能就是new到finalize())。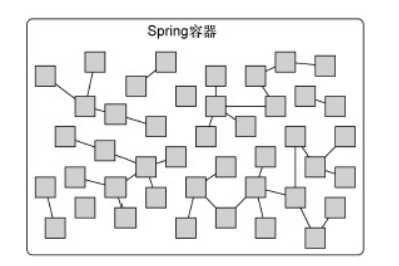
Spring容器是Spring的核心,Spring自带了多个容器实现,可以归为两种不同的类型。bean工厂(由org.springframework.beans.factory.eanFactory接口定义)是最简单的容器,提供基本的DI支持。应用上下文(由org.springframework.context.ApplicationContext接口定义)基于BeanFactory构建,并提供应用框架级别的服务,例如从属性文件解析文本信息以及发布应用事件给感兴趣的事件监听者。通常我们使用的是应用上下文,因为bean工厂对大多数开发者来说功能比较薄弱。
1、使用应用上下文:
Spring自带了多种类型的应用上下文
- AnnotationConfigApplicationContext:从一个或多个基于Java的配置类中加载Spring应用上下文。
- AnnotationConfigWebApplicationContext:从一个或多个基于Java的配置类中加载Spring Web应用上下文。
- ClassPathXmlApplicationContext:从类路径下的一个或多个XML配置文件中加载上下文定义,把应用上下文的定义文件作为类资源。
- FileSystemXmlapplicationcontext:从文件系统下的一个或多个XML配置文件中加载上下文定义。
- XmlWebApplicationContext:从Web应用下的一个或多个XML配置文件中加载上下文定义
2、bean的生命周期:
在传统的Java应用中,bean的生命周期很简单。使用Java关键字new进行bean实例化,然后该bean就可以使用了。一旦该bean不再被使用,则由Java自动进行垃圾回收。相比之下,Spring容器中的bean的生命周期就显得相对复杂多了
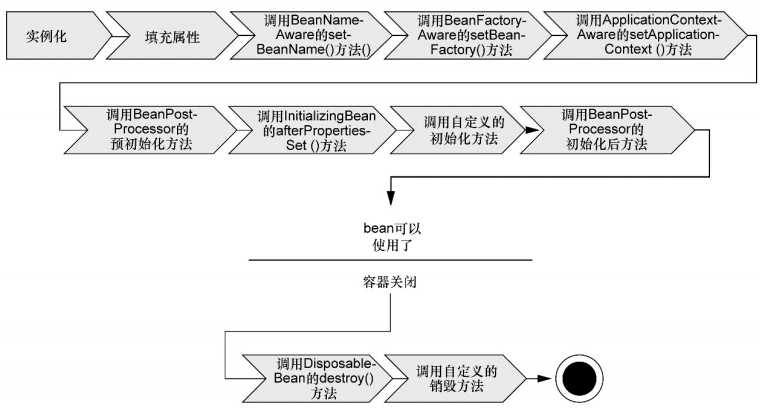
1、Spring对bean进行实例化;
2、Spring将值和bean的引用注入到bean对应的属性中;
3、如果bean实现了BeanNameAware接口,Spring将bean的ID传递给setBean-Name()方法;
4、如果bean实现了BeanFactoryAware接口,Spring将调用setBeanFactory()方法,将BeanFactory容器实例传入;
5、如果bean实现了ApplicationContextAware接口,Spring将调用setApplicationContext()方法,将bean所在的应用上下文的引用传入进来;
6、如果bean实现了BeanPostProcessor接口,Spring将调用它们的post-ProcessBeforeInitialization()方法;
7、如果bean实现了InitializingBean接口,Spring将调用它们的after-PropertiesSet()方法。类似地,如果bean使用init-method声明了初始化方法,该方法也会被调用;
8、如果bean实现了BeanPostProcessor接口,Spring将调用它们的post-ProcessAfterInitialization()方法;
9、此时,bean已经准备就绪,可以被应用程序使用了,它们将一直驻留在应用上下文中,直到该应用上下文被销毁;
10、如果bean实现了DisposableBean接口,Spring将调用它的destroy()接口方法。同样,如果bean使用destroy-method声明了销毁方法,该方法也会被调用
3、Spring的核心模块:
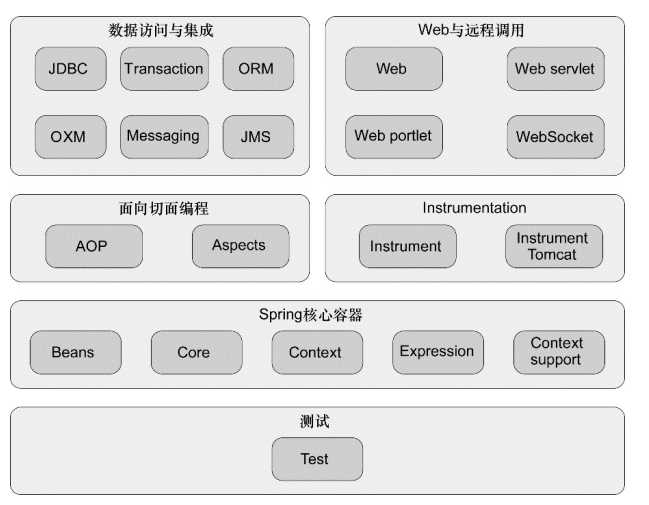
我们来逐一分析一下Sping的各个组成模块
Spring核心容器
容器是Spring框架最核心的部分,它管理着Spring应用中bean的创建、配置和管理。在该模块中,包括了Spring bean工厂,它为Spring提供了DI的功能。基于bean工厂,我们还会发现有多种Spring应用上下文的实现,每一种都提供了配置Spring的不同方式。
除了bean工厂和应用上下文,该模块也提供了许多企业服务,例如E-mail、JNDI访问、EJB集成和调度。所有的Spring模块都构建于核心容器之上。当你配置应用时,其实你隐式地使用了这些类。
Spring的AOP模块
在AOP模块中,Spring对面向切面编程提供了丰富的支持。这个模块是Spring应用系统中开发切面的基础。与DI一样,AOP可以帮助应用对象解耦。借助于AOP,可以将遍布系统的关注点(例如事务和安全)从它们所应用的对象中解耦出来。
数据访问和集成
使用JDBC编写代码通常会导致大量的样板式代码,例如获得数据库连接、创建语句、处理结果集到最后关闭数据库连接。Spring的JDBC和DAO(Data Access Object)模块抽象了这些样板式代码,使我们的数据库代码变得简单明了,还可以避免因为关闭数据库资源失败而引发的问题。该模块在多种数据库服务的错误信息之上构建了一个语义丰富的异常层,以后我们再也不需要解释那些隐晦专有的SQL错误信息了!
Web与远程调用
MVC(Model-View-Controller)模式是一种普遍被接受的构建Web应用的方法,它可以帮助用户将界面逻辑与应用逻辑分离。Java从来不缺少MVC框架,Apache的Struts、JSF、WebWork和Tapestry都是可选的最流行的MVC框架。
Spring装配bean
一、Spring装配的三种方式
1、在XML中进行显示配置
2、在Java中进行显示配置
3、隐式的bean的发现机制和自动装配
至于哪一种装配方式好,这里没有统一的答案,读者可以选择适合自己的方案进行bean的装配
二、自动化装配bean
1、Spring 从两个角度来实现自动化装配bean :
- 组件扫描:Spring会自动发现应用上下文中所创建的bean
- 自动装配:Spring自动满足bean之间的依赖
2、创建可被发现的bean:
接下来我将用一个CD播放器案例来说明整个自动化装配bean的过程,该项目是一个Maven项目,进行实验前需要引入相关Maven配置文件,对Maven还不了解的同学建议去学习相关资料,这里不再赘述
第一步:创建CompactDisc接口,接口中包含了一个play()方法
|
1
2
3
4
5
|
package soundsystem;public interface CompactDisc { void play();} |
CompactDisc的具体内容并不重要,重要的是你将其定义为一个接口。作为接口,它定义了CD播放器对一盘CD所能进行的操作。它将CD播放器的任意实现与CD本身的耦合降低到了最小的程度。
第二步:我们还需要一个CompactDisc的实现,SgtPeppers实现了CompactDisc接口
|
1
2
3
4
5
6
7
8
9
10
11
12
13
14
15
|
package soundsystem;import org.springframework.stereotype.Component;@Component //该类是一个组件类public class SgtPeppers implements CompactDisc { private String title = "曾经的你"; private String artist = "许巍"; @Override public void play() { System.out.println("Playing " + title + " by " + artist); }} |
和CompactDisc接口一样,Sgtpeppers的具体内容并不重要。你需要注意的就是SgtPeppers类上使用了@Component注解。这个简单的注解表明该类会作为组件类,并告知Spring要为这个类创建bean。没有必要显式配置Sgtpeppers bean,因为这个类使用了@Component注解,所以Spring会为你把事情处理妥当。
第三步:我们声明了组件类之后Spring并不知道这个组件类,所以我们还需要开启组件扫描,让Spring去查找相关的组件类。新建一个CDPlayerConfig类
|
1
2
3
4
5
6
7
8
9
10
11
12
13
14
15
16
17
18
19
20
|
package soundsystem;import org.springframework.context.annotation.ComponentScan;import org.springframework.context.annotation.Configuration;@Configuration //Configuration注解表明该类是一个配置类@ComponentScan //ComponentScan注解表示开启组件扫描,默认是扫描当前包下的组件public class CDPlayerConfig { /*@Bean public CompactDisc compactDisc() { return new SgtPeppers(); } @Bean public CDPlayer cdPlayer(CompactDisc compactDisc) { return new CDPlayer(compactDisc); }*/} |
第四步:下面我们来测试一下自动装配是否成功
|
1
2
3
4
5
6
7
8
9
10
11
12
13
14
15
16
17
18
19
20
21
22
|
package soundsystem;import org.junit.Test;import org.junit.runner.RunWith;import org.springframework.beans.factory.annotation.Autowired;import org.springframework.test.context.ContextConfiguration;import org.springframework.test.context.junit4.SpringJUnit4ClassRunner;@RunWith(SpringJUnit4ClassRunner.class)@ContextConfiguration(classes=CDPlayerConfig.class)public class CDPlayTest { @Autowired //@Autowired注解将CompactDisc注入到测试代码中,稍后会讲解到 private CompactDisc compactDisc; @Test public void play() { compactDisc.play(); }} |
运行结果:
|
1
|
Playing 曾经的你 by 许巍 |
我们看到结果正常输出,说明我们的自动装配成功
3、自动装配中的注解介绍:
@Component:
@Component注解表明该类作为组件类,并告知Spring要为这个类创建bean,另外@Component中还可以传入一个参数,用于为这个bean设置ID,如果你之前有过通过xml文件配置bean的经验话就知道在配置bean的时候就需要设置bean的id。
@Component("cdplay"),这个注解表明当前bean的ID为cdplay
@ComponentScan:
@ComponentScan默认会扫描与配置类相同的包,比如上面的程序中因为CDPlayerConfig类位于soundsystem包中,因此Spring将会扫描这个包以及这个包下的所有子包,查找带有@Component注解的类。这样的话,就能发现CompactDisc,并且会在Spring中自动为其创建一个bean。我们也可以为该注解传入参数,让其扫描指定的包:@ComponentScan(basePackages={"soundsystem","video"}),扫描soundsystem和video包下的组件
|
1
2
3
4
5
6
7
8
9
10
11
12
13
14
15
16
17
18
19
|
//直接在value属性中指明包的名称@Configuration@ComponentScan("soundsystem")public class CDPlayerConfig{}//通过basePackages属性配置@Configuration@ComponentScan(basePackages="soundsystem")public class CDPlayerConfig{}//设置多个基础包,用数组表示@Configuration@ComponentScan(basePackages={"soundsystem","video"})public class CDPlayerConfig{}//基础包以String类型表示是不安全的,如果重构代码的话,指定的基础包可能会出现错误,用指定为包中所包含的类或接口的方法@Configuration@ComponentScan(basePackageClasses={CDPlayer.class,DVDPlayer.class})public class CDPlayerConfig{} |
@Autowired:
简单来说,自动装配就是让Spring自动满足bean依赖的一种方法,在满足依赖的过程中,会在Spring应用上下文中寻找匹配某个bean需求的其他bean。为了声明要进行自动装配,我们可以借助Spring的@Autowired注解。
比如上面的测试代码添加了@Autowired注解,这表明当Spring创建CDPlayer bean的时候,会通过这个构造器来进行实例化并且会传入一个可设置给CompactDisc类型的bean。
|
1
2
3
4
5
6
7
8
9
10
11
12
13
|
@Componentpublic class CDPlayer implements MediaPlayer{ private CompactDisc cd; @Autowired//这表明当Spring创建CDPlayer bean的时候,会通过这个构造器来进行实例化并且会传入一个可设置给CompactDisc类型的bean. public CDPlayer(CompactDisc cd){//构造器 this.cd = cd; } public void paly(){ cd.paly(); }} |
@Autowired注解不仅能够用在构造器上,还能用在属性的Setter方法上.比如说,如果CDPlayer有一个setCompactDisc()方法,那么可以采用如下的注解形式进行自动装配:
|
1
2
3
4
|
@Autowiredpublic void setCompactDisc(CompactDisc cd){ this.cd = cd;} |
但是如果没有匹配的bean,那么在应用上下文创建的时候,Spring会抛出一个异常,为了避免异常的出现,你可以将@Autowired的requied属性设置为false
|
1
2
3
4
|
@Autowired(required=false)public void setCompactDisc(CompactDisc cd){ this.cd = cd;} |
三、通过Java代码装配bean
尽管在很多场景下通过组件扫描和自动装配实现Spring的自动化扫描配置是更为推荐的方式,但在有些情况下自动化扫描的方案行不通,如想要将第三方库中的组件装配到自己的应用中。在这种情况下必须通过显示 装配的方式。
显示装配有两种可选方案:Java和XML。JavaConfig是更好的方案:更强大、类型安全并对重构友好。因他就是Java代码。
还是上面的那个案例,我们现在将它用Java代码来实现装配bean
接口:CompactDisc.java
|
1
2
3
4
5
|
package soundsystem;public interface CompactDisc { void play();} |
接口: MediaPlayer.java
|
1
2
3
4
5
|
package soundsystem;public interface MediaPlayer { void play();} |
CompactDisc的实现类:SgtPeppers.java
|
1
2
3
4
5
6
7
8
9
10
11
12
13
|
package soundsystem;public class SgtPeppers implements CompactDisc { private String title = "曾经的你"; private String artist = "许巍"; @Override public void play() { System.out.println("Playing " + title + " by " + artist); }} |
细心的读者可以发现,这里我们去掉了@Compenent注解
MediaPlayer的实现类:CDPlayer.java
|
1
2
3
4
5
6
7
8
9
10
11
12
13
14
15
16
|
package soundsystem;import org.springframework.beans.factory.annotation.Autowired;public class CDPlayer implements MediaPlayer { private CompactDisc cd; @Autowired public CDPlayer(CompactDisc cd) { this.cd = cd; } @Override public void play() { cd.play(); }} |
借助JavaConfig实现注入
CDPlayerConfig.java
|
1
2
3
4
5
6
7
8
9
10
11
12
13
14
15
16
17
|
package soundsystem;import org.springframework.context.annotation.Bean;import org.springframework.context.annotation.Configuration;@Configurationpublic class CDPlayerConfig { @Bean public CompactDisc compactDisc() { return new SgtPeppers(); } @Bean public CDPlayer cdPlayer(CompactDisc compactDisc) { return new CDPlayer(compactDisc); }} |
区别与自动装配,这里去掉了@ComponentScan注解,而是显式的声明了Bean。@Bean注解告诉了Spring上下文这个方法会将返回一个对象,该对象要注册为Spring应用上下文中的bean,方法体重包含了最终产生bean实例的实现逻辑。
测试类:CDPlayerTest.java
|
1
2
3
4
5
6
7
8
9
10
11
12
13
14
15
16
17
18
19
20
|
package soundsystem;import org.junit.Test;import org.junit.runner.RunWith;import org.springframework.beans.factory.annotation.Autowired;import org.springframework.test.context.ContextConfiguration;import org.springframework.test.context.junit4.SpringJUnit4ClassRunner;@RunWith(SpringJUnit4ClassRunner.class)@ContextConfiguration(classes=CDPlayerConfig.class)public class CDPlayerTest { @Autowired private MediaPlayer player; @Test public void play() { player.play(); }} |
依然可以得出正确的输出结果
四、通过XML装配bean
XML 配置是最原始最古老的 Bean 的装配方案,曾经我们的项目离不开它,而如今,我们却在慢慢的抛弃它,没办法,时代在进步,我们也要进步呀。为了能看懂前辈们写的代码,我们还是有必要来看一下如何通过 XML 来装配 Bean。
创建一个Book类:
|
1
2
3
4
5
6
7
8
9
10
11
12
13
14
15
16
17
18
19
20
21
22
23
24
25
26
27
28
29
30
31
32
33
34
35
36
37
38
39
40
41
|
package xmlTest;public class Book { private Integer id; private String name; private Double price; public Book() { } public Book(Integer id, String name, Double price) { this.id = id; this.name = name; this.price = price; } public Integer getId() { return id; } public void setId(Integer id) { this.id = id; } public String getName() { return name; } public void setName(String name) { this.name = name; } public Double getPrice() { return price; } public void setPrice(Double price) { this.price = price; }} |
然后再在 resources 目录下(用IDEA创建maven项目时会有一个resources文件夹)创建一个 beans.xml 文件,作为 Spring 的配置文件,然后在里边配置一个 Book bean,如下:
|
1
2
3
4
5
6
|
<?xml version="1.0" encoding="UTF-8"?><beans xmlns="http://www.springframework.org/schema/beans" xmlns:xsi="http://www.w3.org/2001/XMLSchema-instance" xsi:schemaLocation="http://www.springframework.org/schema/beans http://www.springframework.org/schema/beans/spring-beans.xsd"> <bean class="org.javaboy.spring.Book" id="book"/></beans> |
在这里,我们在 class 属性中配置类的全路径,id 则表示 bean 的名称,也可以通过 name 属性来指定 bean 的名称,大部分场景下两者无任何差别,会有一些特殊场景下(例如用,隔开多个实例名,两者的处理方案不同),两者有区别。
接下来新建一个测试类,看一下我们的配置是否正确:
|
1
2
3
4
5
6
7
8
9
10
11
12
13
14
15
16
|
package xmlTest;import org.springframework.context.support.ClassPathXmlApplicationContext;public class BookTest { public static void main(String[] args) { ClassPathXmlApplicationContext ctx = new ClassPathXmlApplicationContext("classpath:bean.xml"); Book book = (Book) ctx.getBean("book"); System.out.println(book); }} |
输出结果:xmlTest.Book@e45f292
在配置 Bean 时,给 Bean 指定相关的属性值,我们有几种不同的方式:
1.构造方法指定:
首先我们可以通过构造方法指定 bean 的属性值,前提是我们为 Book 类提供一个有参构造方法(大家在创建有参构造方法时,一定记得再顺手加一个无参构造方法):
|
1
2
3
4
5
6
7
8
9
10
11
12
13
|
public class Book { private Integer id; private String name; private Double price; public Book() { } public Book(Integer id, String name, Double price) { this.id = id; this.name = name; this.price = price; } //省略 getter/setter} |
然后在 XML 文件中,我们就可以通过构造方法注入相关值了:
|
1
2
3
4
5
|
<bean class="org.javaboy.spring.Book" id="book2"> <constructor-arg name="id" value="99"/> <constructor-arg name="name" value="三国演义"/> <constructor-arg name="price" value="99"/></bean> |
使用构造方法注入相关值的时候,也可以使用下标来描述参数的顺序,注意如果使用下标,参数顺序不能错:
|
1
2
3
4
5
|
<bean class="org.javaboy.spring.Book" id="book3"> <constructor-arg index="0" value="99"/> <constructor-arg index="1" value="红楼梦"/> <constructor-arg index="2" value="100"/></bean> |
注入成功之后,当我们再次去获取 Bean 的时候,就可以看到这些属性了。
2.通过属性注入:
|
1
2
3
4
5
|
<bean class="org.javaboy.spring.Book" id="book4"> <property name="id" value="99"/> <property name="name" value="水浒传"/> <property name="price" value="99"/></bean> |
Spring的面向切面(AOP)
一、面向切面编程简介
二、AOP术语:
与大多数技术一样,AOP已经形成了自己的术语。描述切面的常用术语有通知(advice)、切点(pointcut)和连接点(join point)。初学者在学习AOP时最头疼的就是理解这些概念,包括我自己也是这样,网上面的一些博客在介绍AOP时也只是从定义角度去解释,不太容易理解,下面我将用一个日常生活中的例子来向大家介绍AOP术语,方便大家理解。
我们现在每家每户都需要用电,那么用电就会涉及到用电量和电费,在10年前科技还没有如此发达的时候,我们的电费都是需要专门的人员来收取的,电力公司会安排人员去到不同的地区进行电表的查看和电费的收取。
通知(Advice):
当抄表员出现在我们家门口时,他们要登记用电量并回去向电力公司报告。显然,他们必须有一份需要抄表的住户清单,他们所汇报的信息也很重要,但记录用电量才是抄表员的主要工作。类似的,切面也有目标——它必须要完成的工作。在AOP术语中,切面的工作被称为通知。
Spring切面可以应用5种类型的通知:
- 前置通知(Before):在目标方法被调用之前调用通知功能;
- 后置通知(After):在目标方法完成之后调用通知,此时不会关心方法的输出是什么;
- 返回通知(After-returning):在目标方法成功执行之后调用通知;
- 异常通知(After-throwing):在目标方法抛出异常后调用通知;
- 环绕通知(Around):通知包裹了被通知的方法,在被通知的方法调用之前和调用之后执行自定义的行为。
连接点(Join Point):
电力公司为多个住户提供服务,甚至可能是整个城市。每家都有一个电表,这些电表上的数字都需要读取,因此每家都是抄表员的潜在目标。
同样,我们的应用可能也有数以千计的时机应用通知。这些时机被称为连接点。连接点是在应用执行过程中能够插入切面的一个点。这个点可以是调用方法时、抛出异常时、甚至修改一个字段时。切面代码可以利用这些点插入到应用的正常流程之中,并添加新的行为。
切点(Poincut):
如果让一个工作人员去抄写全市的所有电表,那么肯定是不现实的。实际上,电力公司会安排每一个抄表员负责一个地区的抄表工作,比如小宋负责阳光小区的抄表工作,小马负责欧风小区的抄表工作。类似的,切点也是如此,一个程序中可能有很多连接点,那么并不是每个连接点我们都需要通知,我们只需要通知部分的连接点即可,那么切点就是这个我们通知的连接点。
切面(Aspect):
当抄表员开始一天的工作时,他知道自己要做的事情(报告用电量)和从哪些房屋收集信息。因此,他知道要完成工作所需要的一切东西。
切面是通知和切点的结合。通知和切点共同定义了切面的全部内容——它是什么,在何时和何处完成其功能。
三、Spring对AOP的支持
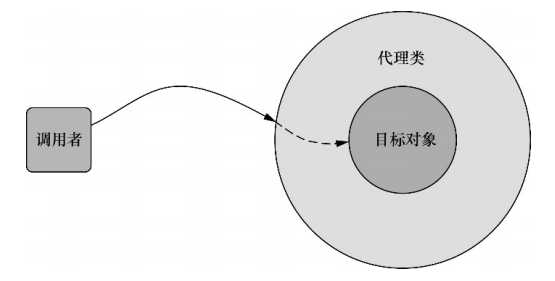
1、动态代理:
Spring AOP构建在动态代理之上,也就是说,Spring运行时会为目标对象动态创建代理对象。代理类封装了目标类,并拦截被通知方法的调用,再把调用转发给真正的目标bean。当代理类拦截到方法调用时,在调用目标bean方法之前,会执行切面逻辑。
2、织入切面的时间:
通过在代理类中包裹切面,Spring在运行期把切面织入到Spring 管理的bean中,也就是说,直到应用需要被代理的bean时,Spring才会创建代理对象。
因为Spring运行时才创建代理对象,所以我们不需要特殊的编译器来织入Spring AOP切面。
四、Spring AOP的使用
假设我们有个现场表演的接口Performance和它的实现类SleepNoMore:
|
1
2
3
4
5
6
7
8
|
package PerformTest;/** * 现场表演,如舞台剧,电影,音乐会 */public interface Performance { void perform();} |
|
1
2
3
4
5
6
7
8
9
10
11
12
13
14
|
package PerformTest;import org.springframework.stereotype.Component;/** * 戏剧:《哈姆雷特》 */@Componentpublic class SleepNoMore implements Performance { @Override public void perform() { System.out.println("戏剧《哈姆雷特》"); }} |
既然是演出,就需要观众,假设我们的需求是:在看演出之前,观众先入座并将手机调整至静音,在观看演出之后观众鼓掌,如果演出失败观众退票,我们当然可以把这些逻辑写在上面的perform()方法中,但不推荐这么做,因为这些逻辑理论上和演出的核心无关,就算观众不将手机调整至静音或者看完演出不鼓掌,都不影响演出的进行。
针对这个需求,我们可以使用AOP来实现。
1、定义切面:
定义一个观众的切面,并声明前置、后置和异常通知:
|
1
2
3
4
5
6
7
8
9
10
11
12
13
14
15
16
17
18
19
20
21
22
23
24
25
26
27
28
29
30
31
32
33
34
35
36
37
38
39
40
41
42
43
44
45
46
47
48
49
50
51
52
53
54
|
package PerformTest;import org.aspectj.lang.annotation.*;/** * 观众 * 使用@Aspect注解定义为切面 */@Aspect //@Aspect注解表明Audience类是一个切面。public class Audience { /** * 表演之前,观众就座,前置通知 */ @Before("execution(* PerformTest.Performance.perform(..))") public void takeSeats() { System.out.println("Taking seats"); } /** * 表演之前,将手机调至静音,前置通知 */ @Before("execution(* PerformTest.Performance.perform(..))") public void silenceCellPhones() { System.out.println("Silencing cell phones"); } /** * 表演结束,不管表演成功或者失败,后置通知 */ @After("execution(* PerformTest.Performance.perform(..))") public void finish() { System.out.println("perform finish"); } /** * 表演之后,鼓掌,后置通知 */ @AfterReturning("execution(* PerformTest.Performance.perform(..))") public void applause() { System.out.println("CLAP CLAP CLAP!!!"); } /** * 表演失败之后,观众要求退款,异常通知 */ @AfterThrowing("execution(* PerformTest.Performance.perform(..))") public void demandRefund() { System.out.println("Demanding a refund"); }} |
@Before:该注解用来定义前置通知,通知方法会在目标方法调用之前执行
@After:该注解用来定义后置通知,通知方法会在目标方法调用之后执行
@AfterReturning:该注解用来定义返回通知,通知方法会在目标方法返回后调用
@AfterThrowing:该注解用来定义异常通知,通知方法会在目标方法抛出异常后调用
execution(* PerformTest.Performance.perform(..))含义:
execution:在方法执行时触发
*:表明我们不关心方法返回值的类型,即可以是任意类型
.PerformTest.performance:使用全限定类名和方法名指定要添加前置通知的方法
(..):方法的参数列表使用(..),表明我们不关心方法的入参是什么,即可以是任意类型
2、定义配置类:
|
1
2
3
4
5
6
7
8
9
10
11
12
13
14
15
16
|
package PerformTest;import org.springframework.context.annotation.Bean;import org.springframework.context.annotation.ComponentScan;import org.springframework.context.annotation.Configuration;import org.springframework.context.annotation.EnableAspectJAutoProxy;@Configuration //配置类注解@EnableAspectJAutoProxy //启用自动代理@ComponentScan //启用扫描public class ConcertConfig { @Bean public Audience audience() { return new Audience(); }} |
3、定义测试类:
|
1
2
3
4
5
6
7
8
9
10
11
12
13
14
15
|
package PerformTest;import org.springframework.context.annotation.AnnotationConfigApplicationContext;public class PerformTest { public static void main(String[] args) { AnnotationConfigApplicationContext context = new AnnotationConfigApplicationContext(ConcertConfig.class); Performance performance = context.getBean(Performance.class); performance.perform(); context.close(); }} |
运行结果:
|
1
2
3
4
5
|
Silencing cell phonesTaking seats戏剧《哈姆雷特》perform finishCLAP CLAP CLAP!!! |
从结果可以看出在戏剧《哈姆雷特》的前面和后面都有语句输出,这就是Spring AOP的通知起了作用
SpringMVC
一、SpringMVC的执行流程
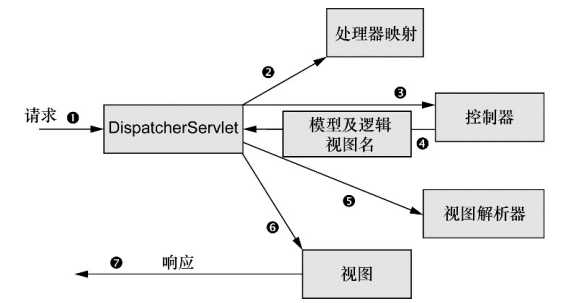
1、请求旅程的第一站是Spring的DispatcherServlet。与大多数基于Java的Web框架一样,Spring MVC所有的请求都会通过一个前端控制器(front controller)Servlet。前端控制器是常用的Web应用程序模式,在这里一个单实例的Servlet将请求委托给应用程序的其他组件来执行实际的处理。在SpringMVC中DispatcherServlet就是前端控制器。
2、Dispatcherservlet的任务是将请求发送给Spring MVC控制器(controller),控制器是一个用于处理请求的Spring组件。在典型的应用程序中可能会有多个控制器,Dispatcherservlet需要知道应该将请求发送给哪个控制器。所以DispatcherServlet以会查询一个或多个处理器映射(handler mapping)来确定请求的下一站在哪里。处理器映射会根据请求所携带的URL信息来进行决策。
3、一旦选择了合适的控制器,Dispatcherservlet会将请求发送给选中的控制器。到了控制器,请求会卸下其负载(用户提交的信息)并耐心等待控制器处理这些信息。
4、控制器在完成逻辑处理后,通常会产生一些信息,这些信息需要返回给用户并在浏览器上显示。这些信息被称为模型(model)。不过仅仅给用户返回原始的信息是不够的——这些信息需要以用户友好的方式进行格式化,一般会是HTML。所以,信息需要发送给一个视图(view),通常会是JSP。控制器所做的最后一件事就是将模型数据打包,并且标示出用于渲染输出的视图名。它接下来会将请求连同模型和视图名发送回DispatcherServlete。
5、这样,控制器就不会与特定的视图相耦合,传递给DispatcherServlet的视图名并不直接表示某个特定的JSP。实际上,它甚至并不能确定视图就是JSP。相反,它仅仅传递了一个逻辑名称,这个名字将会用来查找产生结果的真正视图。Dispatcherservlet将会使用视图解析器(view resolver)来将逻辑视图名匹配为一个特定的视图实现,它可能是也可能不是JSP。
6、既然Dispatcherservlet已经知道由哪个视图渲染结果,那请求的任务基本上也就完成了。它的最后一站是视图的实现(可能是JSP)
7、在这里它交付模型数据。请求的任务就完成了。视图将使用模型数据渲染输出,这个输出会通过响应对象传递给客户端(不会像听上去那样硬编码)
二、SpingMVC初探
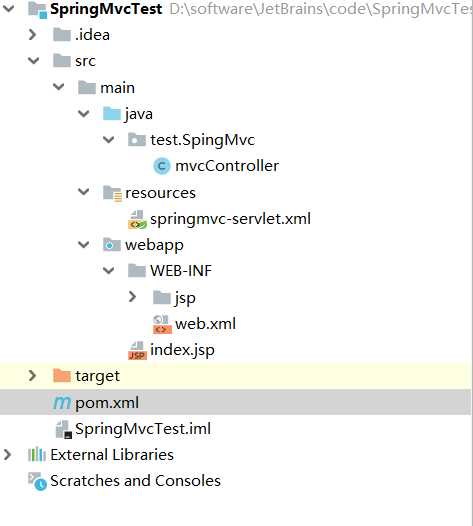
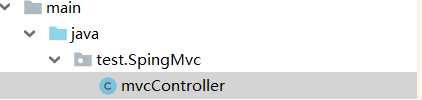
1、首先用maven创建一个web项目(我这里用的是idea),创建完成后的项目目录结构如下:
2、在pom.xml文件中引入spring相关jar包:
|
1
2
3
4
5
6
7
8
9
10
11
12
13
14
15
16
17
18
19
20
21
22
23
24
25
26
27
28
29
30
31
32
33
34
35
36
37
38
39
40
41
42
43
44
45
46
47
48
49
50
51
52
|
<dependencies> <dependency> <groupId>commons-logging</groupId> <artifactId>commons-logging</artifactId> <version>1.1.1</version> </dependency> <dependency> <groupId>org.springframework</groupId> <artifactId>spring-beans</artifactId> <version>4.1.6.RELEASE</version> </dependency> <dependency> <groupId>org.springframework</groupId> <artifactId>spring-aop</artifactId> <version>4.1.6.RELEASE</version> </dependency> <dependency> <groupId>org.springframework</groupId> <artifactId>spring-context</artifactId> <version>4.1.6.RELEASE</version> </dependency> <dependency> <groupId>org.springframework</groupId> <artifactId>spring-core</artifactId> <version>4.1.6.RELEASE</version> </dependency> <dependency> <groupId>org.springframework</groupId> <artifactId>spring-expression</artifactId> <version>4.1.6.RELEASE</version> </dependency> <dependency> <groupId>org.springframework</groupId> <artifactId>spring-web</artifactId> <version>4.1.6.RELEASE</version> </dependency> <dependency> <groupId>org.springframework</groupId> <artifactId>spring-webmvc</artifactId> <version>4.1.6.RELEASE</version> </dependency> </dependencies> |
3、在web.xml中进行SpringMVC的相关配置:
|
1
2
3
4
5
6
7
8
9
10
11
12
13
14
15
16
17
18
19
20
21
22
23
24
25
26
27
28
|
<!DOCTYPE web-app PUBLIC "-//Sun Microsystems, Inc.//DTD Web Application 2.3//EN" "http://java.sun.com/dtd/web-app_2_3.dtd" ><web-app> <display-name>Archetype Created Web Application</display-name> <!--配置前端控制器 DispatcherServlet--> <servlet> <servlet-name>springmvc</servlet-name> <servlet-class>org.springframework.web.servlet.DispatcherServlet</servlet-class> <init-param> <!--ContextconfigLocation配置springmvc加载的配置文件 适配器、处理器映射器--> <param-name>contextConfigLocation</param-name> <param-value>classpath:springmvc-servlet.xml</param-value> </init-param> <!-- <load-on-startup>1</load-on-startup> --> </servlet> <servlet-mapping> <servlet-name>springmvc</servlet-name> <!-- 配置解析路径 1、.action访问以.action结尾的 由DispatcherServlet进行解析 2、/,所有访问都由DispatcherServlet进行解析 --> <url-pattern>/</url-pattern> </servlet-mapping></web-app> |
4、在resources目录下新建springmvc-servlet.xml文件,如果没有resources目录的话自己新建一个resources目录,并将其设置为Resources Root:
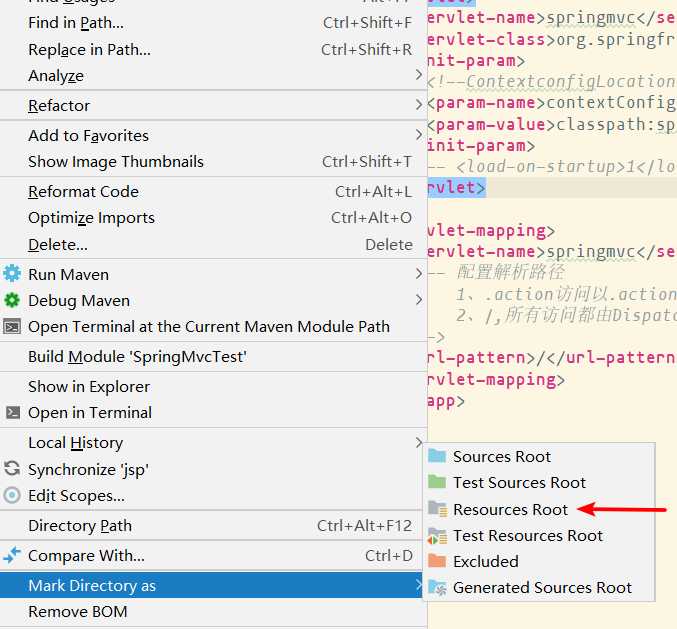
springmvc-servlet.xml文件是Spring的配置文件,文件内容如下:
|
1
2
3
4
5
6
7
8
9
10
11
12
13
14
15
16
17
18
19
20
21
22
23
24
25
26
27
|
<?xml version="1.0" encoding="UTF-8"?><beans xmlns="http://www.springframework.org/schema/beans" xmlns:xsi="http://www.w3.org/2001/XMLSchema-instance" xmlns:context="http://www.springframework.org/schema/context" xmlns:mvc="http://www.springframework.org/schema/mvc" xsi:schemaLocation="http://www.springframework.org/schema/beans http://www.springframework.org/schema/beans/spring-beans.xsd http://www.springframework.org/schema/context http://www.springframework.org/schema/context/spring-context-4.1.xsd http://www.springframework.org/schema/mvc http://www.springframework.org/schema/mvc/spring-mvc-4.1.xsd"> <!--自动扫描方式,扫描包下面的所有的Controller 使用组件扫描的方式可以一次扫描多个Controller--> <context:component-scan base-package="test.SpringMVC"/> <!-- don‘t handle the static resource --> <mvc:default-servlet-handler /> <!--配置注解的处理器映射器和处理器适配器--> <mvc:annotation-driven /> <!--配置视图解析器 在Controller中设置视图名的时候会自动加上前缀和后缀。--> <bean class="org.springframework.web.servlet.view.InternalResourceViewResolver" id="internalResourceViewResolver"> <!-- 前缀 --> <property name="prefix" value="/WEB-INF/jsp/" /> <!-- 后缀 --> <property name="suffix" value=".jsp" /> </bean></beans> |
5、在WEB-INF目录下新建一个文件夹jsp,然后在jsp文件夹中创建一个hello.jsp:
|
1
2
3
4
5
6
7
8
9
10
11
12
13
14
15
16
|
<%-- Created by IntelliJ IDEA. User: wydream Date: 2020/1/2 Time: 17:13 To change this template use File | Settings | File Templates.--%><%@ page contentType="text/html;charset=UTF-8" language="java" %><html> <head> <title>hello</title> </head> <body> Hello World </body></html> |
6、新建一个Controller类:
|
1
2
3
4
5
6
7
8
9
10
11
12
13
14
|
package test.SpingMvc;import org.springframework.stereotype.Controller;import org.springframework.web.bind.annotation.RequestMapping;@Controller@RequestMapping("/mvc")public class mvcController { @RequestMapping("hello") public String hello() { return "hello"; }} |
7、配置tomcat服务器并启动项目:
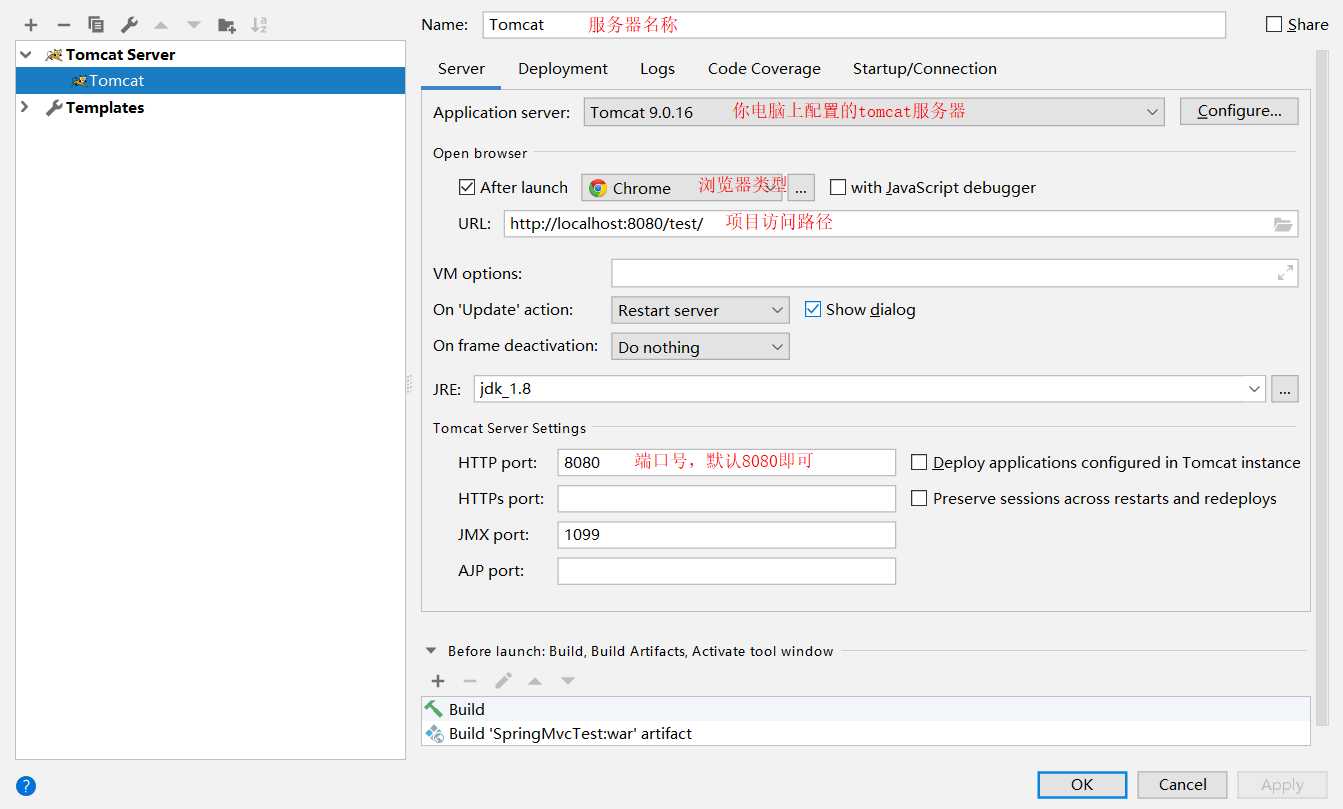
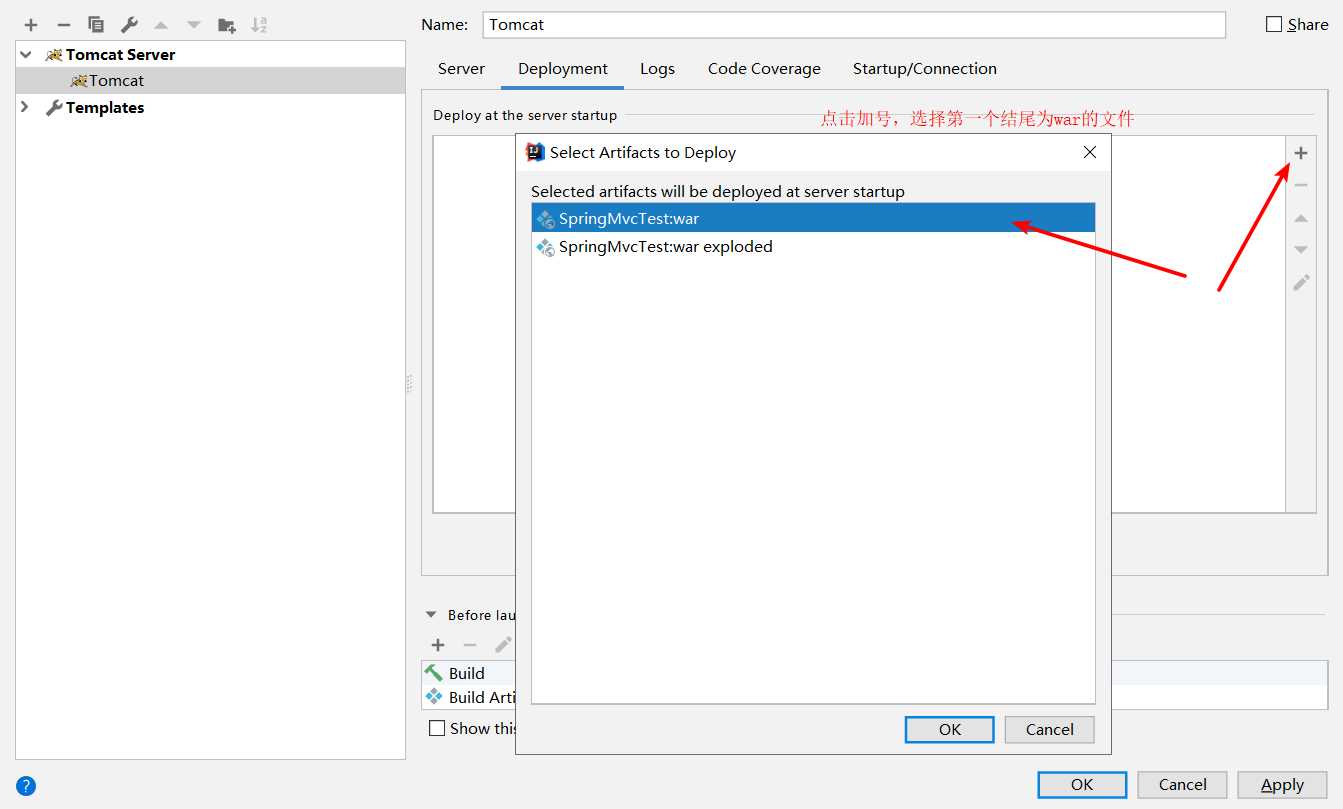
8、在浏览器输入http://localhost:8080/项目名/mvc/hello即可访问
三、配置文件详解
1、web.xml配置:
|
1
2
3
4
5
6
7
8
9
10
11
12
13
14
15
16
17
18
19
20
21
22
23
24
25
26
27
28
29
30
31
32
33
34
35
36
37
38
39
40
41
42
43
44
45
46
47
48
49
50
51
52
53
54
55
56
57
58
59
60
61
62
63
64
65
66
67
68
69
|
<?xml version="1.0" encoding="UTF-8"?><web-app version="3.0" xmlns="http://java.sun.com/xml/ns/javaee" xmlns:xsi="http://www.w3.org/2001/XMLSchema-instance" xsi:schemaLocation="http://java.sun.com/xml/ns/javaee http://java.sun.com/xml/ns/javaee/web-app_3_0.xsd"> <display-name></display-name> <!-- 404错误拦截 --> <error-page> <error-code>404</error-code> <location>/error404.jsp</location> </error-page> <!-- 500错误拦截 --> <error-page> <error-code>500</error-code> <location>/error500.jsp</location> </error-page> <!-- 加载spring容器 --> <context-param> <param-name>contextConfigLocation</param-name> <param-value>WEB-INF/classes/spring/applicationContext-*.xml</param-value> </context-param> <listener> <listener-class>org.springframework.web.context.ContextLoaderListener</listener-class> </listener> <!-- 配置前端控制器 --> <servlet> <servlet-name>spring</servlet-name> <servlet-class>org.springframework.web.servlet.DispatcherServlet</servlet-class> <init-param> <!-- ContextconfigLocation配置springmvc加载的配置文件 适配器、处理映射器等 --> <param-name>contextConfigLocation</param-name> <param-value>WEB-INF/classes/spring/springmvc.xml</param-value> </init-param> </servlet> <servlet-mapping> <servlet-name>spring</servlet-name> <!-- 1、.action访问以.action结尾的 由DispatcherServlet进行解析 2、/,所有访问都由DispatcherServlet进行解析 --> <url-pattern>/</url-pattern> </servlet-mapping> <!-- 解决post乱码问题的过滤器 --> <filter> <filter-name>CharacterEncodingFilter</filter-name> <filter-class>org.springframework.web.filter.CharacterEncodingFilter</filter-class> <init-param> <param-name>encoding</param-name> <param-value>utf-8</param-value> </init-param> </filter> <filter-mapping> <filter-name>CharacterEncodingFilter</filter-name> <url-pattern>/*</url-pattern> </filter-mapping> <welcome-file-list> <welcome-file>welcome.jsp</welcome-file> </welcome-file-list> </web-app> |
2、springmvc.xml文件的配置:
|
1
2
3
4
5
6
7
8
9
10
11
12
13
14
15
16
17
18
19
20
21
22
23
24
25
26
27
28
29
30
31
32
33
34
35
36
37
38
39
40
41
42
43
44
45
46
47
48
49
50
51
52
53
54
55
56
57
58
59
60
61
62
63
64
65
66
67
68
69
70
71
72
73
74
75
76
|
<?xml version="1.0" encoding="UTF-8"?><beans xmlns="http://www.springframework.org/schema/beans"xmlns:xsi="http://www.w3.org/2001/XMLSchema-instance"xmlns:context="http://www.springframework.org/schema/context"xmlns:mvc="http://www.springframework.org/schema/mvc"xmlns:jdbc="http://www.springframework.org/schema/jdbc"xmlns:jee="http://www.springframework.org/schema/jee"xmlns:aop="http://www.springframework.org/schema/aop"xmlns:tx="http://www.springframework.org/schema/tx"xsi:schemaLocation="http://www.springframework.org/schema/beanshttp://www.springframework.org/schema/beans/spring-beans.xsdhttp://www.springframework.org/schema/contexthttp://www.springframework.org/schema/context/spring-context.xsdhttp://www.springframework.org/schema/mvchttp://www.springframework.org/schema/mvc/spring-mvc.xsdhttp://www.springframework.org/schema/txhttp://www.springframework.org/schema/tx/spring-tx.xsdhttp://www.springframework.org/schema/aophttp://www.springframework.org/schema/aop/spring-aop.xsd"> <!-- 配置视图解析器 --> <bean class="org.springframework.web.servlet.view.InternalResourceViewResolver"> <!-- 使用前缀和后缀 --> <property name="prefix" value="/"></property> <property name="suffix" value=".jsp"></property> </bean> <!-- 使用组件扫描的方式可以一次扫描多个Controller --> <context:component-scan base-package="com.wxisme.ssm.controller"> </context:component-scan> <!-- 配置注解的处理器映射器和处理器适配器 --> <mvc:annotation-driven conversion-service="conversionService"></mvc:annotation-driven> <!-- 自定义参数类型绑定 --> <bean id="conversionService" class="org.springframework.format.support.FormattingConversionServiceFactoryBean"> <property name="converters"> <list> <!-- 日期类型绑定 --> <bean class="com.wxisme.ssm.controller.converter.DateConverter"/> </list> </property> </bean> <!-- 访问静态资源文件 --> <!-- <mvc:default-servlet-handler/> 需要在web.xml中配置--> <mvc:resources mapping="/images/**" location="/images/" /> <mvc:resources mapping="/css/**" location="/css/" /> <mvc:resources mapping="/js/**" location="/js/" /> <mvc:resources mapping="/imgdata/**" location="/imgdata/" /> <!-- 定义拦截器 --> <mvc:interceptors> <!-- 直接定义拦截所有请求 --> <bean class="com.wxisme.ssm.interceptor.IdentityInterceptor"></bean> <!-- <mvc:interceptor> 拦截所有路径的请求 包括子路径 <mvc:mapping path="/**"/> <bean class="com.wxisme.ssm.interceptor.IdentityInterceptor"></bean> </mvc:interceptor> --> </mvc:interceptors> <!--配置上传文件数据解析器 --> <bean id="multipartResolver" class="org.springframework.web.multipart.commons.CommonsMultipartResolver"> <property name="maxUploadSize"> <value>9242880</value> </property> </bean> <!-- 定义全局异常处理器 --> <!-- 只有一个全局异常处理器起作用 --> <bean id="exceptionResolver" class="com.wxisme.ssm.exception.OverallExceptionResolver"></bean> </beans> |
3、applicationContext-*.xml的配置:
applicationContext-*.xml包括三个配置文件,分别对应数据层控制、业务逻辑service控制和事务的控制。
数据访问层的控制,applicationContext-dao.xml的配置:
|
1
2
3
4
5
6
7
8
9
10
11
12
13
14
15
16
17
18
19
20
21
22
23
24
25
26
27
28
29
30
31
32
33
34
35
36
37
38
39
40
|
<?xml version="1.0" encoding="UTF-8"?><beans xmlns="http://www.springframework.org/schema/beans"xmlns:xsi="http://www.w3.org/2001/XMLSchema-instance"xmlns:context="http://www.springframework.org/schema/context"xmlns:mvc="http://www.springframework.org/schema/mvc"xmlns:jdbc="http://www.springframework.org/schema/jdbc"xmlns:jee="http://www.springframework.org/schema/jee"xmlns:aop="http://www.springframework.org/schema/aop"xmlns:tx="http://www.springframework.org/schema/tx"xsi:schemaLocation="http://www.springframework.org/schema/beanshttp://www.springframework.org/schema/beans/spring-beans.xsdhttp://www.springframework.org/schema/contexthttp://www.springframework.org/schema/context/spring-context.xsdhttp://www.springframework.org/schema/mvchttp://www.springframework.org/schema/mvc/spring-mvc.xsdhttp://www.springframework.org/schema/txhttp://www.springframework.org/schema/tx/spring-tx.xsdhttp://www.springframework.org/schema/aophttp://www.springframework.org/schema/aop/spring-aop.xsd"><!-- 加载数据库连接的资源文件 --><context:property-placeholder location="/WEB-INF/classes/jdbc.properties"/><!-- 配置数据源 dbcp数据库连接池 --><bean id="dataSource" class="org.apache.commons.dbcp2.BasicDataSource" destroy-method="close"> <property name="driverClassName" value="${jdbc.driver}"/> <property name="url" value="${jdbc.url}"/> <property name="username" value="${jdbc.username}"/> <property name="password" value="${jdbc.password}"/></bean><!-- 配置sqlSessionFactory <br> Spring和MyBatis整合配置,jar包由MyBatis提供。<br>--><bean id="sqlSessionFactory" class="org.mybatis.spring.SqlSessionFactoryBean"> <!-- 数据库连接池 --> <property name="dataSource" ref="dataSource"/> <!-- 加载Mybatis全局配置文件 --> <property name="configLocation" value="/WEB-INF/classes/mybatis/SqlMapConfig.xml"/></bean><!-- 配置mapper扫描器,扫描mapper包下的所有mapper文件和类,要求mapper配置文件和类名需要一致。--> |
|
1
2
3
4
5
6
7
8
|
<bean class="org.mybatis.spring.mapper.MapperScannerConfigurer"> <!-- 扫描包路径,如果需要扫描多个包中间用半角逗号隔开 --> <property name="basePackage" value="com.wxisme.ssm.mapper"></property> <property name="sqlSessionFactoryBeanName" value="sqlSessionFactory"/></bean></beans> |
事务控制,applicationContext-transaction.xml的配置:
|
1
2
3
4
5
6
7
8
9
10
11
12
13
14
15
16
17
18
19
20
21
22
23
24
25
26
27
28
29
30
31
32
33
34
35
36
37
38
39
40
41
42
43
44
45
46
47
48
49
|
<?xml version="1.0" encoding="UTF-8"?><beans xmlns="http://www.springframework.org/schema/beans"xmlns:xsi="http://www.w3.org/2001/XMLSchema-instance"xmlns:context="http://www.springframework.org/schema/context"xmlns:mvc="http://www.springframework.org/schema/mvc"xmlns:jdbc="http://www.springframework.org/schema/jdbc"xmlns:jee="http://www.springframework.org/schema/jee"xmlns:aop="http://www.springframework.org/schema/aop"xmlns:tx="http://www.springframework.org/schema/tx"xsi:schemaLocation="http://www.springframework.org/schema/beanshttp://www.springframework.org/schema/beans/spring-beans.xsdhttp://www.springframework.org/schema/contexthttp://www.springframework.org/schema/context/spring-context.xsdhttp://www.springframework.org/schema/mvchttp://www.springframework.org/schema/mvc/spring-mvc.xsdhttp://www.springframework.org/schema/txhttp://www.springframework.org/schema/tx/spring-tx.xsdhttp://www.springframework.org/schema/aophttp://www.springframework.org/schema/aop/spring-aop.xsd"> <!-- 事务控制 对MyBatis操作数据库 spring使用JDBC事务控制类 --><bean id="transactionManager" class="org.springframework.jdbc.datasource.DataSourceTransactionManager"> <!-- 配置数据源 --> <property name="dataSource" ref="dataSource"/></bean> <!-- 通知 --> <tx:advice id="txAdvice" transaction-manager="transactionManager"> <tx:attributes> <!-- 传播行为 --> <tx:method name="save*" propagation="REQUIRED"/> <tx:method name="insert*" propagation="REQUIRED"/> <tx:method name="update*" propagation="REQUIRED"/> <tx:method name="delete*" propagation="REQUIRED"/> <tx:method name="find*" propagation="SUPPORTS" read-only="true"/> <tx:method name="select*" propagation="SUPPORTS" read-only="true"/> </tx:attributes> </tx:advice> <!-- 配置aop --> <aop:config> <aop:advisor advice-ref="txAdvice" pointcut="execution(* com.wxisme.ssm.service.impl.*.*(..))"/> </aop:config> </beans> |
4、 MyBatis的配置:
SqlMapConfig.xml的配置 全局setting配置这里省略,数据库连接池在spring整合文件中已经配置,具体setting配置参考官方文档。
|
1
2
3
4
5
6
7
8
9
10
11
12
13
14
15
16
17
18
19
20
21
|
<?xml version="1.0" encoding="UTF-8"?><!DOCTYPE configurationPUBLIC "-//mybatis.org//DTD Config 3.0//EN""http://mybatis.org/dtd/mybatis-3-config.dtd"><configuration><!-- 将数据库连接数据抽取到属性文件中方便测试 --><!-- <properties resource="/WEB-INF/classes/jdbc.properties"></properties> --><!-- 别名的定义 --><typeAliases> <!-- 批量定义别名 ,指定包名,自动扫描包中的类,别名即为类名,首字母大小写无所谓--> <package name="com.wxisme.ssm.po"/></typeAliases><!-- 数据库连接用数据库连接池 --><mappers> <!-- 通过扫描包的方式来进行批量加载映射文件 --> <package name="com.wxisme.ssm.mapper"/></mappers></configuration> |
原文:https://www.cnblogs.com/xichji/p/12147927.html