
接上篇文章,在这个流程中,PostMan可以代表客户端应用,订单服务是资源服务器,唯一缺少的是 认证服务器 ,下面来搭建认证服务器
项目结构:
Pom.xml : DependencyManager 引入SpringCloud的配置,Dependency引入 spring-cloud-starter-oauth2
<?xml version="1.0" encoding="UTF-8"?>
<project xmlns="http://maven.apache.org/POM/4.0.0" xmlns:xsi="http://www.w3.org/2001/XMLSchema-instance"
    xsi:schemaLocation="http://maven.apache.org/POM/4.0.0 https://maven.apache.org/xsd/maven-4.0.0.xsd">
    <modelVersion>4.0.0</modelVersion>

    <groupId>com.nb.security</groupId>
    <artifactId>nb-server-auth</artifactId>
    <version>0.0.1-SNAPSHOT</version>

    <properties>
        <mybatis-plus.version>3.1.2</mybatis-plus.version>
        <java.version>1.8</java.version>
        <project.reporting.outputEncoding>UTF-8</project.reporting.outputEncoding>
        <project.build.sourceEncoding>UTF-8</project.build.sourceEncoding>
        <mybatis-plus.version>3.1.2</mybatis-plus.version>
        <druid.version>1.1.17</druid.version>
        <jwt.version>0.9.1</jwt.version>
        <commons.version>2.6</commons.version>
        <aliyun-java-sdk-core.version>3.2.3</aliyun-java-sdk-core.version>
        <aliyun-java-sdk-dysmsapi.version>1.0.0</aliyun-java-sdk-dysmsapi.version>
        <aliyun.oss.version>3.6.0</aliyun.oss.version>
        <qc.cos.version>5.6.5</qc.cos.version>
    </properties>

    <dependencyManagement>
        <dependencies>
            <dependency>
                <!-- Import dependency management from Spring Boot -->
                <groupId>org.springframework.boot</groupId>
                <artifactId>spring-boot-dependencies</artifactId>
                <version>2.1.6.RELEASE</version>
                <type>pom</type>
                <scope>import</scope>
            </dependency>

            <!--spring cloud-->
            <dependency>
                <groupId>org.springframework.cloud</groupId>
                <artifactId>spring-cloud-dependencies</artifactId>
                <version>Greenwich.SR2</version>
                <type>pom</type>
                <scope>import</scope>
            </dependency>

        </dependencies>
    </dependencyManagement>


    <dependencies>


        <dependency>
            <groupId>org.springframework.boot</groupId>
            <artifactId>spring-boot-starter-web</artifactId>
        </dependency>

        <dependency>
            <groupId>org.springframework.cloud</groupId>
            <artifactId>spring-cloud-starter-oauth2</artifactId>
        </dependency>
        <!--集成mybatisplus-->
        <!-- mybatis-plus -->
        <dependency>
            <groupId>com.baomidou</groupId>
            <artifactId>mybatis-plus-boot-starter</artifactId>
            <version>${mybatis-plus.version}</version>
        </dependency>
        <dependency>
            <groupId>com.baomidou</groupId>
            <artifactId>mybatis-plus-generator</artifactId>
            <version>3.2.0</version>
        </dependency>
        <dependency>
            <groupId>org.apache.velocity</groupId>
            <artifactId>velocity-engine-core</artifactId>
            <version>2.1</version>
        </dependency>
        <dependency>
            <groupId>org.freemarker</groupId>
            <artifactId>freemarker</artifactId>
            <version>2.3.29</version>
        </dependency>

        <!-- druid -->
        <dependency>
            <groupId>com.alibaba</groupId>
            <artifactId>druid-spring-boot-starter</artifactId>
            <version>${druid.version}</version>
        </dependency>
        <!--mysql-->
        <dependency>
            <groupId>mysql</groupId>
            <artifactId>mysql-connector-java</artifactId>
            <version>5.1.47</version>
            <scope>runtime</scope>
        </dependency>


        <!--commons-lang3-->
        <dependency>
            <groupId>org.apache.commons</groupId>
            <artifactId>commons-lang3</artifactId>
        </dependency>


    </dependencies>

    <build>
        <plugins>
            <!--指定JDK编译版本 -->
            <plugin>
                <groupId>org.apache.maven.plugins</groupId>
                <artifactId>maven-compiler-plugin</artifactId>
                <configuration>
                    <source>1.8</source>
                    <target>1.8</target>
                    <encoding>UTF-8</encoding>
                </configuration>
            </plugin>
            <!-- 打包跳过测试 -->
            <plugin>
                <groupId>org.apache.maven.plugins</groupId>
                <artifactId>maven-surefire-plugin</artifactId>
                <configuration>
                    <skipTests>true</skipTests>
                </configuration>
            </plugin>
            <plugin>
                <groupId>org.springframework.boot</groupId>
                <artifactId>spring-boot-maven-plugin</artifactId>
            </plugin>
        </plugins>
    </build>

</project>
application.yml :
server:
  port: 9090
spring:
  application:
    name: auth-server
  datasource:
    url: jdbc:mysql://localhost:3306/db_oauth?allowMultiQueries=true&useUnicode=true&characterEncoding=UTF-8
    username: root
    password: root
    driver-class-name: com.mysql.jdbc.Driver


#mybatis plus 设置
mybatis-plus:
  mapper-locations: classpath*:mapper/*Mapper.xml
  global-config:
    # 关闭MP3.0自带的banner
    banner: false
    db-config:
      #主键类型  0:"数据库ID自增",1:"该类型为未设置主键类型", 2:"用户输入ID",3:"全局唯一ID (数字类型唯一ID)", 4:"全局唯一ID UUID",5:"字符串全局唯一ID (idWorker 的字符串表示)";
      id-type: 0
      # 默认数据库表下划线命名
      table-underline: true
  configuration:
    # 这个配置会将执行的sql打印出来,在开发或测试的时候可以用
    log-impl: org.apache.ibatis.logging.stdout.StdOutImpl
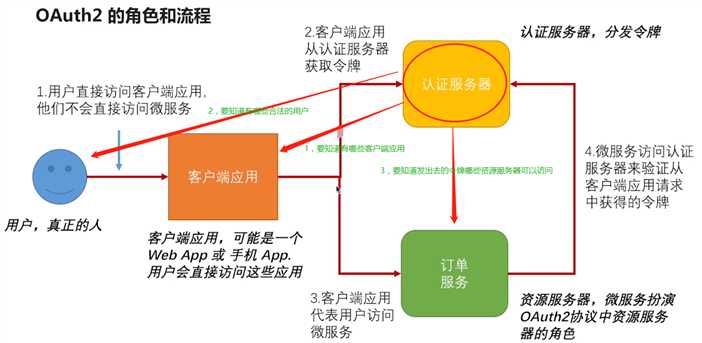
作为认证服务器,OAuth2 协议里的其他几个角色他都要知道,认证服务器都要知道各个角色都是谁,他们各自的特征是什么。
1,要知道有哪些客户端应用 来申请令牌
2,要知道有哪些合法的用户
3,要知道发出去的令牌,能够访问哪些资源服务器
写代码
我们需要新建一个认证服务器配置类 OAuth2AuthServerConfig ,继承 AuthorizationServerConfigurerAdapter ,AuthorizationServerConfigurerAdapter 是认证服务器适配器,我们看一下的源码:
/**
 * @author Dave Syer
 *
 */
public class AuthorizationServerConfigurerAdapter implements AuthorizationServerConfigurer {

    @Override
    public void configure(AuthorizationServerSecurityConfigurer security) throws Exception {
    }

    @Override
    public void configure(ClientDetailsServiceConfigurer clients) throws Exception {
    }

    @Override
    public void configure(AuthorizationServerEndpointsConfigurer endpoints) throws Exception {
    }

}
里面有三个方法,这三个方法,正对应上图中箭头所指的三个问题,我们需要重写这三个方法,实现自己的配置。
1,配置Client信息
从图中可以看出,认证服务器要配置两个Client,一个是【客户端应用】,他需要来认证服务器申请令牌,一个是 【订单服务】,他要来认证服务器验令牌。
重写AuthorizationServerConfigurerAdapter 的 configure(ClientDetailsServiceConfigurer clients) throws Exception 方法
/**
 * Created by: 李浩洋 on 2019-10-29
 *
 * 认证服务器
 **/
@Configuration  //这是一个配置类
@EnableAuthorizationServer //当前应用是一个认证服务器
public class OAuth2AuthServerConfig extends AuthorizationServerConfigurerAdapter {//AuthorizationServerConfigurerAdapter:认证服务器适配器

    //Spring 对密码加密的封装,自己配置下
    @Autowired
    private PasswordEncoder passwordEncoder;

    /**
     * 配置客户端应用的信息,让认证服务器知道有哪些客户端应用来申请令牌。
     *
     * ClientDetailsServiceConfigurer:客户端的详情服务的配置
     * @param clients
     * @throws Exception
     */
    @Override
    public void configure(ClientDetailsServiceConfigurer clients) throws Exception {
        clients.inMemory()//配置在内存里,后面修改为数据库里
                //~============== 注册【客户端应用】,使客户端应用能够访问认证服务器 ===========
                .withClient("orderApp")
                .secret(passwordEncoder.encode("123456")) //spring
                .scopes("read","write") //orderApp有哪些权限
                .accessTokenValiditySeconds(3600) //token的有效期
                .resourceIds("order-server") //资源服务器的id。发给orderApp的token,能访问哪些资源服务器,可以多个
                .authorizedGrantTypes("password")//授权方式,再给orderApp做授权的时候可以用哪种授权方式授权
                //~=============客户端应用配置结束 =====================
                .and()
                //~============== 注册【资源服务器-订单服务】(因为订单服务需要来认证服务器验令牌),使订单服务也能够访问认证服务器 ===========
                .withClient("orderServer")
                .secret(passwordEncoder.encode("123456")) //spring
                .scopes("read","write") //orderApp有哪些权限
                .accessTokenValiditySeconds(3600) //token的有效期
                .resourceIds("order-server") //资源服务器的id。发给orderApp的token,能访问哪些资源服务器,可以多个
                .authorizedGrantTypes("password");//授权方式,再给orderApp做授权的时候可以用哪种授权方式授权
    }


}
Spring Cloud微服务安全实战_4-4_OAuth2协议与微服务安全
原文:https://www.cnblogs.com/lihaoyang/p/12045480.html