SELinux功能(类似防火墙)大多数生产环境的做法是关闭,安全问题通过其它手段来解决。
查看selinux的配置文件:cat /etc/selinux/config
# SELINUX= can take one of these three values:
#     enforcing - SELinux security policy is enforced.
#     permissive - SELinux prints warnings instead of enforcing.
#     disabled - No SELinux policy is loaded.
SELINUX=enforcing
# SELINUXTYPE= can take one of these two values:
#     targeted - Targeted processes are protected,
#     mls - Multi Level Security protection.
SELINUXTYPE=targeted
SELINUX有三种状态:
目前默认系统是enforcing(强制执行)状态,我们需要将其改为disabled。
[root@oldboy ~]# sed -i ‘s#SELINUX=enforcing#SELINUX=disabled#g‘ /etc/selinux/config
修改配置文件可使配置永久生效,但必须要重启系统。
上面是通过sed的替换命令快速修改,也可通过vi或vim编辑器修改。
由于修改配置SElinux后,想要其生效,必须要重启系统。
因此,可配合使用setenforce 0这个临时使其关闭的命令,这样在重启前后都可以使SELinux关闭生效,也就是说无须立刻重启服务器了,在生产场景下Linux机器是不能随意重启的。
[root@oldboy ~]# getenforce
Enforcing
[root@oldboy ~]# setenforce
usage:  setenforce [ Enforcing | Permissive | 1 | 0 ]
[root@oldboy ~]# setenforce 0  # 临时将SELinux调成Permissive状态
[root@oldboy ~]# getenforce
Permissive
设定运行级别(runlevel)为3,即:表示使用文本命令行模式管理Linux。
cat /etc/inittab # 查看运行级别
[root@oldboy ~]# cat /etc/inittab
# inittab is only used by upstart for the default runlevel.
#
# ADDING OTHER CONFIGURATION HERE WILL HAVE NO EFFECT ON YOUR SYSTEM.
#
# System initialization is started by /etc/init/rcS.conf
#
# Individual runlevels are started by /etc/init/rc.conf
#
# Ctrl-Alt-Delete is handled by /etc/init/control-alt-delete.conf
#
# Terminal gettys are handled by /etc/init/tty.conf and /etc/init/serial.conf,
# with configuration in /etc/sysconfig/init.
#
# For information on how to write upstart event handlers, or how
# upstart works, see init(5), init(8), and initctl(8).
#
# Default runlevel. The runlevels used are:
#   0 - halt (Do NOT set initdefault to this)
#   1 - Single user mode
#   2 - Multiuser, without NFS (The same as 3, if you do not have networking)
#   3 - Full multiuser mode
#   4 - unused
#   5 - X11
#   6 - reboot (Do NOT set initdefault to this)
#
id:3:initdefault:
这里3就是Linux默认的运行级别,如果有需求可以将其修改为其它级别。工作中常用3级别,即文本模式。
企业环境新装Linux系统之后有必要保留的开机自启动服务有5个:
上述5个服务是安装完系统后建议保留的开机自启动服务,也几乎是一切生产服务器必须保留的开机自启动服务。
将来还可以根据服务器的业务使用场景调整相应的自启动服务。
设置开机自启动的常见方法:
1. 执行命令,然后手动选择处理的方法
- 方法1:执行ntsysv命令,然后在弹出的窗口中进行设置。
- 方法2:执行setup命令,system service,然后在弹出的窗口中进行设置。
方法1:执行 ntsysv 命令,然后在弹出的窗口中进行设置。
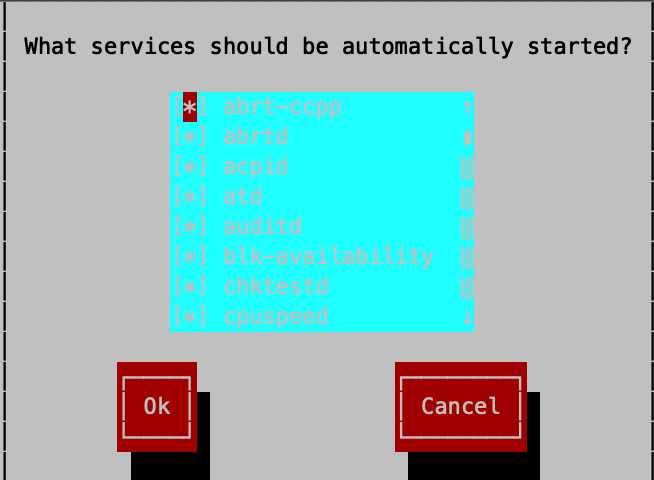
把* 去掉,就是取消了。
方法2:执行setup命令,system service,然后在弹出的窗口中进行设置。
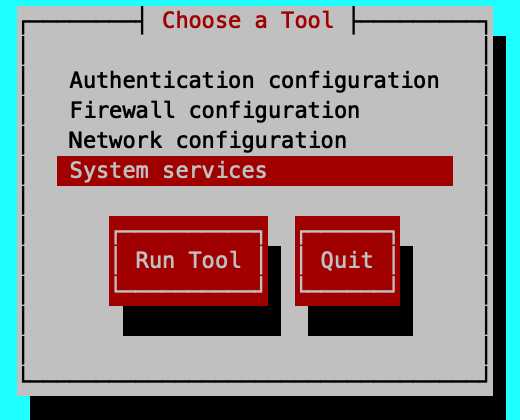
按tab键将光标移动到Quit。
2. 通过一行命令或Shell脚本进行设置
在快速设置前,先来查看默认情况下Linux系统开启的服务有哪些。
由于我们工作在文本模式3级别,因此只需要查找3级别上开启的服务即可。
查看命令如下:
chkconfig --list |grep 3:on
[root@oldboy ~]# chkconfig --list|grep 3:on
abrt-ccpp       0:off   1:off   2:off   3:on    4:off   5:on    6:off
abrtd           0:off   1:off   2:off   3:on    4:off   5:on    6:off
acpid           0:off   1:off   2:on    3:on    4:on    5:on    6:off
atd             0:off   1:off   2:off   3:on    4:on    5:on    6:off
auditd          0:off   1:off   2:on    3:on    4:on    5:on    6:off
blk-availability        0:off   1:on    2:on    3:on    4:on    5:on    6:off
chktestd        0:off   1:off   2:on    3:on    4:on    5:on    6:on
cpuspeed        0:off   1:on    2:on    3:on    4:on    5:on    6:off
crond           0:off   1:off   2:on    3:on    4:on    5:on    6:off
haldaemon       0:off   1:off   2:off   3:on    4:on    5:on    6:off
ip6tables       0:off   1:off   2:on    3:on    4:on    5:on    6:off
iptables        0:off   1:off   2:on    3:on    4:on    5:on    6:off
irqbalance      0:off   1:off   2:off   3:on    4:on    5:on    6:off
kdump           0:off   1:off   2:off   3:on    4:on    5:on    6:off
lvm2-monitor    0:off   1:on    2:on    3:on    4:on    5:on    6:off
mdmonitor       0:off   1:off   2:on    3:on    4:on    5:on    6:off
messagebus      0:off   1:off   2:on    3:on    4:on    5:on    6:off
netfs           0:off   1:off   2:off   3:on    4:on    5:on    6:off
network         0:off   1:off   2:on    3:on    4:on    5:on    6:off
postfix         0:off   1:off   2:on    3:on    4:on    5:on    6:off
rsyslog         0:off   1:off   2:on    3:on    4:on    5:on    6:off
sshd            0:off   1:off   2:on    3:on    4:on    5:on    6:off
sysstat         0:off   1:on    2:on    3:on    4:on    5:on    6:off
udev-post       0:off   1:on    2:on    3:on    4:on    5:on    6:off
可以看到,默认情况下,开启了很多服务,我们需要保留开启的所有服务也包含其中。
这里只需要关注3级别上的设置是否为on即可(on为开启状态)。
了解了系统在3级别上开启的服务后,就可以通过命令快速实现配置了。
下面是几种通过命令或脚本设置开机自启动的方法。
第一种快速处理方法:先全关闭,再开启需要保留的。
操作思路:
先将3级别文本模式下默认开启的服务都关闭,然后开启需要开启的服务。
[root@oldboy ~]# chkconfig --list|grep 3:on|awk ‘{print "chkconfig",$1,"off"}‘|bash
[root@oldboy ~]# chkconfig --list|grep -E ‘sshd|rsyslog|network|crond|sysstat‘|awk ‘{print "chkconfig",$1,"on"}‘|bash
第二种快速处理方法:Shell循环实现
操作思路:默认情况下开机需要保留的服务已经是开启状态了,因此,只需把3级别文本模式下的已开启但又不需要的服务都关掉就好了。
[root@oldboy ~]# for ser in `chkconfig --list|grep 3:on|grep -vE "sshd|sysstat|crond|network|rsyslog"|awk ‘{print $1}‘`;do chkconfig $ser off;done
第三种快速处理方法:不要Shell循环语句也一条命令搞定
操作思路:
默认情况下开机需要保留的服务都已经是开启状态了,因此,只需把3级别文本模式下已经开启但又不需要开启的服务都关掉就好了,这里将不用循环结构而是利用命令拼出所有要处理的命令字符串,然后通过bash将其当做命令执行。
[root@oldboy ~]# chkconfig --list|grep ‘3:on‘|egrep -v ‘crond|sshd|network|rsyslog|sysstat‘ |awk ‘{print "chkconfig",$1,"off"}‘|bash
将指定的要自启动的服务批量启动:
chkconfig --list|egrep ‘crond|sshd|network|rsyslog|sysstat‘|awk ‘{print "chkconfig",$1,"on"}‘|bash
关闭防火墙的目的是让初学者学习更方便,将来学了iptables技术后可再统一开启。
在企业环境中,一般只有配置外网IP的Linux服务器才需要开启防火墙,但即使有外网IP,高并发,高流量的业务服务器仍然不能开启防火墙,因为开启后会有较大性能损失,导致网站访问速度很慢,这种情况下只能在前端加更好的硬件防火墙了。
临时关闭防火墙:
/etc/init.d/iptables stop
[root@oldboy ~]# /etc/init.d/iptables stop
iptables: Setting chains to policy ACCEPT: filter       [  OK  ]
iptables: Flushing firewall rules:                      [  OK  ]
iptables: Unloading modules:                            [  OK  ]
[root@oldboy ~]# /etc/init.d/iptables status
iptables: Firewall is not running
永久关闭防火墙:
chkconfig iptables off 开关开机自启动命令
pdf 89
调整Linux系统的字符集设置。
查看linux字符集配置文件i18n:
[root@oldboy ~]# cat /etc/sysconfig/i18n
LANG="en_US.UTF-8"
SYSFONT="latarcyrheb-sun16"
用sed替换掉LANG的字符集,将en_US.UTF-8改为zh_CN.UTF-8。
sed -i ‘s#en_US#zh_CN#g‘ /etc/sysconfig/i18n
用echo $LANG,发现虽然文件修改修改成功,还是LANG还是原来的,需要source启动生效。
source启动生效:
[root@oldboy ~]# . /etc/sysconfig/i18n
[root@oldboy ~]# echo $LANG
zh_CN.UTF-8
注意:
设置闲置账号超时时间,临时生效:
export HISTSIZE=5
设定用户的命令行历史记录文件(~/.bash_history)记录指定命令数量的示例命令如下。
注意,此处的配置仅临时生效:
[root@oldboy ~]# export HISTFILESIZE=3
[root@oldboy ~]# cat ~/.bash_history    # 命令行文件的对应记录数,一般10-20个为佳
ls
cat /etc/sysconfig/i18n
. /etc/sysconfig/il8n
将下面命令放入配置文件,可使其永久生效:
echo "export TIMEOUT=300" >>/etc/profile
echo "export HISTSIZE=5" >>/etc/profile
echo "export HISTFILESIZE=5" >>/etc/profile

tail -3 /etc/profile

source /etc/profile  # 使得配置文件生效
在上述命令中,涉及的系统控制变量说明:
实际工作中类似的变量还有不少,大家可以根据企业工作需求选择使用,最好执行前加上export命令。
更多的Linux系统的环境变量,大家可以执行man bash查询。
清除Linux系统登录时的系统信息介绍:

[root@oldboy ~]# cat /etc/issue
CentOS release 6.7 (Final)
Kernel \r on an \m

[root@oldboy ~]# >/etc/issue  # 清除/etc/issue里面的系统信息说明
[root@oldboy ~]# cat /etc/issue
由于不同的版本的Linux的有漏洞,信息越明确,越容易被攻击。
原文:https://www.cnblogs.com/zoe233/p/11918983.html