| 目录 | 内容 |
| system | 系统目录,放置在Android运行所需的核心库 |
| data | 应用目录,放置着运行在Android上的应用及其数据 |
| sdcard | 扩展存储卡目录,用来存放共享的数据 |
| mnt | 记录Android挂载的外部存储信息 |

 1 // =================get SDCard information===================
 2     public static boolean isSdcardAvailable() {
 3         String status = Environment.getExternalStorageState();
 4         //Environment.MEDIA_MOUNTED表示SD卡正常挂载
 5         if (status.equals(Environment.MEDIA_MOUNTED)) {
 6             return true;
 7         }
 8         return false;
 9     }
10
11     public static long getSDAllSizeKB() {
12         //sd卡的位置
13         File path = Environment.getExternalStorageDirectory();
14         //StatFs获取的都是以block为单位的
15         StatFs sf = new StatFs(path.getPath());
16         // 得到单个block的大小
17         long blockSize = sf.getBlockSize();
18         // 获取所有数据块数
19         long allBlocks = sf.getBlockCount();
20         // 返回SD卡大小
21         return (allBlocks * blockSize) / 1024; // KB
22     }
23
24     /**
25      * free size for normal application
26      * @return
27      */
28     public static long getSDAvalibleSizeKB() {
29         File path = Environment.getExternalStorageDirectory();
30         StatFs sf = new StatFs(path.getPath());
31         long blockSize = sf.getBlockSize();
32         long avaliableSize = sf.getAvailableBlocks();
33         return (avaliableSize * blockSize) / 1024;// KB
34     }
Environment.getExternalStorageDirectory()表示获取扩展存储器的目录。(建议使用此方法动态获取,因为sdcard这个目录路径是可配置的)
StatFs.getBlockSize在API18后变为StatFs.getBlockSizeLong,其他类似的getBlock方法也一样,关于StatFs,详情可以看这篇博文
然后在activity中的button1加入事件
case R.id.button1: {
            Log.d("TEST", "sdcard?"+FileUtil.isSdcardAvailable());
            Log.d("TEST", "全部容量"+(float)FileUtil.getSDAllSizeKB()/1024/1024);
            Log.d("TEST", "可用容量"+(float)FileUtil.getSDAvalibleSizeKB()/1024/1024);
            Toast.makeText(this, "status", Toast.LENGTH_SHORT).show();
            break;
        }
运行结果如下
接下来我们来判断某个文件夹是否存在在SD卡中以及创建一个文件夹
/**
     * @param director 文件夹名称
     * @return
     */
    public static boolean isFileExist(String director) {
        File file = new File(Environment.getExternalStorageDirectory()
                + File.separator + director);
        return file.exists();
    }

    /**
     * create multiple director
     * @param path
     * @return
     */
    public static boolean createFile(String director) {
        if (isFileExist(director)) {
            return true;
        } else {
            File file = new File(Environment.getExternalStorageDirectory()
                    + File.separator + director);
            if (!file.mkdirs()) {
                return false;
            }
            return true;
        }
    }
其中File.separator是表示分隔符,在不同操作系统下是不同的,如windows就是代表"/",而在Linux下却是代表"\"。所以介意使用File.separator来代替分隔符。File.mkdirs()表示创建一个文件夹,且可附带创建父目录,而mkdir()不行,详情的File大家可以查看官方文档,或者看看这篇博文
然后在activity中的button2加入响应事件
case R.id.button2: {
            Log.d("TEST", "example文件夹存在?"+FileUtil.isFileExist("example"));
            Log.d("TEST", "创建forexample文件夹"+FileUtil.createFile("forexample"));
            Toast.makeText(this, "IsFile", Toast.LENGTH_SHORT).show();
            break;
        }
运行后可以看到
我们会发现在手机的sdcard目录下新建了一个forexample的文件夹。
最后我们来实现文件的读和写
写:
/**
     *
     * @param director
     *            (you don‘t need to begin with
     *            Environment.getExternalStorageDirectory()+File.separator)
     * @param fileName
     * @param content
     * @param encoding
     *            (UTF-8...)
     * @param isAppend
     *            : Context.MODE_APPEND
     * @return
     */
    public static File writeToSDCardFile(String directory, String fileName,
            String content, String encoding, boolean isAppend) {
        // mobile SD card path +path
        File file = null;
        OutputStream os = null;
        try {
            if (!createFile(directory)) {
                return file;
            }
            file = new File(Environment.getExternalStorageDirectory()
                    + File.separator + directory + File.separator + fileName);
            os = new FileOutputStream(file, isAppend);
            if (encoding.equals("")) {
                os.write(content.getBytes());
            } else {
                os.write(content.getBytes(encoding));
            }
            os.flush();
        } catch (IOException e) {
            Log.e("FileUtil", "writeToSDCardFile:" + e.getMessage());
        } finally {
            try {
                if (os != null) {
                    os.close();
                }
            } catch (IOException e) {
                e.printStackTrace();
            }
        }
        return file;
    }

    /**
     * write data from inputstream to SDCard
     */
    public File writeToSDCardFromInput(String directory, String fileName,
            InputStream input) {
        File file = null;
        OutputStream os = null;
        try {
            if (createFile(directory)) {
                return file;
            }
            file = new File(Environment.getExternalStorageDirectory()
                    + File.separator + directory + File.separator + fileName);
            os = new FileOutputStream(file);
            byte[] data = new byte[bufferd];
            int length = -1;
            while ((length = input.read(data)) != -1) {
                os.write(data, 0, length);
            }
            // clear cache
            os.flush();
        } catch (Exception e) {
            Log.e("FileUtil", "" + e.getMessage());
            e.printStackTrace();
        } finally {
            try {
                os.close();
            } catch (Exception e) {
                e.printStackTrace();
            }
        }
        return file;
    }
从上面可以看到有两种写入的方法,一种是将字符串直接写入,另一种是将数据流写到文件中。还有一点要提的是file的默认目录就是sdcard的目录,所以开头不必每次都要加sdcard的目录路径。
FileOutputStream(file, isAppend) 两个参数,左边是File文件,而右边是一个boolean值,为true时,数据将会接在原来文件的后面写入,而false是则会覆盖。
读:
public static String ReadFromSDCardFile(String directory,String fileName){
        String res="";
        File file = null;
        file = new File(Environment.getExternalStorageDirectory()
                + File.separator + directory + File.separator + fileName);
        try {
            FileInputStream fis = new FileInputStream(file);
            int length = fis.available();
            byte [] buffer = new byte[length];
            fis.read(buffer);
            //将字节按照编码格式转成字符串
            res = EncodingUtils.getString(buffer, "UTF-8");
            fis.close();
            return res;
        }catch (FileNotFoundException  e) {
            // TODO Auto-generated catch block
            Log.d("TEST", "FileNotFound");
            e.printStackTrace();
        }catch (Exception  e) {
            Log.d("TEST", "Can Not Open File");
            e.printStackTrace();
        }
        return null;
    }
编码默认是UTF-8,若是想要改变的话,将其作为参数传入就行。
Activity中在按钮中加入响应
case R.id.button3: {
            FileUtil.writeToSDCardFile("forexample", "test.txt",
                    editText.getText().toString(), "UTF-8", true);
            Toast.makeText(this, "WriteFile", Toast.LENGTH_SHORT).show();
            break;
        }
        case R.id.button4: {
            textView.setText(FileUtil.ReadFromSDCardFile("forexample", "test.txt"));
            Toast.makeText(this, "ReadFile", Toast.LENGTH_SHORT).show();
            break;
        }
在文字编辑框上写入“我是cpacm”,先点击writefile按钮,再点击ReadFile,得到运行结果
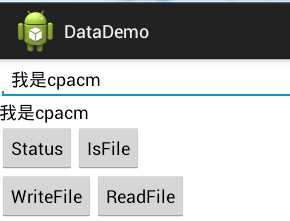
同时在根目录下的forexample文件夹里会找到test.txt,里面有着“我是cpacm”的一行字。到此,文件的读写成功。
(2)放在该应用数据目录下的文件读写
存储在应用目录下的私有数据目录,通常不会通过File类的方式直接读写,而是利用一些封装过的类或函数来操作。一般可以通过Context.openFileOutput来执行。
在Activity加入两个方法,分别为文件的读和写
    public void writeFile(String fileName,String writestr){
        try{
                FileOutputStream fout =openFileOutput(fileName,MODE_PRIVATE);
                byte [] bytes = writestr.getBytes();
                fout.write(bytes);
                fout.close();
              }
                catch(Exception e){
                e.printStackTrace();
               }
        }

        //读数据
    public String readFile(String fileName){
      String res="";
      try{
             FileInputStream fin = openFileInput(fileName);
             int length = fin.available();
             byte [] buffer = new byte[length];
             fin.read(buffer);
             res = EncodingUtils.getString(buffer, "UTF-8");
             fin.close();
         }
         catch(Exception e){
             e.printStackTrace();
         }
         return res;
    }
同时在按钮的响应中加入
case R.id.button5: {
            writeFile("test2.txt",editText.getText().toString());
            Toast.makeText(this, "WritePrivateFile", Toast.LENGTH_SHORT).show();
            break;
        }
        case R.id.button6: {
            textView.setText(readFile("test2.txt"));
            Toast.makeText(this, "ReadPrivateFile", Toast.LENGTH_SHORT).show();
            break;
        }
效果图跟上张一样。
最后不要忘记在配置文件中声明权限
<uses-permission android:name="android.permission.WRITE_EXTERNAL_STORAGE" />
<uses-permission android:name="android.permission.MOUNT_UNMOUNT_FILESYSTEMS" />
用户在使用应用时,常常会有一些个人偏好。为了满足不同用户的需求,应用通常会提供对应的设置项(Preference),让用户根据自己的喜好选择。这些设置信息会存储在本地并进行结构化地展示,使用户可以编辑。
private SharedPreferences userInfo;
        //在界面组件或服务组件中调用,构造应用默认的设置文件,默认文件名字为_preferences.xml
        //userInfo = PreferenceManager.getDefaultSharedPreferences(this);
        //或获取指定名字的SharedPreferences对象  参数分别为存储的文件名和存储模式。
        userInfo = getSharedPreferences("preferences", Activity.MODE_PRIVATE);

        //读取数据,如果无法找到则会使用默认值
        String username = userInfo.getString("name", "未定义姓名");
        String msg = userInfo.getString("msg", "未定义信息");
        //显示文本
        textView.setText(username+","+msg);
两种获取方式,默认或者指定一个文件
接下来加入响应按钮
        case R.id.button7: {
            //获得SharedPreferences的编辑器
            SharedPreferences.Editor editor = userInfo.edit();
            //将信息存入相应的键值中
            editor.putString("name", editText.getText().toString()).commit();
            Toast.makeText(this, "SetName", Toast.LENGTH_SHORT).show();
            break;
        }
        case R.id.button8: {
            //获得SharedPreferences的编辑器
            SharedPreferences.Editor editor = userInfo.edit();
            //将信息存入相应的键值中ss
            editor.putString("msg", editText.getText().toString()).commit();
            Toast.makeText(this, "SetMessage", Toast.LENGTH_SHORT).show();
            break;
        }
        case R.id.button9: {
            //获得SharedPreferences文件
            userInfo = getSharedPreferences("preferences", Activity.MODE_PRIVATE);
            String username = userInfo.getString("name", "未定义姓名");
            String msg = userInfo.getString("msg", "未定义信息");
            textView.setText(username+","+msg);
            Toast.makeText(this, "ShowMsg", Toast.LENGTH_SHORT).show();
            break;
        }
        case R.id.button10: {
            //输出XML文件
            textView.setText(print());
            Toast.makeText(this, "ShowXML", Toast.LENGTH_SHORT).show();
            break;
        }
按钮7,8可以设置信息,按钮9则从SharedPreferences文件中读取信息并显示在文字框中。按钮10会显示这个XML文件中的所有信息。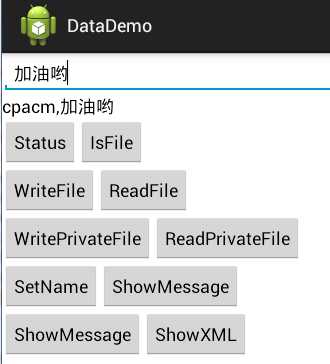
访问其他应用中的Preference(在SecondApp中访问FirstApp的数据),前提条件是:FirstApp的preference创建时指定了Context.MODE_WORLD_READABLE或者Context.MODE_WORLD_WRITEABLE权限。
如:在<package name>为com.first.app的应用使用下面语句创建了preference("first_app_perferences")。
在SecondApp中要访问FirstApp应用中的preference,首先需要创建FirstApp应用的Context,然后通过Context 访问preference ,访问preference时会在应用所在包下的shared_prefs目录找到preference
Context firstAppContext = createPackageContext("com.first.app", Context.CONTEXT_IGNORE_SECURITY);
SharedPreferences sharedPreferences = firstAppContext.getSharedPreferences("first_app_perferences",  Context.MODE_WORLD_READABLE);
String name = sharedPreferences.getString("name", "");
int age = sharedPreferences.getInt("age", 0);
如果不通过创建Context访问FirstApp应用的preference,可以以读取xml文件方式直接访问FirstApp应用的preference对应的xml文件,
如:
File xmlFile = new File(“/data/data/<package name>/shared_prefs/first_app_perferences.xml”);//<package name>应替换成应用的包名: com.first.app
public class PreferencesDemo extends PreferenceActivity{
     @Override
     public void onCreate(Bundle savadInstanceState){
         super.onCreate(savadInstanceState);
         this.addPreferencesFromResource(R.xml.preference);
     }
}
【Android的从零单排开发日记】——Android数据存储(上)
原文:http://www.cnblogs.com/yhws/p/3932616.html