Mongodb安装
Linux版本:CentOS release 6.9
Mongodb版本:mongodb-linux-x86_64-3.6.1.tgz
示例是在一台主机上安装mongodb集群
|
|
端口 |
||
|
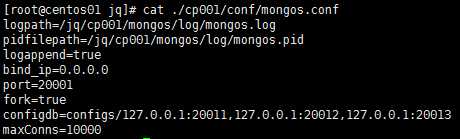
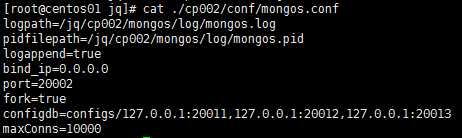
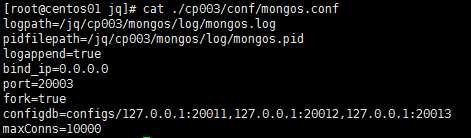
路由进程mongo |
20001 |
20002 |
20003 |
|
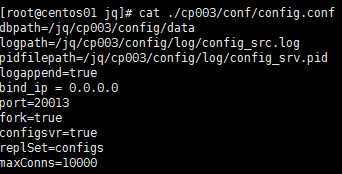
配置服务器config |
20011 |
20012 |
20013 |
|
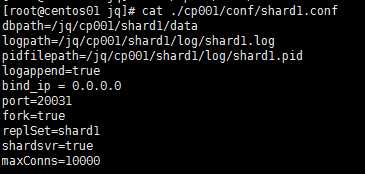
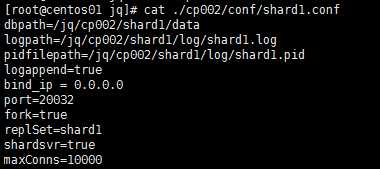
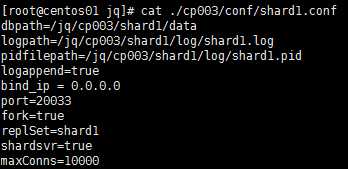
分片服务器shard1 |
20031 |
20032 |
20033 |
|
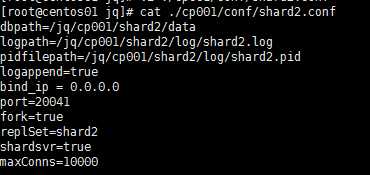
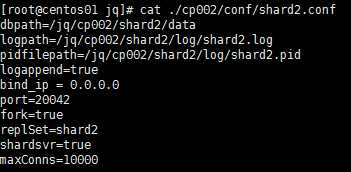
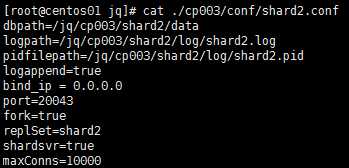
分片服务器shard2 |
20041 |
20042 |
20043 |
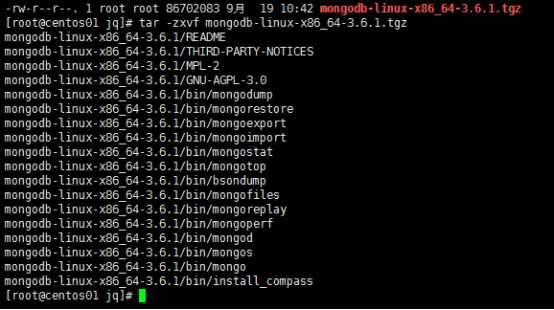
1、解压文件
执行解压命令:tar -zxvf mongodb-linux-x86_64-3.6.1.tgz
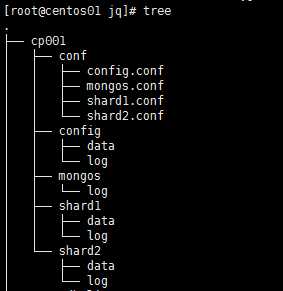
2、创建数据,日志目录,结构如下 在同台机器创建三主三从三配置三路由架构cp001,cp002,cp003目录结构均一样
3、
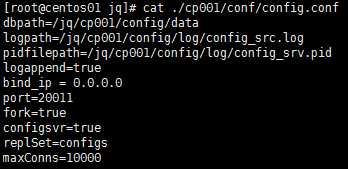
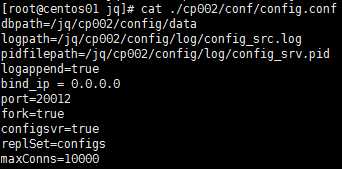
1、配置文件
dbpath数据存放位置
logpath日志文件位置
pidfilepath进程号存放位置
port端口号
fork是否后台运行
replSet副本集名称
configdb监听的配置服务器,只能有1个或者3个 configs为配置服务器的副本集名字
1)mongo配置服务器的配置
2)mongo路由服务器配置
3)shard1配置
4)shard2配置
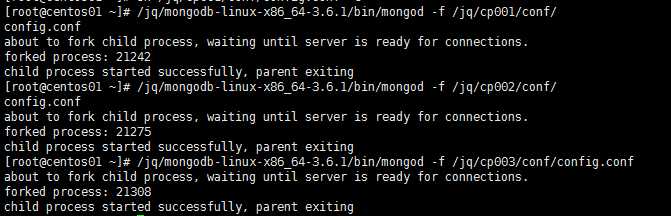
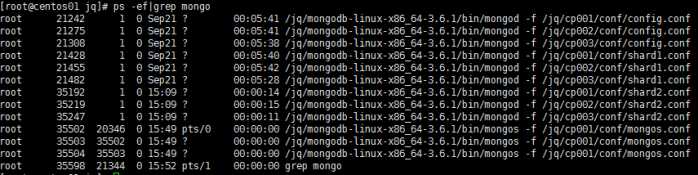
4、启动Mongodb
1)启动配置
/jq/mongodb-linux-x86_64-3.6.1/bin/mongod -f /jq/cp001/conf/config.conf
/jq/mongodb-linux-x86_64-3.6.1/bin/mongod -f /jq/cp002/conf/config.conf
/jq/mongodb-linux-x86_64-3.6.1/bin/mongod -f /jq/cp003/conf/config.conf
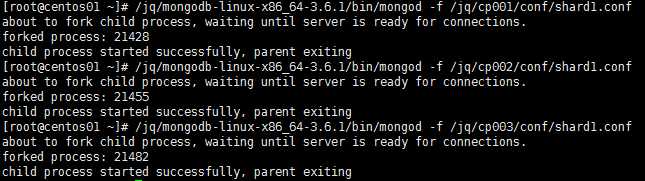
2)启动复制集
/jq/mongodb-linux-x86_64-3.6.1/bin/mongod -f /jq/cp001/conf/shard1.conf
/jq/mongodb-linux-x86_64-3.6.1/bin/mongod -f /jq/cp002/conf/shard1.conf
/jq/mongodb-linux-x86_64-3.6.1/bin/mongod -f /jq/cp003/conf/shard1.conf
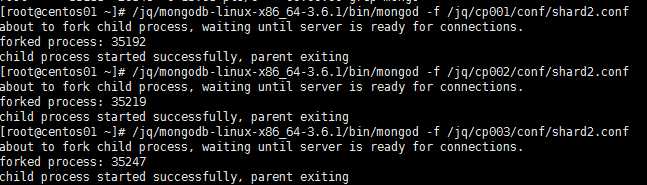
/jq/mongodb-linux-x86_64-3.6.1/bin/mongod -f /jq/cp001/conf/shard2.conf
/jq/mongodb-linux-x86_64-3.6.1/bin/mongod -f /jq/cp002/conf/shard2.conf
/jq/mongodb-linux-x86_64-3.6.1/bin/mongod -f /jq/cp003/conf/shard2.conf
3)启动路由
/jq/mongodb-linux-x86_64-3.6.1/bin/mongos -f /jq/cp001/conf/mongos.conf
*由于是同一台主机,只执行一个配置
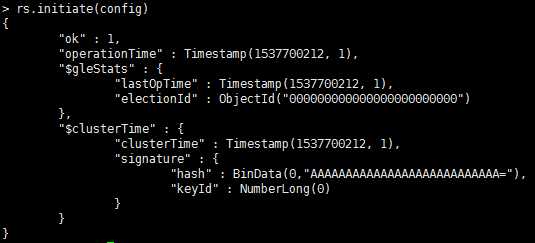
5、登陆任意一个config server节点,配置副本集
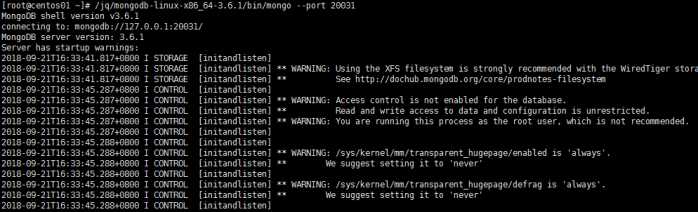
/jq/mongodb-linux-x86_64-3.6.1/bin/mongo --port 20011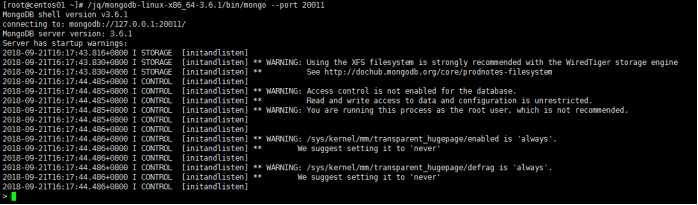
#设置变量 这里的id号,要和配置文件中的副本集名称相同
config = {
_id : "configs",
members : [
{_id : 0, host : "127.0.0.1:20011" },
{_id : 1, host : "127.0.0.1:20012" },
{_id : 2, host : "127.0.0.1:20013" }
]
}
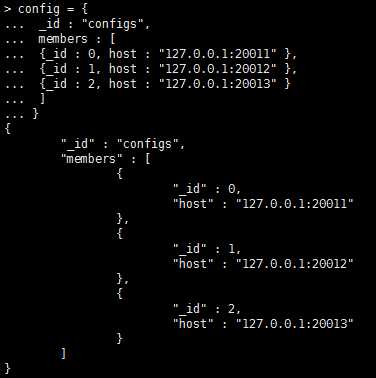
#初始化副本集
rs.initiate(config)
6、配置shard
1)配置shard1,进入任意一个shard1节点
/jq/mongodb-linux-x86_64-3.6.1/bin/mongo --port 20031
#设置变量
config = {
_id : "shard1",
members : [
{_id : 0, host : "127.0.0.1:20031" },
{_id : 1, host : "127.0.0.1:20032" },
{_id : 2, host : "127.0.0.1:20033" }
]
}
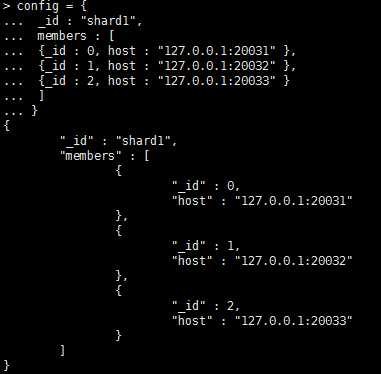
#设置shard1初始化
rs.initiate(config)

2)配置shard2,进入任意一个shard2节点
/jq/mongodb-linux-x86_64-3.6.1/bin/mongo --port 20041
#设置变量
config = {
_id : "shard2",
members : [
{_id : 0, host : "127.0.0.1:20041" },
{_id : 1, host : "127.0.0.1:20042" },
{_id : 2, host : "127.0.0.1:20043" }
]
}
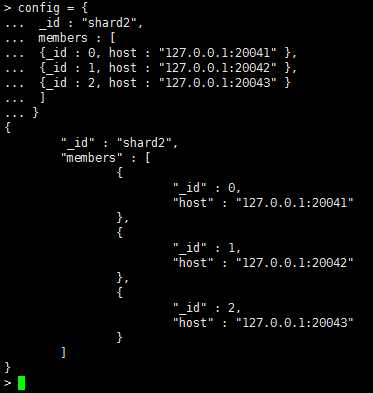
#设置shard2初始化
rs.initiate(config)

7、启用分片
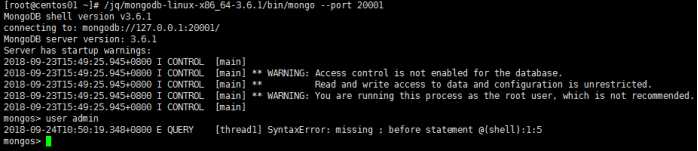
登陆任意一个mongos
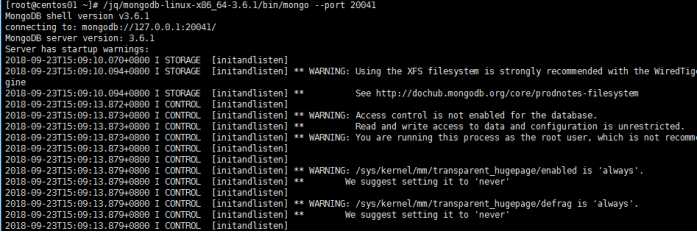
/jq/mongodb-linux-x86_64-3.6.1/bin/mongo --port 20001
切换到admin数据库
use admin
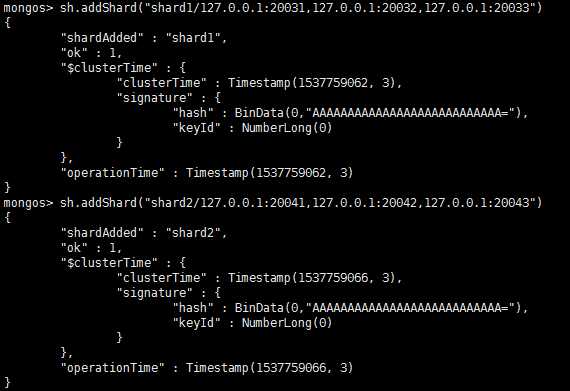
串联路由服务器与分配副本集
sh.addShard("shard1/127.0.0.1:20031,127.0.0.1:20032,127.0.0.1:20033")
sh.addShard("shard2/127.0.0.1:20041,127.0.0.1:20042,127.0.0.1:20043")
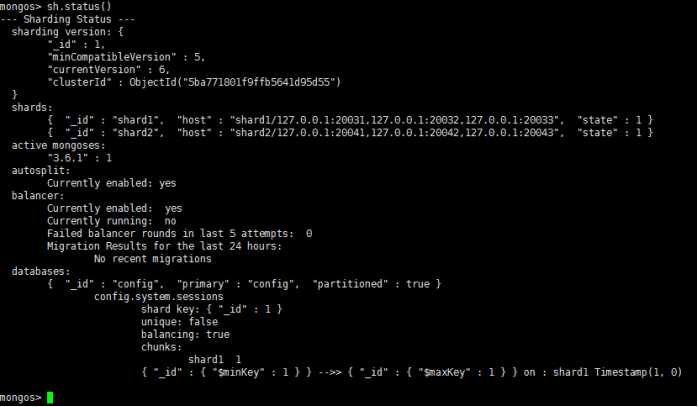
查看状态
sh.status()
8、测试分片
*不启用分片
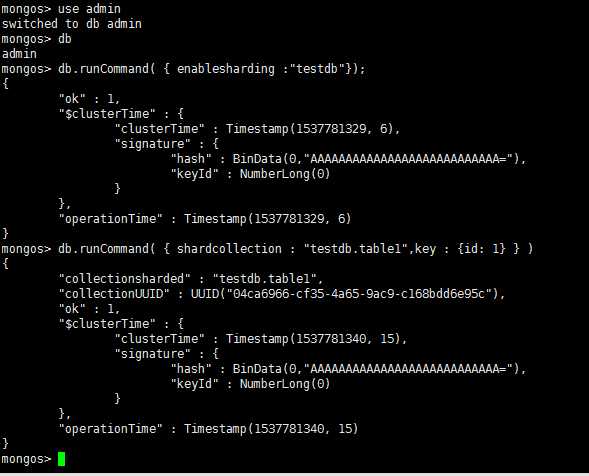
use admin
#指定testdb分片生效
db.runCommand( { enablesharding :"testdb"});
#指定数据库里需要分片的集合和片键
db.runCommand( { shardcollection : "testdb.table1",key : {id: 1} } )
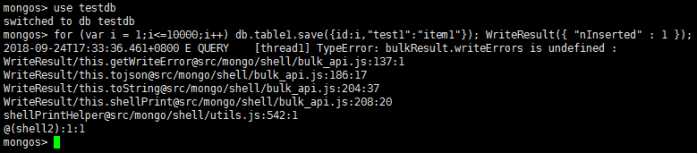
for (var i = 1;i<=10000;i++) db.table1.save({id:i,"test1":"item1"}); WriteResult({ "nInserted" : 1 });
#查看状态
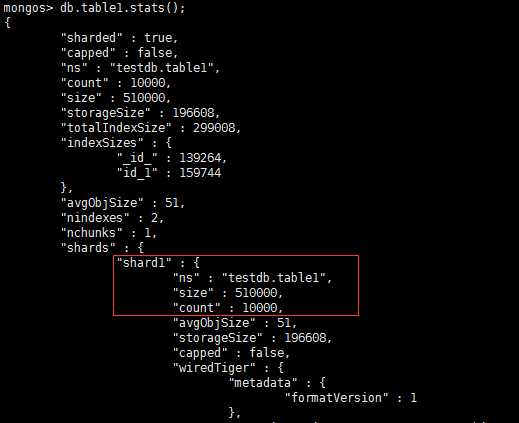
db.table1.stats();
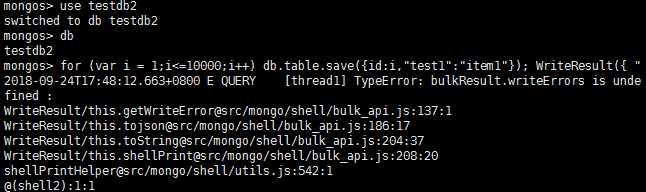
*启用分片
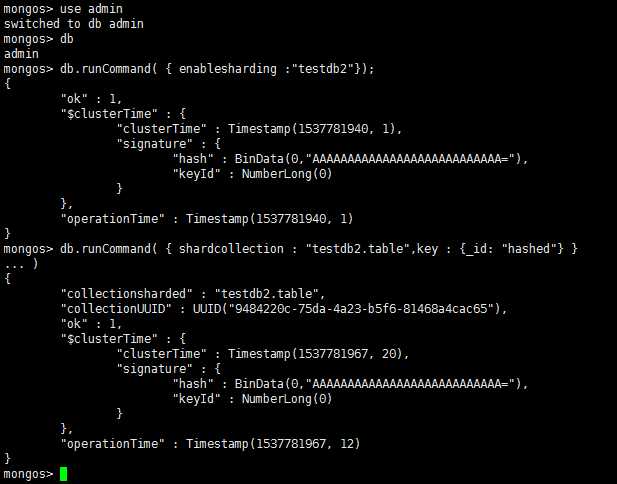
use admin
#指定testdb分片生效
db.runCommand( { enablesharding :"testdb2"});
#指定数据库里需要分片的集合和片键
db.runCommand( { shardcollection : "testdb2.table",key : {_id: "hashed"} })
for (var i = 1;i<=10000;i++) db.table.save({id:i,"test1":"item1"}); WriteResult({ "nInserted" : 1 });
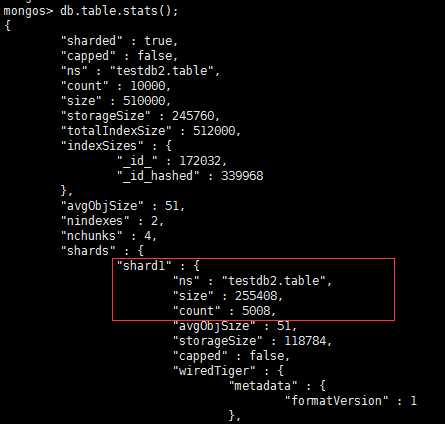
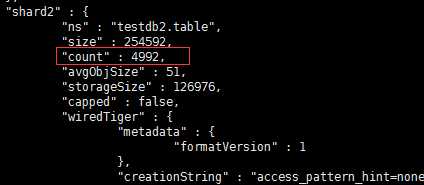
#查看状态
db.table1.stats();
停止MongoDB
/jq/mongodb-linux-x86_64-3.6.1/bin/mongod -f /jq/cp001/conf/config.conf --shutdown
/jq/mongodb-linux-x86_64-3.6.1/bin/mongod -f /jq/cp002/conf/config.conf --shutdown
/jq/mongodb-linux-x86_64-3.6.1/bin/mongod -f /jq/cp003/conf/config.conf --shutdown
/jq/mongodb-linux-x86_64-3.6.1/bin/mongod -f /jq/cp001/conf/shard1.conf --shutdown
/jq/mongodb-linux-x86_64-3.6.1/bin/mongod -f /jq/cp002/conf/shard1.conf --shutdown
/jq/mongodb-linux-x86_64-3.6.1/bin/mongod -f /jq/cp003/conf/shard1.conf --shutdown
/jq/mongodb-linux-x86_64-3.6.1/bin/mongod -f /jq/cp001/conf/shard2.conf --shutdown
/jq/mongodb-linux-x86_64-3.6.1/bin/mongod -f /jq/cp002/conf/shard2.conf --shutdown
/jq/mongodb-linux-x86_64-3.6.1/bin/mongod -f /jq/cp003/conf/shard2.conf --shutdown
/jq/mongodb-linux-x86_64-3.6.1/bin/mongos -f /jq/cp001/conf/mongos.conf --shutdown
原文:https://www.cnblogs.com/xuchen0117/p/11781507.html