1.什么是索引 ?-- 目录
索引就是建立起的一个在存储表阶段就有的一个存储结构,能在查询的时候加速。
2.索引的重要性:
读写比例 为 10:1,所有读(查询)的速度就至关重要了。
3.索引的原理:
block 磁盘预读原理
相当于读文件操作的 :for line in f
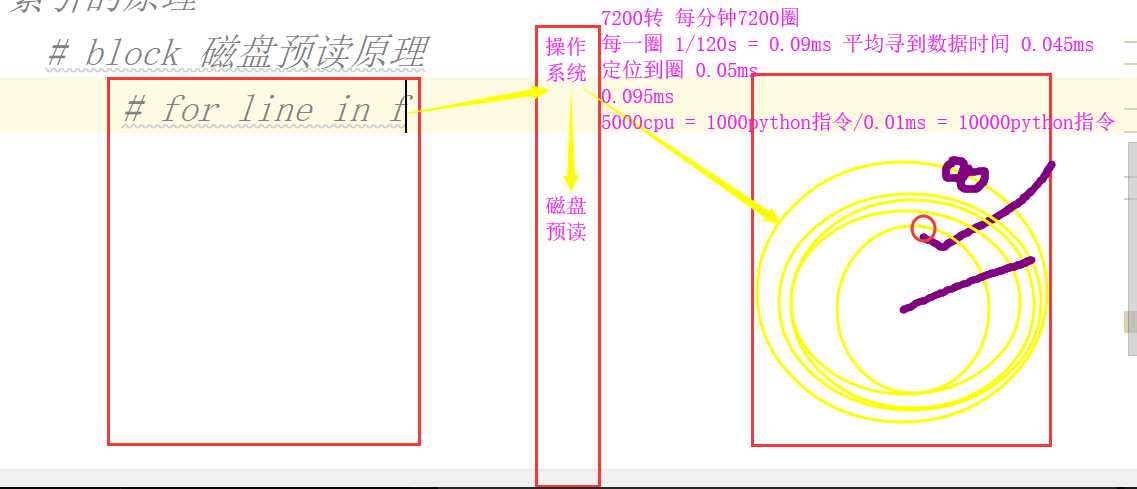
每个索引块可以存4096个字节
读硬盘的io操作的时间非常的长,比CPU执行指令的时间长很多,尽量的减少IO次数才是读写数据的主要要解决的问题。
1.数据库的存储方式:
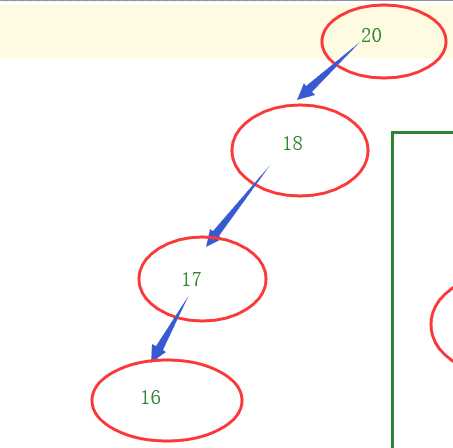
1.新的数据结构 —— 树
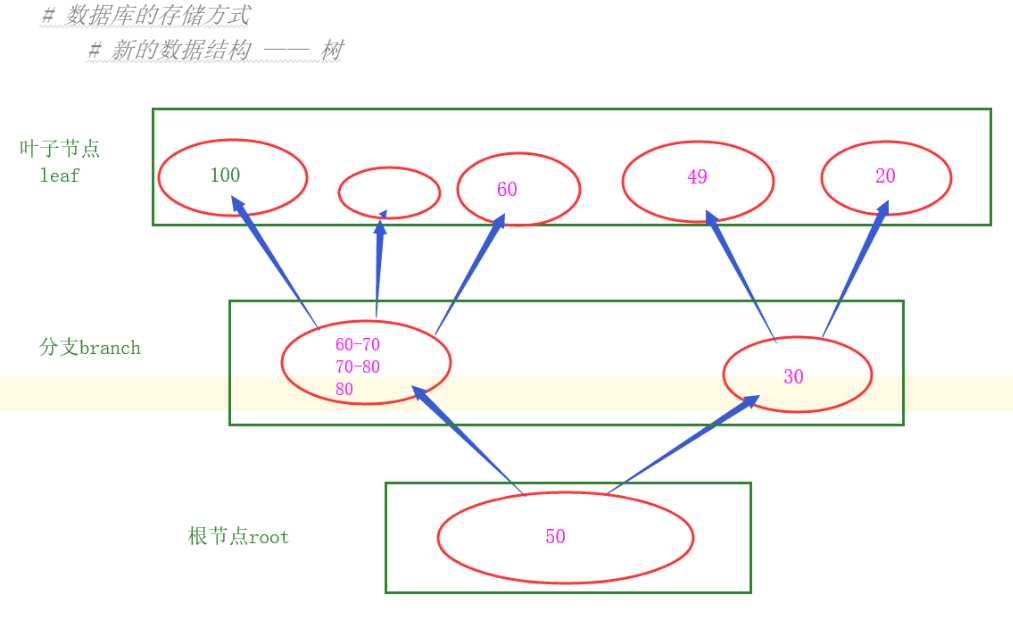
缺点:容易出现数据只在一端,造成读取慢(io操作次数多)。
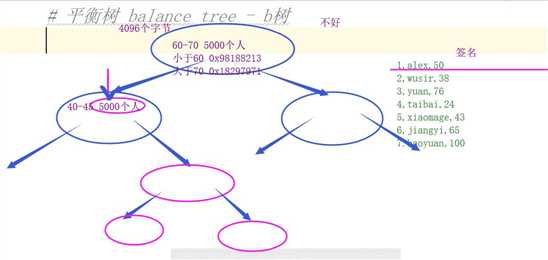
2.平衡树 balance tree - b树
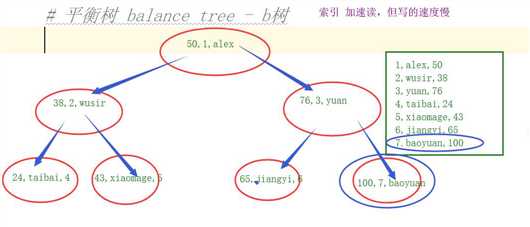
缺点:存储的数据长度大、能存储的数据条数有限,造成书的高度比较大,读取效率很低。
3.在b树的基础上进行了改良 - b+树

4.mysql当中所有的b+树索引的高度都基本控制在3层:
5.什么会影响索引的效率? —— 树的高度
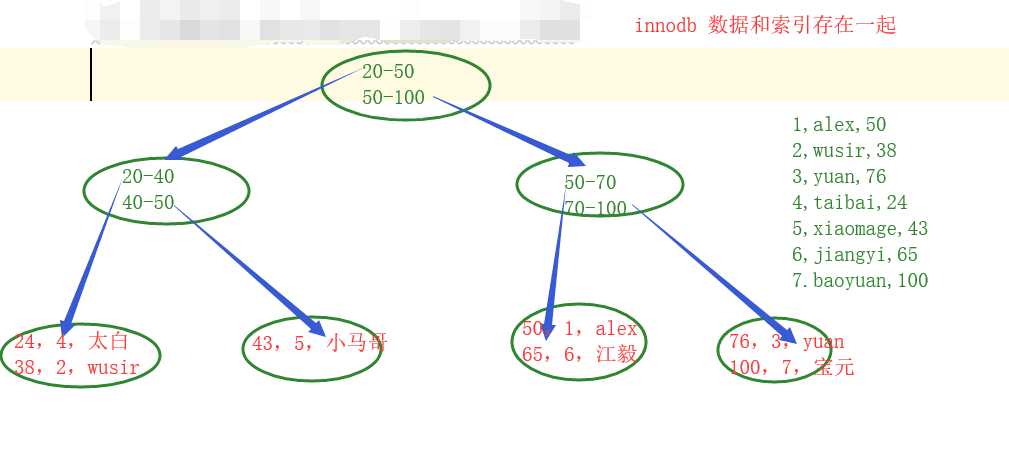
在innodb中 :聚集索引和辅助索引并存的
聚集索引 - 主键 、更快
只有主键是聚集索引
数据直接存储在树结构的叶子节点
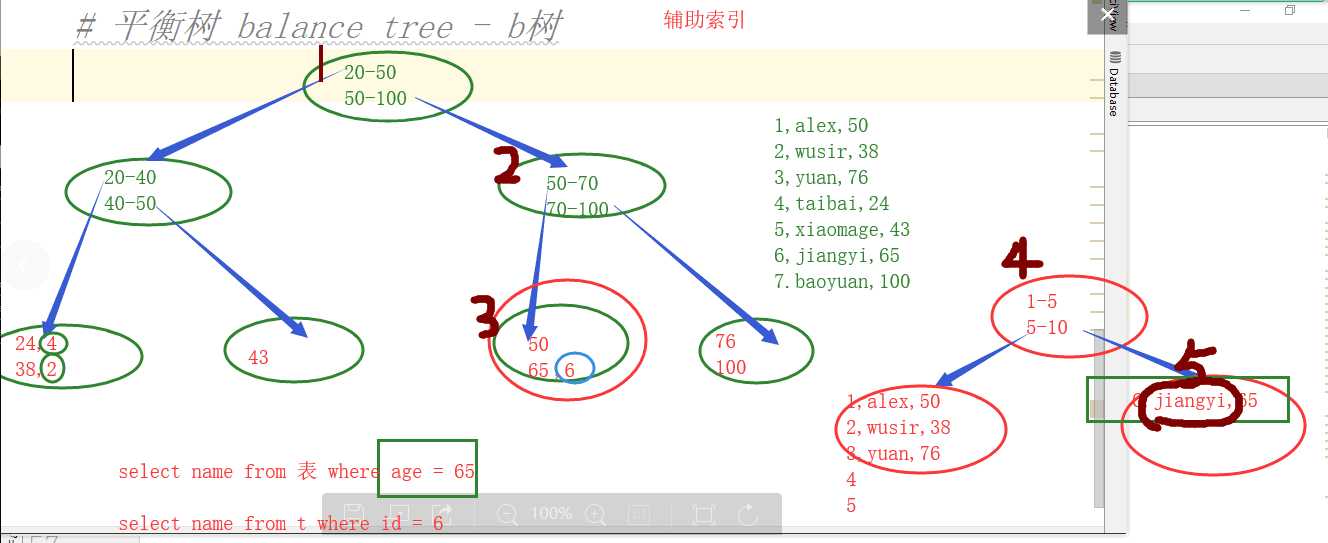
辅助索引 - 除了主键之外所有的索引都是辅助索引 、稍慢
数据不直接存储在树中
在myisam中 :只有辅助索引,没有聚集索引
1.索引的种类:
primary key 主键 ,是聚集索引 ,约束的作用:非空 + 唯一
联合主键
unique 自带索引 ,是辅助索引 ,约束的作用:唯一
联合唯一
index 是辅助索引,没有约束作用
联合索引
注意:按大项分有三个种类:primary key 、unique 、index
? 细分有6个种类:primary key 、联合主键 、unique 、联合唯一 、index 、联合索引
2.看一下如何创建索引、创建索引之后的变化
create index 索引名字 on 表(字段)
删除索引 :drop index 索引名 on 表名字;
3.索引是如何发挥作用的?
select * from 表 where id = xxxxx;
1.索引不生效的原因:
<1.>要查询的数据的范围大
与范围相关的:
1.< >= <= !=(!=几乎命中不了索引)
2.between and
select * from 表 order by age limit 0,5;
select * from 表 where id between 1000000 and 1000005;
3.like
<2.>如果一列内容的区分度不高,索引也不生效
<3.>索引列不能在条件中参与计算
<4.>对两列内容进行条件查询
and :and条件两端的内容,优先选择一个有索引的,并且树形结构更好的,来进行查询(效率也会更高)。两个条件都成立才能完成where条件,先完成范围小的,缩小后面条件的压力。
or :带or条件的,不会进行优化,只是根据条件从左到右依次筛选。
条件中带有or的要想命中索引,这些条件中所有的列都是索引列。
<5.>联合索引
创建联合索引:create index ind_mix on s1(id,name,email);
select * from s1 where id =1000000 and email = 'eva1000000@oldboy'; 能命中索引1.在联合索引中如果使用了or条件索引就不能生效:
select * from s1 where id =1000000 or email = ‘eva1000000@oldboy‘; 不能命中索引
2.最左前缀原则 :在联合索引中,条件必须含有在创建索引的时候的第一个索引列。
select * from s1 where id =1000000;    能命中索引
select * from s1 where email = 'eva1000000@oldboy';  不能命中索引

# 联合索引 (a,b,c,d)
a,b 、 a,c  、 a  、 a,d  、 a,b,d  、 a,c,d  、 a,b,c,d # 等含有a索引的都能命中索引
# 不含a索引的其他索引都不能命中。
3.在整个条件中,从开始出现模糊匹配的那一刻,索引就失效了
select * from s1 where id >1000000 and email = 'eva1000001@oldboy';   不能命中索引

select * from s1 where id =1000000 and email like 'eva%';    能命中引
2.什么时候用联合索引?
3.对于单列的索引:
4.使用or来连接多个条件:
1.覆盖索引
如果我们使用索引作为条件查询,查询完毕之后,不需要回表查,就是覆盖索引。
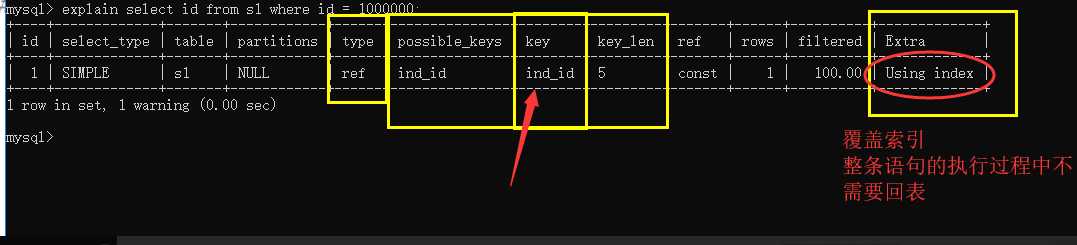
explain select id from s1 where id = 1000000;
explain select count(id) from s1 where id > 1000000;
2.合并索引
对两个字段分别创建索引,由于sql的条件让两个索引同时生效了,那么这个时候这两个索引就成为了合并索引
3.执行计划 explain
如果你想在执行sql语句之前就知道sql语句的执行情况,那么可以使用执行计划。
# 情况1:
如果有30000000条数据,使用sql语句查询需要20s,
explain sql语句   --> 并不会真正的执行sql,而是会给你列出一个执行计划
# 情况2:
        20条数据 --> 30000000
            explain sql
4.建议
<1>建表、使用sql语句的时候注意的:
<2> utf8 与 utf8mb4 :
以后如果遇到使用 utf8 出现乱码的情况,可以更改为 utf8mb4 进行编码。
1.where条件单表查,锁定最小返回记录表。这句话的意思是把查询语句的where都应用到表中返回的记录数最小的表开始查起,单表每个字段分别查询,看哪个字段的区分度最高
2.explain查看执行计划,是否与第1步预期一致(从锁定记录较少的表开始查询)
3.order by limit 形式的sql语句让排序的表优先查
4.了解业务方使用场景
5.加索引时参照建索引的几大原则
6.观察结果,不符合预期继续从0分析
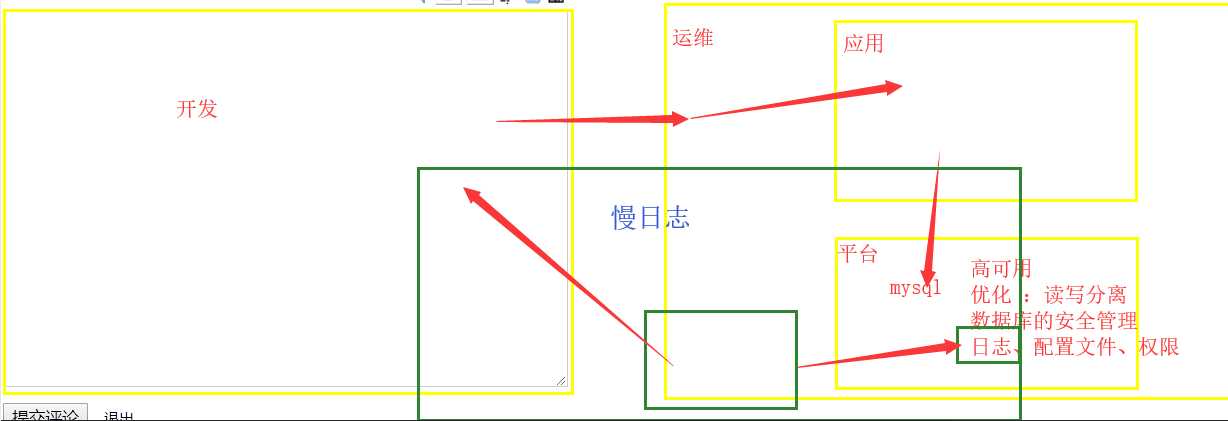
1.慢日志
2.配置:
内存
show variables like ‘%query%‘;
show variables like ‘%queries%‘;
set global 变量名 = 值
配置文件
mysqld --defaults-file=‘E:\wupeiqi\mysql-5.7.16-winx64\mysql-5.7.16-winx64\my-default.ini‘
my.conf内容:
注意:修改配置文件之后,需要重启服务
3.日志管理
详见网址:https://www.cnblogs.com/Eva-J/articles/10126413.html#_label8
python相当于是客户端
import pymysql
conn = pymysql.connect(host='127.0.0.1', user='root', password="123",database='day40') # python与mysql连接
cur = conn.cursor()   # 创建 数据库操作符:游标

# 增加数据
cur.execute('insert into employee(emp_name,sex,age,hire_date) '
            'values ("郭凯丰","male",40,20190808)')

# 删除数据
cur.execute('delete from employee where id = 18')
conn.commit() # 提交
conn.close()

# 查询数据
import pymysql
conn = pymysql.connect(host='127.0.0.1', user='root', password="123",database='day40')
cur = conn.cursor(pymysql.cursors.DictCursor)   # 想要输出为字典格式时加上pymysql.cursors.DictCursor
cur.execute('select * from employee where id > 10')
ret = cur.fetchone()  # 查询第一条数据
print(ret['emp_name'])
ret = cur.fetchmany(5) # 查询5条数据
ret = cur.fetchall()  # 查询所有的数据
print(ret)
conn.close()1.数据库的逻辑备份
语法:mysqldump -h 服务器 -u用户名 -p密码 数据库名 > 备份文件.sql
#示例:
#单库备份
mysqldump -uroot -p123 db1 > db1.sql
mysqldump -uroot -p123 db1 table1 table2 > db1-table1-table2.sql

#多库备份
mysqldump -uroot -p123 --databases db1 db2 mysql db3 > db1_db2_mysql_db3.sql

#备份所有库
mysqldump -uroot -p123 --all-databases > all.sql
2.数据恢复
#方法一:
[root@egon backup]# mysql -uroot -p123 < /backup/all.sql

#方法二:
mysql> use db1;
mysql> SET SQL_LOG_BIN=0;   #关闭二进制日志,只对当前session生效
mysql> source /root/db1.sql
3.事务
begin;  # 开启事务
select * from emp where id = 1 for update;  # 查询id值,for update添加行锁;
update emp set salary=10000 where id = 1; # 完成更新
commit; # 提交事务(解锁)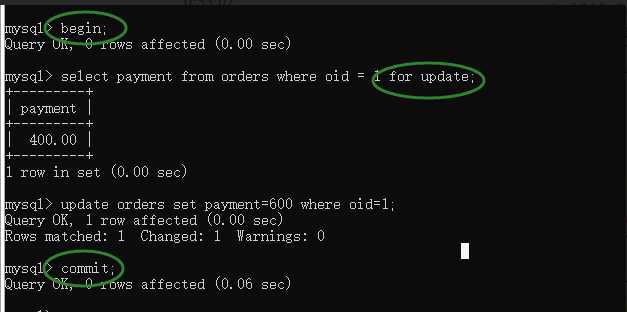
注意3个关键点:
create table userinfo(
id int primary key auto_increment,
name char(12) unique not null,
password char(18) not null
)

insert into userinfo(name,password) values('alex','alex3714')

# 用户名和密码到数据库里查询数据
# 如果能查到数据 说明用户名和密码正确
# 如果查不到,说明用户名和密码不对
username = input('user >>>')
password = input('passwd >>>')
sql = "select * from userinfo where name = '%s' and password = '%s'"%(username,password)
print(sql)

-- :表示注释掉--之后的sql语句
select * from userinfo where name = 'alex' ;-- and password = '792164987034';
select * from userinfo where name = 219879 or 1=1 ;-- and password = 792164987034;
select * from userinfo where name = '219879' or 1=1 ;-- and password = '792164987034';
上面的输入情况都能查询到结果,所以存在安全隐患,这种存在安全隐患的情况就叫 sql注入。
为了避免 sql注入,在用pymysql时,不要再自己去拼接sql语句了,要让mysql模块自己去拼接。
import pymysql

conn = pymysql.connect(host = '127.0.0.1',user = 'root',
                       password = '123',database='day41')
cur = conn.cursor()
username = input('user >>>')
password = input('passwd >>>')
sql = "select * from userinfo where name = %s and password = %s"
cur.execute(sql,(username,password))  # 让mysql模块去拼接
print(cur.fetchone())
cur.close()
conn.close()原文:https://www.cnblogs.com/yangjie0906/p/11404865.html