这里采用四种方法对图像进行灰度处理:
方法一:读取图片时只读取灰度图像
方法二:调用opencv Api实现
方法三:算法实现图像灰度:gray = (B + G + R)/3
方法四:算法实现:gray = r*0.299 + g*0.587 + b*0.114
代码:
import cv2
import numpy as np
gray1 = cv2.imread(‘D:/pythonob/imageinpaint/img/zidan.jpg‘,0)#方法一
imgSrc = cv2.imread(‘D:/pythonob/imageinpaint/img/zidan.jpg‘,1)
gray2 = cv2.cvtColor(imgSrc,cv2.COLOR_BGR2GRAY)#方法二:API实现图像灰度。第二个参数:转换方式BGR-->gray
#方法三;算法实现图像灰度:gray = (B + G + R)/3
imgInfo = imgSrc.shape
height = imgInfo[0]
width = imgInfo[1]
gray3 = np.zeros((height,width,3),np.uint8)
for i in range(0,height):
for j in range(0,width):
(b,g,r) = imgSrc[i,j]
gray = (int(b) + int(g) + int(r))/3
gray3[i,j] = np.uint8(gray)
#方法四:gray = r*0.299 + g*0.587 + b*0.114
gray4 = np.zeros((height,width,3),np.uint8)
for i in range(0,height):
for j in range(0,width):
(b,g,r) = imgSrc[i,j]
gray = int(b)*0.114 + int(g)*0.587 + int(r)*0.299
gray4[i,j] = np.uint8(gray)
cv2.imshow(‘G1‘,gray1)
cv2.imshow(‘imgSrc‘,imgSrc)
cv2.imshow(‘G2‘,gray2)
cv2.imshow(‘G3‘,gray3)
cv2.imshow(‘G4‘,gray4)
cv2.waitKey(0)
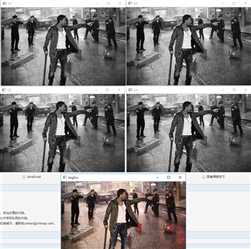
效果图:
原文:https://www.cnblogs.com/cxxBoo/p/11452398.html