终于,这两天的考试熬过去了, 兴致冲冲的来整理笔记来, 这篇博客是我近几天的NIO印象笔记汇总,记录了对Selector及Selector的重要参数的理解,对Channel的理解,常见的Channel,对NIO事件驱动的编程模型的理解,NIO与传统IO的对比,NIO的TCP/IP编程的实践.
这个概念绝对是一级概念,Channel是一个管道,用于连接字节缓冲区和另一端的实体, 这个字节缓冲区就是ByteBuffer, 另一端的实体可以是一个File 或者是 Socket ;
或者基于IO的网络编程, 数据的交互借助于InputStream或者是OutputStream, 而Channel可以理解成对Stream的又一层封装;在这种编程模型中 服务端想和客户端进行交互,就需要从服务端自己的ServerSocketChannel中获取前来连接的客户端的SocketChannel,并把他注册关联上感性趣的事件且自己的Selector选择器上, 这样一旦客户端把Buffer中的数据推送进channel, 服务端就可以感知,进而处理
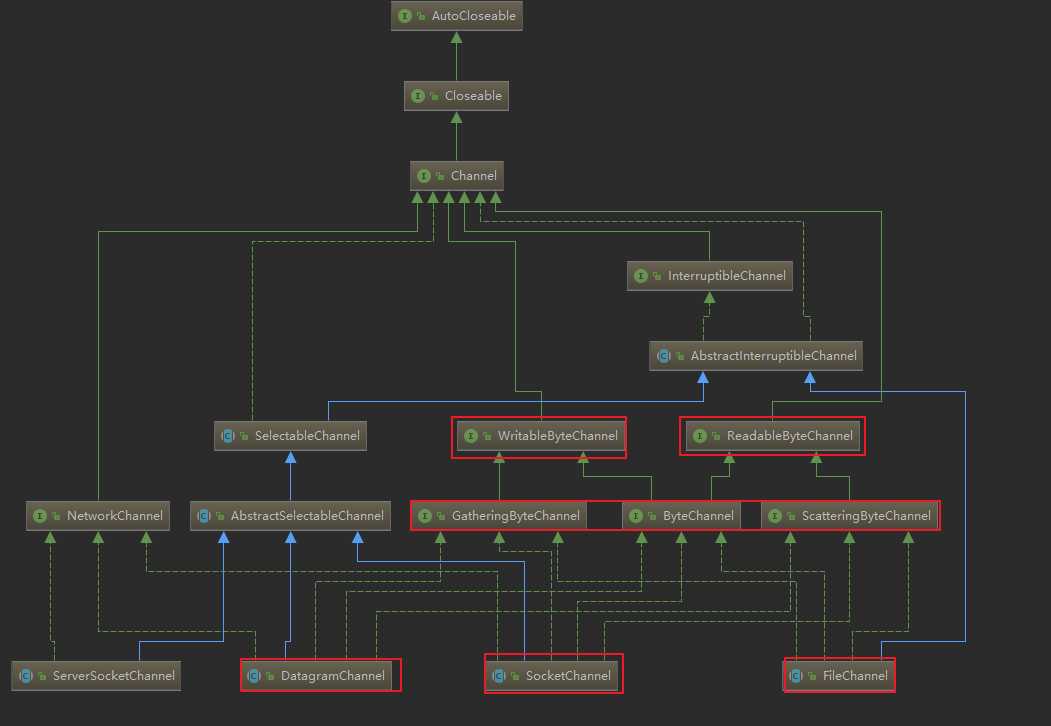
Channel的NIO编程模型中一大组件,它类似IO中的Stream,但是两者也有本质的区别;
为什么说是类似呢? 看下面的两段代码, 需求是磁盘上的文件进行读写
在IO编程中,我们第一步可能要像下面这样获取输入流,按字节把磁盘上的数据读取到程序中,再进行下一步操作
FileInputStream fileInputStream = new FileInputStream("123.txt");在NIO编程中,目标是需要先获取通道,再基于Channel进行读写
FileInputStream fileInputStream = new FileInputStream("123.txt");
FileChannel channel = fileInputStream.channel();
对用户来说,在IO / NIO 中这两种都直接关联这磁盘上的数据文件,数据的读写首先都是获取Stream和Channel,所以说他们相似;
但是: 对于Stream来说,所有的Stream都是单向的,对我们的程序来说,Stream要么只能是从里面获取数据的输入流,要么是往里面输入数据的输出流,因为InputStream和outputStream都是抽象类,在java中是不支持多继承的, 而通道不同,他是双向的,对一个通道可读可写
如上图,凡是同时实现了readable,writeable接口的类,都双向的通道. 下面是典型的例子
SocketChannel
在NIO网络编程中,服务端可以通过ServerSocketChannel获取客户端的SocketChannel
这个SocketChannel可以read() 客户端的消息存入Buffer, 往客户端 write()buffer里的内容
socketChannel1.read(byteBuffer);
socketChannel1.write(byteBuffer);
对于一个channel,我们既能从中获取数据,也能往外read数据
效率最低的按字节拷贝
public static  void text4() throws IOException {
    System.out.println("开始: ... ");
        FileInputStream    fis = new FileInputStream("123.txt");
        FileOutputStream   fos = new FileOutputStream("output123.txt");
    int read=0;
    long start =0;
    while((read=fis.read())!=-1){
        fos.write(read);
    }
    System.out.println("耗时: "+(System.currentTimeMillis()-start) );
    fis.close();
    fos.close();
}
一个3901KB的文件的拷贝,在我的机器上跑出了 1561097384707 的好成绩; 实属无奈,擦点以为编译器卡死
以NIO,channel+buffer的模型,拷贝文件
try (
    FileInputStream  fis = new FileInputStream("123.txt");
    FileOutputStream   fos = new FileOutputStream("output123.txt");
){
    //1.获取通道
    FileChannel   inChannel = fis.getChannel();
    FileChannel   outChannel = fos.getChannel();

    //2.分配指定大小的缓冲区
    ByteBuffer buffer = ByteBuffer.allocate(1024);
    long start = System.currentTimeMillis();
    //3.将通道中的数据缓冲区中
    while (inChannel.read(buffer) != -1) {
        buffer.flip();//切换成都数据模式
        //4.将缓冲区中的数据写入通道中
        outChannel.write(buffer);
        buffer.clear();//清空缓冲区
    }
    System.out.println("总耗时:" + (System.currentTimeMillis() - start));
} catch (Exception e) {
    e.printStackTrace();
}
速度明显提升 大约平均耗时 110
NIO+零拷贝 复制文件
  // 直接获取通道
    FileChannel inChannel2 = FileChannel.open(Paths.get("123.txt"), StandardOpenOption.READ);
    FileChannel outChannel2 = FileChannel.open(Paths.get("output123.txt"), StandardOpenOption.WRITE, StandardOpenOption.READ, StandardOpenOption.CREATE);
    //内存映射文件
    MappedByteBuffer inMappedBuf = inChannel2.map(FileChannel.MapMode.READ_ONLY, 0, inChannel2.size());
    MappedByteBuffer outMappedBuf = outChannel2.map(FileChannel.MapMode.READ_WRITE, 0, inChannel2.size());
    //直接对缓冲区进行数据读写操作
    byte[] dst = new byte[inMappedBuf.limit()];
    long start = System.currentTimeMillis();
    inMappedBuf.get(dst);
    outMappedBuf.put(dst);
    System.out.println("耗费的时间为:" + ( System.currentTimeMillis() - start));

    inChannel2.close();
    outChannel2.close();
或者
/*
     * 通道之间的数据传输(直接缓冲区)
     */
    FileChannel inChannel3 = FileChannel.open(Paths.get("123.txt"), StandardOpenOption.READ);
    FileChannel outChannel3 = FileChannel.open(Paths.get("output123.txt"), StandardOpenOption.WRITE, StandardOpenOption.READ, StandardOpenOption.CREATE);
    long start = System.currentTimeMillis();
    inChannel3.transferTo(0, inChannel3.size(), outChannel3);
    System.out.println("耗时: "+(System.currentTimeMillis()-start) );

    //等价于
    // outChannel3.transferFrom(inChannel3, 0, inChannel3.size());

    inChannel3.close();
    outChannel3.close();
零拷贝仅需要耗时 6 就可以完成
什么是阻塞? 举个例子, 如果有一天我碰到了不会的作业题,于是我给老师发了条短息请教咋做, 这时,假如我进入了阻塞模式,我就会一直瞅着手机,别的也不干,就等着老师回信息, 假如我进入了非阻塞的模式,发完短信后跳过这个题,去做别的题
常见的阻塞比如, 键盘录入, Socket的accept()以及IO的read write, 全部会卡在那行代码直到执行完毕才会往下执行, 这种风格的好处是显而易见的, 及其容易的进行顺序编程
但是在NIO中,channel的read,write可以是阻塞的,也可以是非阻塞的,这取决于channel是否阻塞, 一般在进行网络编程时,要搭配上selector选择器,一起用, 同时channel我们也会设置成非阻塞的, 想想也不能让服务器的读写阻塞住,因为它可不是面对一两个用户,我们需要它可以一遍一遍的正常流水运行
在客户端,connect方法不再是阻塞的,和服务端进行数据交互之前,java提供了检查机确保连接百分百健康, 如果服务端没有接受连接,客户端是是没办法进一步操作的
if (selectionKey.isConnectable()) {
// 强转成 有连接事件发生的Channel
client = (SocketChannel) selectionKey.channel();
// 完成连接
if (client.isConnectionPending()) {
client.finishConnect();
从通道中的read和write方法也不是阻塞的,即可返回,可以让服务端的业务代码很流畅的执行完,再接受新的请求,处理新请求

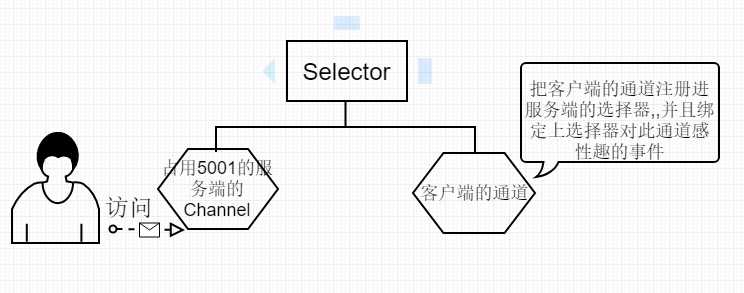
Selector选择器NIO的第三个组件,三者的关系图如上所示
selector是选择器的意思, 和它直接关联的组件是Channel, 没错,它的作用就是不断的轮询绑定在他身上的所有channel. 一旦有通道发生了它感兴趣的事件,接着处理此事件
无论是服务端的Selector 还是客户端的Selector 它都维护了三个Set集合 , 里面封装的是 SelectionKey, 他是channel注册进Selector的产物,一般是使用它反向获取channel
感兴趣的key的集合, 举个例子, 通道1注册进选择器时,告诉选择器,我可能会给你发信息,你得盯着我,读我给你的信息, 于是选择器对通道1感性趣的事件是 read, 那么在选择器轮询channel时, 一旦通道1出现了write操作,就会被选择器感知,开始read
每次遍历selected key时我们会执行这行代码:Set<SelectionKey> selectionKeys = selector.selectedKeys(); 它的意思是,我们取出了 选择器的感性事件的set集合,只要程序还在运行,只要选择器一旦被open(),除非我们手动的close() 否则选择器对象就不会被释放,所以它的感兴趣的set集合是不会被自动会收到,于是我们就得收到的把处理过的感兴趣的事件对应的SelectionKey移除出这个set集合,不然下一次轮询时,这个事件还会再一次被处理,并且无限制的处理下去
key有且仅有两种方式从 selected-key-set 中剔除 1. 通过Set的remove()方法, 2.通过迭代器的remove()方法
select() 本集合中的SelectionKey会从key set中移除, 意味着它所关联的channel将会被选择器丢弃掉,不再进行监听cancel()方法都会将key添加到cannelled key 集合中select()方法select(long); // 设置超时时间
selectNow(); // 立即返回,不阻塞
select(); 阻塞轮询
select()过程的细节:
前者是把key从selected key set集合,也就是被选中的集合中剔除出去,表示当前的事件已经处理完了
后者是表示,把key从全集中剔除出去, 表示想要废弃这个key关联的channel
他是根据不同操作系统提供的不同的Provider使用provide()创建出来的
如上图, 在NIO网络编程模式中,不再是传统的多线程编程模型,当有新的客户端的连接到来,不再重新开辟新的线程去跑本次连接,而是统一,一条线程处理所有的连接, 而一次连接本质上就是一个Channel, NIO网络编程模型是基于事件驱动型的; 即,有了提前约定好的事件发生,接着处理事件,没有时间发生,选择器就一直轮询 下面解释上图的流程
ServerSocketChannel,而选择器只关心ServerSocketChannel上发生的OP_ACCEPT事件,而又没有客户端来链接 所以他被阻塞在了select()System.out.println("Server...");
// 获取服务端的SerSokcetChannel
ServerSocketChannel serverSocketChannel = ServerSocketChannel.open();
// todo 一定要把他配置成 非阻塞的
serverSocketChannel.configureBlocking(false);
// 从通道中获取 服务端的对象
ServerSocket serverSocket = serverSocketChannel.socket();
serverSocket.bind(new InetSocketAddress(8899));
// 创建选择器
Selector selector = Selector.open();
// 把通到注册到 选择器上
serverSocketChannel.register(selector, SelectionKey.OP_ACCEPT);
while (true) {
// 阻塞式等待 channel上有事件发生
int select = selector.select();SocketChannel的感兴趣事件是OP_CONNECT连接事件; 当执行到下面的socketChannel.connect(new InetSocketAddress("localhost", 8899)); 连接的请求就已经发送出去了,也就是说,如果没有意外,执行完这一行代码,服务端的select()方法已经返回了, 但是客户端的connect()是非阻塞的,立即返回,故在客户端依然会继续执行, 进而判断一下是否是真的连接上了// 获取客户端的通道
SocketChannel socketChannel = SocketChannel.open();
socketChannel.configureBlocking(false);
Selector selector = Selector.open();
// 把客户端的通道注册进选择器
socketChannel.register(selector, SelectionKey.OP_CONNECT);
// todo 连接客户端, 执行完这行代码后, 服务端就能就收到通知!!!
socketChannel.connect(new InetSocketAddress("localhost", 8899));
while (true) {
int number = selector.select(); // 选择器阻塞式的 等待 Channel上发生它关心的事件
System.out.println(" 发生了感兴趣的事件: " + number);
Set<SelectionKey> keySet = selector.selectedKeys();
// 验证
for (SelectionKey selectionKey : keySet) {
SocketChannel client = null;
if (selectionKey.isConnectable()) {
// 强转成 有连接事件发生的Channel
client = (SocketChannel) selectionKey.channel();
// 完成连接
if (client.isConnectionPending()) {
client.finishConnect();
ByteBuffer byteBuffer = ByteBuffer.allocate(512);
byteBuffer.put((LocalDate.now() + "连接成功").getBytes());
byteBuffer.flip();
client.write(byteBuffer);SocketChanel, 怎么获取呢? serverSocketChannel1.accept(); 怎么建立连接呢? 实际上就是把当前的客户端的channel注册在服务端的选择器上,并告诉它自己关心的事件啥, 当然一开始建立连接时, 服务端肯定首先要做的就是监听客户端发送过来的数据,于是 绑定上感兴趣的事件是read, 并且不要忘了,每次遍历感兴趣的key的集合时,都要及时的把当前的key剔除selectionKeys.forEach(selectionKey -> {
SocketChannel socketChannel = null;
String sendKey = null;
try {
if (selectionKey.isAcceptable()) {
// 1. 用户请求建立连接, 根据SelectionKey 获取服务端的通道
// todo 当前的这个SelecttionKey 是有 ServerSocketChannel 和 selector 联系生成的, 因此我们 强制转换回 ServerSocketChannel
ServerSocketChannel serverSocketChannel1 = (ServerSocketChannel) selectionKey.channel();
// todo !!!!!!! 这是重点, 这里的accept是非阻塞的 !!!!!!!!
// 根据服务的 通道 获取到客户端的通道
socketChannel = serverSocketChannel1.accept();
System.out.println("socketChannel.class: " + socketChannel.getClass());
// todo 配置成非阻塞的
socketChannel.configureBlocking(false);
// todo 新获取的通道 注册进选择器
socketChannel.register(selector, SelectionKey.OP_READ);
// 保存客户端的信息
String key = "[ " + UUID.randomUUID().toString() + " ]";
clientMap.put(key, socketChannel);
// todo 把 拥有当前事件SelectionKey 剔除executorService.submit(() -> {
while (true) {
try {
// 清空上面的缓存
byteBuffer.clear();
BufferedReader bufferedReader = new BufferedReader(new InputStreamReader(System.in));
String msg = bufferedReader.readLine();
byteBuffer.put(msg.getBytes());
byteBuffer.flip();
finalClient.write(byteBuffer);
} catch (Exception e) {
e.printStackTrace();
}
}
});
}
// 上面的代码是发生了 请求连接事件
// todo 给客户端注册一个读取客户端返回数据的事件
client.register(selector, SelectionKey.OP_READ);
 else if (selectionKey.isReadable()) {
    System.out.println("readable...");
    // 获取客户端的通道
    socketChannel = (SocketChannel) selectionKey.channel();
    System.out.println("当前的客户端 通道实例: socketChannel == " + socketChannel);
    // 获取当前 是哪个客户端发起的信息
    ByteBuffer byteBuffer = ByteBuffer.allocate(512);
    // 读取客户端发送的消息
    while (true) {// todo todo todo  很重要的一点!!!  read方法是非阻塞的, 很可能还有没读取到数据就返回了
        int read = socketChannel.read(byteBuffer);
        System.out.println("read == : " + read);
        if (read <= 0) {
            break;
        }
    }
    // 往其他客户端写
    byteBuffer.flip();
    Charset charset = Charset.forName("utf-8");
    String msg = String.valueOf(charset.decode(byteBuffer).array());
    // Buffer转字符串
    System.out.println("收到客户端: " + socketChannel + "  发送的消息: " + msg);
    // 遍历map
    for (Map.Entry<String, SocketChannel> map : clientMap.entrySet()) {
        if (socketChannel == map.getValue()) {
            sendKey = map.getKey();
        }
    }
    // todo 转发给全部的客户端发送
    for (Map.Entry<String, SocketChannel> map : clientMap.entrySet()) {
        SocketChannel socketChannel1 = map.getValue();
        ByteBuffer byteBuffer1 = ByteBuffer.allocate(512);
        // 把信息放进 byteBuffer1中
        String message = msg + " : " + sendKey;
        byteBuffer1.put(message.getBytes());
        byteBuffer.flip();
        socketChannel1.write(byteBuffer);
}selectionKey.isReadable() 并且进入这个if块, 当它尝试从里面读取的时候,就发现这个连接已经坏掉了,于是报错,强制断开连接, 因为还要继续轮询,全集key set 中依然保存着当前的客户端的channel, 所以会一直报错下去, 怎么办呢? 如下// selectionKey.cancel(); 常规
try {
// 这样也能取消这个键
socketChannel.close();
} catch (IOException e1) {
e1.printStackTrace();
}
// 当然我们现在还要多一步, 因为他还在我们的map里面 不然一会发消息的时候,会出错
// todo 移除出map 中失效的 channel
// todo 遍历map
for (Map.Entry<String, SocketChannel> map : clientMap.entrySet()) {
if (socketChannel == map.getValue()) {
sendKey = map.getKey();
}
}
clientMap.remove(sendKey, socketChannel);原文:https://www.cnblogs.com/ZhuChangwu/p/11099548.html