1.创建spring boot 项目
2、pom文件配置如下:
<dependencies>
<dependency>
<groupId>org.springframework.boot</groupId>
<artifactId>spring-boot-starter-web</artifactId>
</dependency>
<!-- jsp -->
<dependency>
<groupId>org.apache.tomcat.embed</groupId>
<artifactId>tomcat-embed-jasper</artifactId>
<scope>provided</scope>
</dependency>
<dependency>
<groupId>javax.servlet</groupId>
<artifactId>jstl</artifactId>
</dependency>
<!-- freemarker -->
<dependency>
<groupId>org.springframework.boot</groupId>
<artifactId>spring-boot-starter-freemarker</artifactId>
</dependency>
<!-- thymeleaf -->
<dependency>
<groupId>org.springframework.boot</groupId>
<artifactId>spring-boot-starter-thymeleaf</artifactId>
</dependency>
</dependencies>
3、编写controller
@Controller
public class ShowUserController {
@RequestMapping("/showuser")
public String showUser(Model model) {
List<user> list = new ArrayList<user>();
list.add(new user("1","张三","23"));
list.add(new user("2","李斯","26"));
list.add(new user("3","汪汪","25"));
list.add(new user("4","嘿咻","24"));
model.addAttribute("userList",list);
//thymeleaf 例子
return "thymeleaf";
//freemarker 例子
//return "userShow";
//jsp 例子
//return "userindex";
}
}
4、页面
(1)thymeleaf.html
<html>
<head>
<title>springboot-freemarker测试</title>
<meta charset=‘utf-8‘/>
</head>
<body>
<table border=1 align="center" width="50%">
<tr>
<td>ID</td>
<td>NAME</td>
<td>AGE</td>
</tr>
<tr th:each=" user : ${userList} ">
<td th:text="${user.userId}"></td>
<td th:text="${user.userName}"></td>
<td th:text="${user.userAge}"></td>
</tr>
</table>
</body>
</html>
(2)userShow.ftl
<html>
<head>
<title>springboot-freemarker测试</title>
<meta charset=‘utf-8‘/>
</head>
<body>
<table border=1 align="center" width="50%">
<tr>
<td>ID</td>
<td>NAME</td>
<td>AGE</td>
</tr>
<#list userList as user >
<tr>
<td th:text="${user.userId}"></td>
<td th:text="${user.userName}"></td>
<td th:text="${user.userAge}"></td>
</tr>
</#list>
</table>
</body>
</html>
(3)userindex.jsp
<%@ taglib prefix="spring" uri="http://www.springframework.org/tags"%>
<%@ taglib prefix="c" uri="http://java.sun.com/jsp/jstl/core"%>
<%@ page language="java" contentType="text/html; charset=utf-8" pageEncoding="utf-8"%>
<!DOCTYPE html>
<html>
<head>
<meta charset="UTF-8"/>
<title>用户展示</title>
</head>
<body>
<table border=1 align="center" width="50%">
<tr>
<td>ID</td>
<td>NAME</td>
<td>AGE</td>
</tr>
<c:forEach var="user" items="${userList}" >
<tr>
<td>${user.userId}</td>
<td>${user.userName}</td>
<td>${user.userAge}</td>
</tr>
</c:forEach>
</table>
</body>
</html>
注:jsp 额外配置 application.properties 文件
//jsp 位置
spring.mvc.view.prefix=/WEB-INF/jsp/
//jsp后缀
spring.mvc.view.suffix=.jsp
5编写启动类
@SpringBootApplication
public class App {
public static void main(String[] args) {
// TODO Auto-generated method stub
SpringApplication.run(App.class, args);
}
}
分别运行调试。
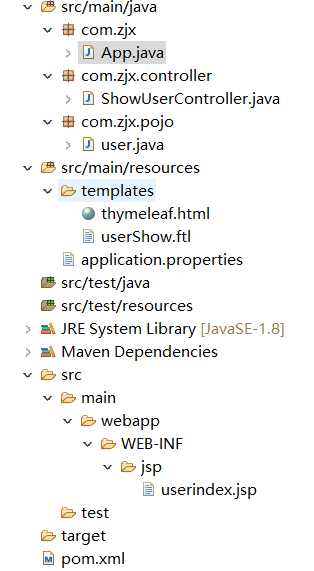
注意各文件位置
本人初学。请各位大佬多多指点。谢谢
Spring boot 整合jsp、thymeleaf、freemarker
原文:https://www.cnblogs.com/yixingzhou/p/11080433.html