springmvc是一个基于spring的mvc框架,各种优点啥的用过就知道了.下面开始讲HelloWorldController的实现.
1.开发环境搭建<导jar包+配置文件>
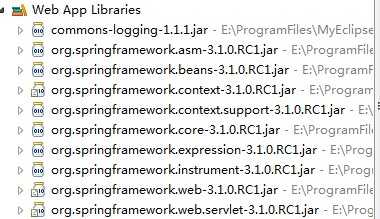
1.1 新建web工程springmvc,导入springmvc所需的jar包,因为springmvc是基于spring的,所以必须包含spring的jar包,我用的版本是spring3.1.0.导入以下jar包:
1.2 配置web.xml
      <!-- spring mvc配置 处理*.action和*.do请求 -->
            <servlet>
                <servlet-name>spring</servlet-name>
                <servlet-class>org.springframework.web.servlet.DispatcherServlet</servlet-class>
                <!-- 加载spring-servlet.xml配置文件,默认spring-servlet文件放在/WEB-INF目录下,为了便于管理,这里放到了src目录下 -->
                <init-param>
                    <param-name>contextConfigLocation</param-name>
                    <param-value>classpath:spring-servlet.xml</param-value>
                </init-param>
                <load-on-startup>1</load-on-startup>
            </servlet>
            <servlet-mapping>
                <servlet-name>spring</servlet-name>
                <url-pattern>*.action</url-pattern>
            </servlet-mapping>
            <servlet-mapping>
                <servlet-name>spring</servlet-name>
                <url-pattern>*.do</url-pattern>
            </servlet-mapping>


            <!-- spring 配置 -->
            <listener>
                <listener-class>org.springframework.web.context.ContextLoaderListener</listener-class>
            </listener>
            <context-param>
                <param-name>contextConfigLocation</param-name>
                <param-value>
                    classpath:applicationContext.xml
                </param-value>
            </context-param>
1.3 spring-servlet.xml配置
springmvc启动会去/WEB-INF/目录下加载web.xml文件${servlet-name}-servlet.xml的配置文件,在web.xml文件中我们配置的servlet-name为spring,并且配置了spring-servlet.xml的路径为src目录下.
spring建议我们把springmvc的配置放到${servlet-name}-servlet.xml,把service层的配置放到xxx-service.xml,把dao层的配置放到xxx-database.xml配置文件中,也就是把配置分散开来.下面就是spring-servlet.xml的配置
<?xml version="1.0" encoding="UTF-8"?>
        <beans xmlns="http://www.springframework.org/schema/beans"
            xmlns:xsi="http://www.w3.org/2001/XMLSchema-instance" xmlns:p="http://www.springframework.org/schema/p"
            xmlns:context="http://www.springframework.org/schema/context"
            xsi:schemaLocation="
        http://www.springframework.org/schema/beans
        http://www.springframework.org/schema/beans/spring-beans.xsd
        http://www.springframework.org/schema/context
        http://www.springframework.org/schema/context/spring-context.xsd">

            <!-- springmvc配置-->

            <!-- 自动扫描 -->
            <context:component-scan base-package="cn.springmvc.controller"/>


            <!-- 视图解析类配置  -->
            <bean class="org.springframework.web.servlet.view.InternalResourceViewResolver">
                 <!-- 如果返回的逻辑视图名为index,则视图解析器会找到webroot/jsps/index.jsp -->
          <property name="prefix">
                    <value>/jsps/</value>
                </property>
                <property name="suffix">
                    <value>.jsp</value>
                </property>
            </bean>
        </beans>
1.4 配置applicationContext.xml,将spring的其他配置放到applicationContext.xml文件中.因为目前并没有用到其他配置,所以该配置文件中暂时不用写内容.
<?xml version="1.0" encoding="UTF-8"?>
        <beans xmlns="http://www.springframework.org/schema/beans"
            xmlns:xsi="http://www.w3.org/2001/XMLSchema-instance" xmlns:p="http://www.springframework.org/schema/p"
            xmlns:context="http://www.springframework.org/schema/context"
            xsi:schemaLocation="
        http://www.springframework.org/schema/beans
        http://www.springframework.org/schema/beans/spring-beans.xsd
        http://www.springframework.org/schema/context
        http://www.springframework.org/schema/context/spring-context.xsd">

            <!-- spring 其他配置 -->

 </beans>
ok,基本配置都完了,开始写Controller.
2.HelloWorldController
controller是springmvc中负责处理请求的核心组件,等价于struts2中的Action.下面我们开始编写HelloWorldController.
     package cn.springmvc.controller;

        import org.springframework.stereotype.Controller;
        import org.springframework.web.bind.annotation.RequestMapping;

        @Controller("helloWorldController") //--->beanName
        @RequestMapping(value="/hello")   // controller的映射路径
        public class HelloworldController {

            @RequestMapping(value="/say")// 方法的映射路径
            public String sayHello(){
                System.out.println("hello");
                return "hello";
            }

        }
现在就可以发布项目,然后输入url访问了:localhost:8080/springmvc/hello/say.action
现在感受到springmvc的好处了吧,哈哈!简洁的配置真让人爱不释手!
补充一点,struts2中的Action是prototype的,所以Action没有线程安全问题.springmvc中的Controller默认是单例的,如果controller可能产生线程安全问题,可以在Controller上加上@Scope("prototype")注解,告诉spring,每次请求都创建新的controller对象.
springmvc入门之HelloWorld篇,布布扣,bubuko.com
原文:http://www.cnblogs.com/heavenyes/p/3908546.html