shell>wget http://dev.mysql.com/get/mysql80-community-release-el7-3.noarch.rpm如果对这个版本不满意也可以登录https://dev.mysql.com/downloads/repo/yum/ 选择自己喜欢的版本进行下载;
2.下载完rpm包后使用centos自带的yum进行安装:
shell>yum install -y mysql80-community-release-el7-3.noarch.rpm3.接着开始进行mysql服务器的正式安装:
shell>yum install -y mysql-community-server4.完成安装后,启动mysql服务(centOS7以下的版本用的是service命令,centOS7开始需要使用systemctl命令):
shell>systemctl start mysqld.service5.查看service是否启动成功:
shell>systemctl status mysqld.service正常启动后显示如下: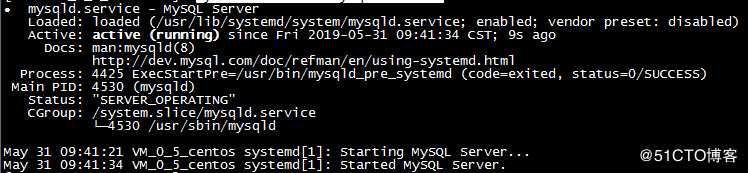
6.设置开机自启动:
shell>systemctl enable mysqld
shell>systemctl daemon-reload
7.获取mysql为root用户默认设置的临时密码:
shell>grep "password" /var/log/mysqld.log密码如下红框部分:
8.进入mysql并修改密码:
shell>mysql -uroot -p上图红框部分的密码
mysql>alter user ‘root‘@‘localhost‘ identified by ‘Centos_root31‘;
9.为远程登录用户赋权:
mysql>grant all privileges on *.* to ‘xxx‘@‘%‘ identified by ‘xxx‘ with grant option;原文:https://blog.51cto.com/abezoo/2402906