现在比较流行的操作数据库操作层框架Mybatis,下面我们就来看看Springboot如何整合mybatis, 之前一直在用xml形式写sql,这次依然用xml的方式感觉这种还是比较灵活方便。
添加mybatis关键就是要引入mybatis-spring-boot-starter到pom文件中,如果你用MySQL,那就引入MySQL的pom文件,这里我用Oracle,淡然要引入Oracle的依赖了。添加完成mybatis和Oracle 在pom.xml 文件中的引入。
|
1
2
3
4
5
6
7
8
9
10
11
12
13
14
15
16
17
18
19
20
21
|
<!-- 链接Oracle数据库 oracle ojdbc不免费,需要手动引入jar包 --> <dependency> <groupId>oracle</groupId> <artifactId>ojdbc6</artifactId> <version>11.2.0.3</version> </dependency> <dependency> <groupId>org.springframework.boot</groupId> <artifactId>spring-boot-starter-jdbc</artifactId> </dependency> <!-- 集成mybatis --> <dependency> <groupId>org.mybatis.spring.boot</groupId> <artifactId>mybatis-spring-boot-starter</artifactId> <version>1.3.1</version> </dependency> <dependency> <groupId>com.alibaba</groupId> <artifactId>druid</artifactId> <version>1.1.0</version> </dependency> |
注意:
如果你用的是Oracle数据库在pom.xml中有可能会报这个错Missing artifact oracle:ojdbc6:jar 因为Oracle的ojdbc.jar是收费的,所以maven的中央仓库没有这个资源,只能配置本地仓库才能加载到项目中去。
配置application.properties
|
1
2
3
4
5
6
7
8
9
10
11
|
mybatis.config-locations=classpath:mybatis/mybatis-config.xmlmybatis.mapper-locations=classpath:mapper/*.xml#oracle database jdbcspring.datasource.url=jdbc:oracle:thin:@//localhost:1521/orclspring.datasource.username=rootspring.datasource.password=123456spring.datasource.driver-class-name=oracle.jdbc.driver.OracleDriverspring.datasource.max-idle=10spring.datasource.max-wait=10000spring.datasource.min-idle=5spring.datasource.initial-size=5 |
指定了mybatis的配置地址,你可以在mybatis/mybatis-config.xml中添加一些其他配置
完成之后你就可以去mapper文件夹下自由潇洒的去写sql去了
我们来测试一下看看是否成功,去写个sql试试效果怎么样?就返回用户的一些基本信息吧。实现代码如下:
Controller层:
|
1
2
3
4
5
6
7
8
9
10
11
|
@RestControllerpublic class UserController { @Autowired private UserService userService; @RequestMapping(value = "/user", method = RequestMethod.GET) public User findUserByName(@RequestParam(value = "userName", required = true) String userName) { return userService.findUserByName(userName); }} |
Service层:只写方法具体实现在UserServiceImpl类中
|
1
2
3
4
5
6
|
@Servicepublic interface UserService { User findUserByName(String userName); } |
Service层的实现类,实现UserService中的方法
|
1
2
3
4
5
6
7
8
9
10
11
12
|
@Componentpublic class UserServiceImpl implements UserService { @Autowired private UserDao userDao; @Override public User findUserByName(String userName) { User user = userDao.findUserByName(userName); return user; }} |
Dao层 注意要添加@Mapper注解,否则会报错的
|
1
2
3
4
|
@Mapper public interface UserDao { User findUserByName(@Param("userName") String userName);} |
实体类
|
1
2
3
4
5
6
|
public class User { private String code; private String username; private String name; //get/set方法省略} |
userMapper.xml 要注意namespace能否正确跳转(路径是否正确)
|
1
2
3
4
5
6
7
8
9
|
<?xml version="1.0" encoding="UTF-8"?><!DOCTYPE mapper PUBLIC "-//mybatis.org//DTD Mapper 3.0//EN" "http://mybatis.org/dtd/mybatis-3-mapper.dtd" ><mapper namespace="com.power.manger.dao.UserDao"> <select id="findUserByName" resultMap=" com.XXX.model.User " parameterType="java.lang.String"> select code, user_name as username, name from tb_user_info where name=#{userName} </select></mapper> |
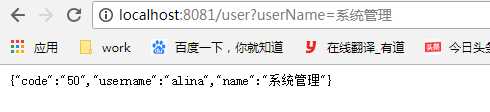
这些都完成之后,那么接下来就是见证奇迹的时刻了,启动项目,浏览器输入地址显示如下
数据库中查询结果如下
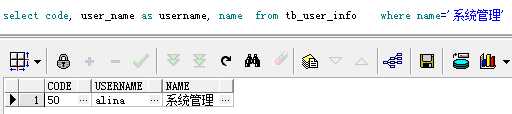
成功整合了mybatis和Oracle!
原文:https://www.cnblogs.com/jc1997/p/10946555.html