GitLab 是利用 Ruby on Rails 一个开源的版本管理系统,实现一个自托管的 Git 项目仓库,可通过 Web 界面进行访问公开的或者私人项目。
与 Github 类似,GitLab 能够浏览源代码,管理缺陷和注释。可以管理团队对仓库的访问,它非常易于浏览提交过的版本并提供一个文件历史库。团队成员可以利用内置的简单聊天程序(Wall)进行交流
安装依赖包
        [root@ci-node1 git_test]# yum install curl policycoreutils openssh-server openssh-clients policycoreutils-python –y

获取安装包:
        [root@ci-node1 src]# wget https://mirrors.tuna.tsinghua.edu.cn/gitlab-ce/yum/el7/gitlab-ce-10.0.6-ce.0.el7.x86_64.rpm
        [root@ci-node1 src]# rpm -ivh gitlab-ce-10.0.6-ce.0.el7.x86_64.rpm
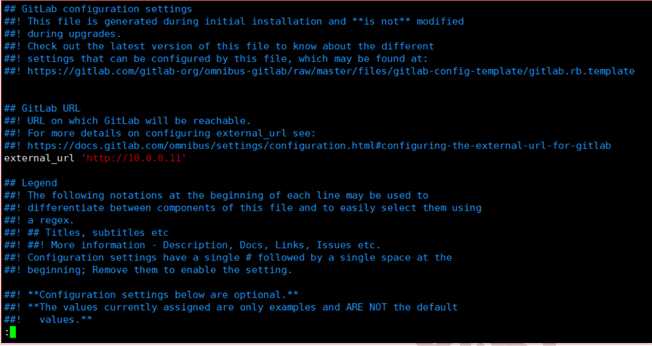
GitLab 的默认配置文件为于:/etc/gitlab/gitlab.rb,修改下图所示的 external_url为本机 IP 地址或者一个可以访问到本机的域名。
修改完主配置文件后,使用 gitlab-ctl reconfigure 重新配置 gitlab
重新配置执行成功后,我们就可以启动 Gitlab
[root@ci-node1 src]# gitlab-ctl restart
ok: run: gitaly: (pid 17752) 1s
ok: run: gitlab-monitor: (pid 17768) 0s
ok: run: gitlab-workhorse: (pid 17771) 1s
ok: run: logrotate: (pid 17815) 0s
ok: run: nginx: (pid 17821) 1s
ok: run: node-exporter: (pid 17828) 0s
ok: run: postgres-exporter: (pid 17833) 0s
ok: run: postgresql: (pid 17841) 1s
ok: run: prometheus: (pid 17850) 0s
ok: run: redis: (pid 17858) 1s
ok: run: redis-exporter: (pid 17865) 0s
ok: run: sidekiq: (pid 17871) 0s
ok: run: unicorn: (pid 17880) 0s
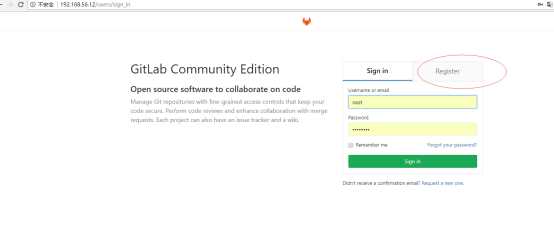
在浏览器地址里输入:http://10.0.0.11,出现如图所示页面:首次登录要求我们重新设置 root 用户的密码
GitLab 由主要由以下服务构成,他们共同承担了 Gitlab 的运作需要
Nginx:静态 web 服务器。
gitlab-shell:用于处理 Git 命令和修改 authorized keys 列表。
gitlab-workhorse: 轻量级的反向代理服务器。
logrotate:日志文件管理工具。
postgresql:数据库。
redis:缓存数据库。
sidekiq:用于在后台执行队列任务(异步执行)。
unicorn:An HTTP server for Rack applications,GitLab Rails 应用是托管在这个服务器上面的。
我们可以使用 gitlab-ctl status 命令来查看各服务的状态
GitLab Shell
GitLab Shell 有两个作用:为 GitLab 处理 Git 命令、修改 authorized keys 列表。
当通过 SSH 访问 GitLab Server 时,GitLab Shell 会:
当通过 http(s)访问 GitLab Server 时,工作流程取决于你是从 Git 仓库拉取(pull)代码还是向 git 仓库推送(push)代码。
如果你是从 Git 仓库拉取(pull)代码,GitLab Rails 应用会全权负责处理用户鉴权和执行 Git 命令的工作;
如果你是向 Git 仓库推送(push)代码,GitLab Rails 应用既不会进行用户鉴权也不会执行 Git 命令,它会把以下工作交由 GitLab Shell 进行处理:
GitLab Workhorse
GitLab Workhorse 是一个敏捷的反向代理。它会处理一些大的 HTTP 请求,比如文件上传、文件下载、Git push/pull 和 Git 包下载。其它请求会反向代理
# 启动所有 gitlab 组件:
   gitlab-ctl start
# 停止所有 gitlab 组件:
   gitlab-ctl stop
# 停止 postgresql 组件:
   gitlab-ctl stop postgresql
# 停止相关数据连接服务
   gitlab-ctl stop unicorn
   gitlab-ctl stop sidekiq
# 重启所有 gitlab 组件:
   gitlab-ctl restart
# 重启 gitlab-workhorse 组件:
   gitlab-ctl restart gitlab-workhorse
# 查看服务状态
   gitlab-ctl status
# 如果更改了主配置文件 [gitlab.rb 文件],使配置文件生效 但是会初始化除了gitlab.rb 之外的所有文件
   sudo gitlab-ctl reconfigure
# 查看日志
   sudo gitlab-ctl tail
# 检查 redis 的日志
   sudo gitlab-ctl tail redis
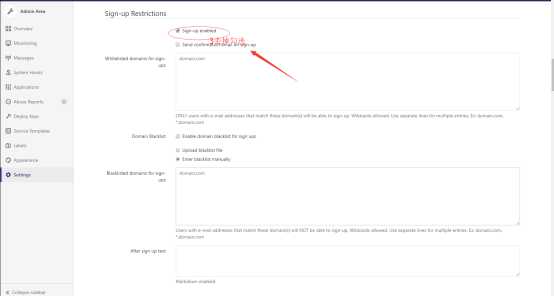
由于我们Gitlab系统是私有仓库,一般用户都是由管理员创建和分派的,所以我们需要关闭注册。

原文:https://www.cnblogs.com/harryblog/p/10863117.html