将安装包上传到服务器的/usr/local/software目录下

yum install make cmake gcc gcc-c++
这个下载的过程很慢。中间会遇到两次确认,[Y/N],选择Y确认

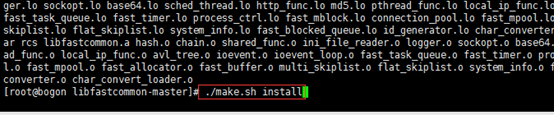
unzip libfastcommon-master.zip 进入解压后的路径,执行./make.sh

等编译完成后,执行./make.sh install
返回/usr/local/software目录,解压fastdfs-master.zip

unzip fastdfs-master.zip
进入解压后的目录,执行编译命令
cd fastdfs-master
./make.sh

等编译成功后,进行安装

cd ..
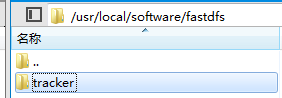
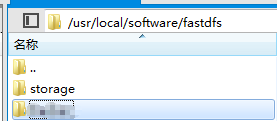
在software下创建fastdfs文件文件夹,在里面再写一个tracker文件夹。
创建文件夹的命令是:
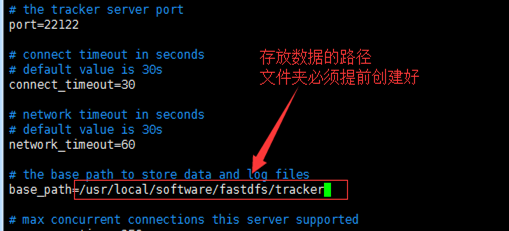
你也可以把tracker创建在别的地方,只要在配置文件中填写好你存放数据的位置就行。
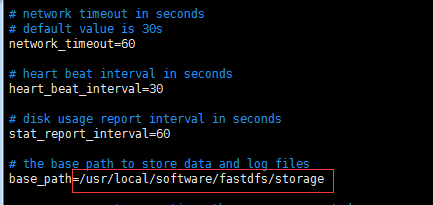
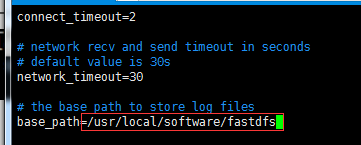
我存放数据的路径是/usr/local/software/fastdfs/tracker
复制tracker的配置文件并重命名,编辑配置文件

如果你直接关闭了防火墙,可以省略这一步。
使用iptables开放如下端口
/sbin/iptables -I INPUT -p tcp --dport 22122 -j ACCEPT
保存
/etc/rc.d/init.d/iptables save
重启服务
service iptables restart

启动命令:
/etc/init.d/fdfs_trackerd start
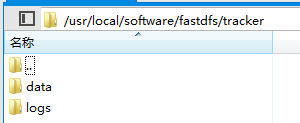
启动成功后tracker目录下会生成两个文件夹
可以使用命令查看tracker的运行状态:
ps -ef | grep fdfs_trackerd

注:实际开发中,tracker和storage是在不同的服务器上的,所以安装tracker和storage都要执行第1.1-1.3节中的步骤。在本课程中,只使用一台服务器,所以配置storage的时候省略了1.1-1.3节中的操作。
mkdir -p /usr/local/software/fastdfs/storage

cp /etc/fdfs/storage.conf.sample /etc/fdfs/storage.conf
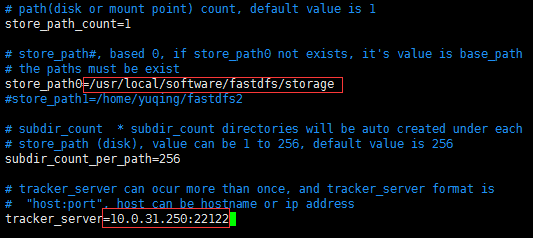
vim /etc/fdfs/storage.conf
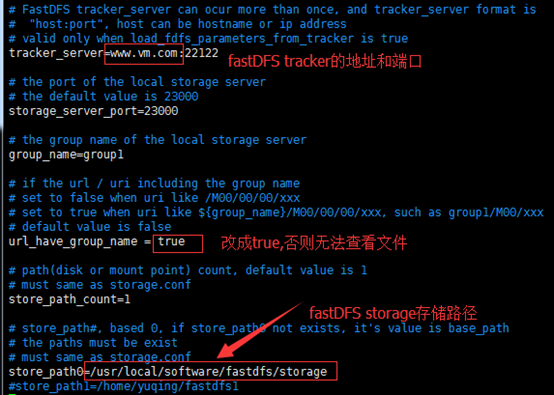
往下找,还有个store_path0和tracker_server, tracker_server的ip就是tracker服务器的ip
如果你直接关闭了防火墙,可以省略这一步。
使用iptables开放如下端口
/sbin/iptables -I INPUT -p tcp --dport 23000 -j ACCEPT
保存
/etc/rc.d/init.d/iptables save
重启服务
service iptables restart
/etc/init.d/fdfs_storaged start
pwd使用命令查看storage的运行状态:
ps -ef | grep fdfs_storaged

cp /etc/fdfs/client.conf.sample /etc/fdfs/client.conf
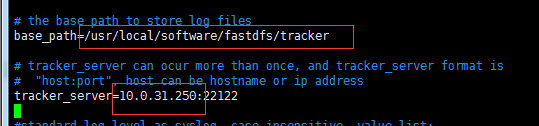
vim /etc/fdfs/client.conf
修改下面这两行为tracker的配置
保存并退出
执行
/usr/bin/fdfs_upload_file /etc/fdfs/client.conf /usr/1712.txt

最后一个/usr/1712.txt是提前放到服务器上的文件。
返回的group1/xxxxx就是上传成功后的访问地址。暂时还不能通过http查看。
把压缩包上传到/usr/local/software目录下

解压
unzip fastdfs-nginx-module-master.zip
进入解压后的路径
cd /usr/local/software/fastdfs-nginx-module-master/src

将mod_fastdfs.conf复制到/etc/fdfs下
cp mod_fastdfs.conf /etc/fdfs
修改下面的配置:
将libfdfsclient.so拷贝至/usr/lib下
cp /usr/lib64/libfdfsclient.so /usr/lib/
将/usr/local/software/fastdfs-master/conf下这两个文件复制过去

创建nginx/client目录
mkdir -p /var/temp/nginx/client
nginx依赖环境参照nginx安装文档
将nginx压缩包上传到/usr/local/software下

安装nginx
进入/usr/local/software/nginx-1.10.0
安装依赖包

yum -y install gcc pcre pcre-devel zlib zlib-devel openssl openssl-devel
这个下载的过程有点慢。
执行
./configure --prefix=/usr/local/software/nginx --sbin-path=/usr/bin/nginx --add-module=/usr/local/software/fastdfs-nginx-module-master/src
编译后执行 make,再执行 make install
修改/usr/local/software/nginx/conf/nginx.conf
添加server:
server {
listen 8888;
server_name localhost;
location /group1/M00/{
ngx_fastdfs_module;
}
}
说明:
server_name指定本机ip
location /group1/M00/:group1为nginx 服务FastDFS的分组名称,M00是FastDFS自动生成编号,对应store_path0,如果FastDFS定义store_path1,这里就是M01
8888端口号与/etc/fdfs/storage.conf中的http.server_port=8888相对应
启动nginx
nginx
停止nginx
nginx -s stop
重新启动
nginx -s reload
下载工程https://github.com/happyfish100/fastdfs-client-java
安装到自己的maven仓库
导入jar包:

1 <!-- fastdfs -->
2 <dependency>
3     <groupId>org.csource</groupId>
4     <artifactId>fastdfs-client-java</artifactId>
5     <version>1.27-SNAPSHOT</version>
6 </dependency>
创建配置文件client.conf:
1 tracker_server=服务器的ip或域名:22122
测试方法:
 1 import org.csource.fastdfs.*;
 2
 3 public class FastDFSTest {
 4     public static void main(String[] args) throws Exception {
 5         // 1、向工程中添加jar包
 6         // 2、创建一个配置文件。配置tracker服务器地址
 7         // 3、加载配置文件(绝对路径,工程目录不要有中文)
 8         ClientGlobal.init(FastDFSTest.class.getResource("/").getPath() + "client.conf");
 9         // 4、创建一个TrackerClient对象。
10         TrackerClient trackerClient = new TrackerClient();
11         // 5、使用TrackerClient对象获得trackerserver对象。
12         TrackerServer trackerServer = trackerClient.getConnection();
13         // 6、创建一个StorageServer的引用null就可以。
14         StorageServer storageServer = null;
15         // 7、创建一个StorageClient对象。trackerserver、StorageServer两个参数。
16         StorageClient storageClient = new StorageClient(trackerServer, storageServer);
17         // 8、使用StorageClient对象上传文件。
18         String[] strings = storageClient.upload_file("f:/qf_logo.jpg", "jpg", null);
19         for (String string : strings) {
20             System.out.println(string);
21         }
22     }
23 }
封装工具类:
 1 public class FastDFSClient {
 2
 3    private TrackerClient trackerClient = null;
 4    private TrackerServer trackerServer = null;
 5    private StorageServer storageServer = null;
 6    private StorageClient1 storageClient = null;
 7
 8    public FastDFSClient(String conf) throws Exception {
 9       if (conf.contains("classpath:")) {
10          conf = conf.replace("classpath:", this.getClass().getResource("/").getPath());
11       }
12       ClientGlobal.init(conf);
13       trackerClient = new TrackerClient();
14       trackerServer = trackerClient.getConnection();
15       storageServer = null;
16       storageClient = new StorageClient1(trackerServer, storageServer);
17    }
18
19    /**
20     * 上传文件方法
21     * <p>Title: uploadFile</p>
22     * <p>Description: </p>
23     * @param fileName 文件全路径
24     * @param extName 文件扩展名,不包含(.)
25     * @param metas 文件扩展信息
26     * @return
27     * @throws Exception
28     */
29    public String uploadFile(String fileName, String extName, NameValuePair[] metas) throws Exception {
30       String result = storageClient.upload_file1(fileName, extName, metas);
31       return result;
32    }
33
34    public String uploadFile(String fileName) throws Exception {
35       return uploadFile(fileName, null, null);
36    }
37
38    public String uploadFile(String fileName, String extName) throws Exception {
39       return uploadFile(fileName, extName, null);
40    }
41
42    /**
43     * 上传文件方法
44     * <p>Title: uploadFile</p>
45     * <p>Description: </p>
46     * @param fileContent 文件的内容,字节数组
47     * @param extName 文件扩展名
48     * @param metas 文件扩展信息
49     * @return
50     * @throws Exception
51     */
52    public String uploadFile(byte[] fileContent, String extName, NameValuePair[] metas) throws Exception {
53
54       String result = storageClient.upload_file1(fileContent, extName, metas);
55       return result;
56    }
57
58    public String uploadFile(byte[] fileContent) throws Exception {
59       return uploadFile(fileContent, null, null);
60    }
61
62    public String uploadFile(byte[] fileContent, String extName) throws Exception {
63       return uploadFile(fileContent, extName, null);
64    }
65 }
66 测试方法:
67 FastDFSClient fastDFSClient = new FastDFSClient(
68         "classpath:client.conf");
69 String string = fastDFSClient.uploadFile("f:/logo.jpg");
70 System.out.println(string);
返回结果:
group1/M00/00/00/CscAbloEvACATPsCAALl54RJz6c951.jpg
原文:https://www.cnblogs.com/Bkxk/p/10233966.html