错误示例:
 1 public class Test {
 2     public static void main(String[] args){
 3         thread1.start();
 4         thread2.start();
 5         thread3.start();
 6     }
 7
 8     static Thread thread1 = new Thread(new Runnable() {
 9         @Override
10         public void run() {
11             System.out.println("thread1");
12         }
13     });
14
15     static Thread thread2 = new Thread(new Runnable() {
16         @Override
17         public void run() {
18             System.out.println("thread2");
19         }
20     });
21
22     static Thread thread3 = new Thread(new Runnable() {
23         @Override
24         public void run() {
25             System.out.println("thread3");
26         }
27     });
28 }
执行结果:
1 thread2
2 thread1
3 thread3
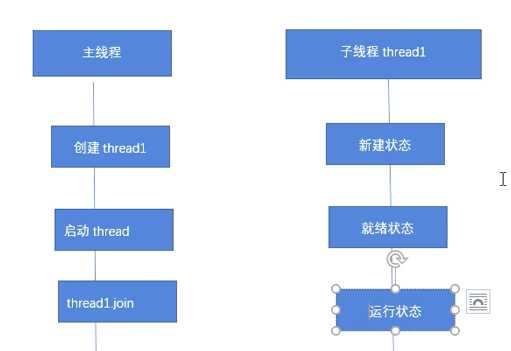
原因:start()方法只是让子线程处于就绪状态,最终执行状态是不可控的
方案一:
 1 public class Test {
 2     public static void main(String[] args) throws InterruptedException {
 3         thread1.start();
 4         thread1.join();//主线程放弃cpu执行权,让给子线程执行
 5         thread2.start();
 6         thread2.join();
 7         thread3.start();
 8         thread3.join();
 9     }
10
11     static Thread thread1 = new Thread(new Runnable() {
12         @Override
13         public void run() {
14             System.out.println("thread1");
15         }
16     });
17
18     static Thread thread2 = new Thread(new Runnable() {
19         @Override
20         public void run() {
21             System.out.println("thread2");
22         }
23     });
24
25     static Thread thread3 = new Thread(new Runnable() {
26         @Override
27         public void run() {
28             System.out.println("thread3");
29         }
30     });
31 }
结果:
1 thread1
2 thread2
3 thread3
join方法的原理就是调用相应线程的wait方法进行等待操作的,例如A线程中调用了B线程的join方法,则相当于在A线程中调用了B线程的wait方法,当B线程执行完(或者到达等待时间),B线程会自动调用自身的notifyAll方法唤醒A线程,从而达到同步的目的。
源码:
 1 public final synchronized void join(long millis)
 2     throws InterruptedException {
 3         long base = System.currentTimeMillis();
 4         long now = 0;
 5
 6         if (millis < 0) {
 7             throw new IllegalArgumentException("timeout value is negative");
 8         }
 9
10         if (millis == 0) {
11             while (isAlive()) {
12                 wait(0);
13             }
14         } else {
15             while (isAlive()) {
16                 long delay = millis - now;
17                 if (delay <= 0) {
18                     break;
19                 }
20                 wait(delay);
21                 now = System.currentTimeMillis() - base;
22             }
23         }
24     }
wait(0)是当前主线程进入等待
方案二:
 1 public class Test {
 2     public static void main(String[] args) throws InterruptedException {
 3         executorService.submit(thread1);
 4         executorService.submit(thread2);
 5         executorService.submit(thread3);
 6     }
 7
 8     static ExecutorService executorService = Executors.newSingleThreadExecutor();
 9
10     static Thread thread1 = new Thread(new Runnable() {
11         @Override
12         public void run() {
13             System.out.println("thread1");
14         }
15     });
16
17     static Thread thread2 = new Thread(new Runnable() {
18         @Override
19         public void run() {
20             System.out.println("thread2");
21         }
22     });
23
24     static Thread thread3 = new Thread(new Runnable() {
25         @Override
26         public void run() {
27             System.out.println("thread3");
28         }
29     });
30 }
执行结果:
thread1
thread2
thread3
单线程化线程池(newSingleThreadExecutor)的优点,串行执行所有任务
原文:https://www.cnblogs.com/chinano1/p/9981368.html