<project xmlns="http://maven.apache.org/POM/4.0.0" xmlns:xsi="http://www.w3.org/2001/XMLSchema-instance" xsi:schemaLocation="http://maven.apache.org/POM/4.0.0 http://maven.apache.org/xsd/maven-4.0.0.xsd">
  <modelVersion>4.0.0</modelVersion>
  <groupId>com.toov5.springboot.avtivemq</groupId>
  <artifactId>springboot.avtivemq</artifactId>
  <version>0.0.1-SNAPSHOT</version>

    <parent>
        <groupId>org.springframework.boot</groupId>
        <artifactId>spring-boot-starter-parent</artifactId>
        <version>2.0.1.RELEASE</version>
    </parent>
    <!-- 管理依赖 -->
    <dependencyManagement>
        <dependencies>
            <dependency>
                <groupId>org.springframework.cloud</groupId>
                <artifactId>spring-cloud-dependencies</artifactId>
                <version>Finchley.M7</version>
                <type>pom</type>
                <scope>import</scope>
            </dependency>
        </dependencies>
    </dependencyManagement>
    <dependencies>
        <!-- SpringBoot整合Web组件 -->
        <dependency>
            <groupId>org.springframework.boot</groupId>
            <artifactId>spring-boot-starter-web</artifactId>
        </dependency>
        <!-- SpringBoot Activemq -->
        <dependency>
            <groupId>org.springframework.boot</groupId>
            <artifactId>spring-boot-starter-activemq</artifactId>
        </dependency>
    </dependencies>
    <!-- 注意: 这里必须要添加, 否者各种依赖有问题 -->
    <repositories>
        <repository>
            <id>spring-milestones</id>
            <name>Spring Milestones</name>
            <url>https://repo.spring.io/libs-milestone</url>
            <snapshots>
                <enabled>false</enabled>
            </snapshots>
        </repository>
    </repositories>


</project>

没有版本号,表示springboot已经整合好了
项目结构:

yml:
spring:
  activemq:
    broker-url: tcp://192.168.91.6:61616
    user: admin
    password: admin
my_queue: springboot-queue-toov5
server:
  port: 8080
config:
package com.toov5.config;

import javax.jms.Queue;

import org.apache.activemq.command.ActiveMQQueue;
import org.springframework.beans.factory.annotation.Value;
import org.springframework.context.annotation.Bean;
import org.springframework.stereotype.Component;

@Component
public class ConfigQueue {
   @Value("${my_queue}")
   private String myQueue;

    //首先将队列注入到SpringBoot容器中去
    @Bean
    public Queue queue() {
        return new ActiveMQQueue(myQueue);
    }

}
producer
package com.toov5.Producer;

import javax.jms.Queue;

import org.springframework.beans.factory.annotation.Autowired;
import org.springframework.jms.core.JmsMessagingTemplate;
import org.springframework.scheduling.annotation.Scheduled;
import org.springframework.stereotype.Component;

@Component
public class P2PProducer {
    @Autowired
    private JmsMessagingTemplate jmsMessagingTemplate;
    //把队列注入进来
    @Autowired  //此注解默认是以类型找  在配置文件中 已经注入的  @Bean
    private Queue queue;

    //每隔5s时间向队列发送消息
    @Scheduled(fixedDelay=5000)  //每间隔2s向队列发送消息
    public void send() {
        String msgString = System.currentTimeMillis()+" ";
        jmsMessagingTemplate.convertAndSend(queue,msgString);
        System.out.println("点对点通讯,msg"+msgString);
    }
}
启动类:
package com.toov5;

import org.springframework.boot.SpringApplication;
import org.springframework.boot.autoconfigure.SpringBootApplication;
import org.springframework.scheduling.annotation.EnableScheduling;

@SpringBootApplication
@EnableScheduling  //开启定时任务
public class AppProducer {
   public static void main(String[] args) {
    SpringApplication.run(AppProducer.class, args);
}
}
运行:
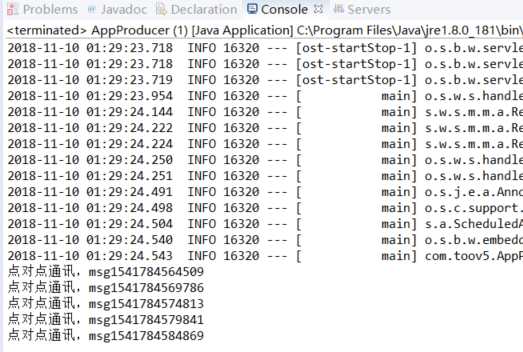
一直在增加
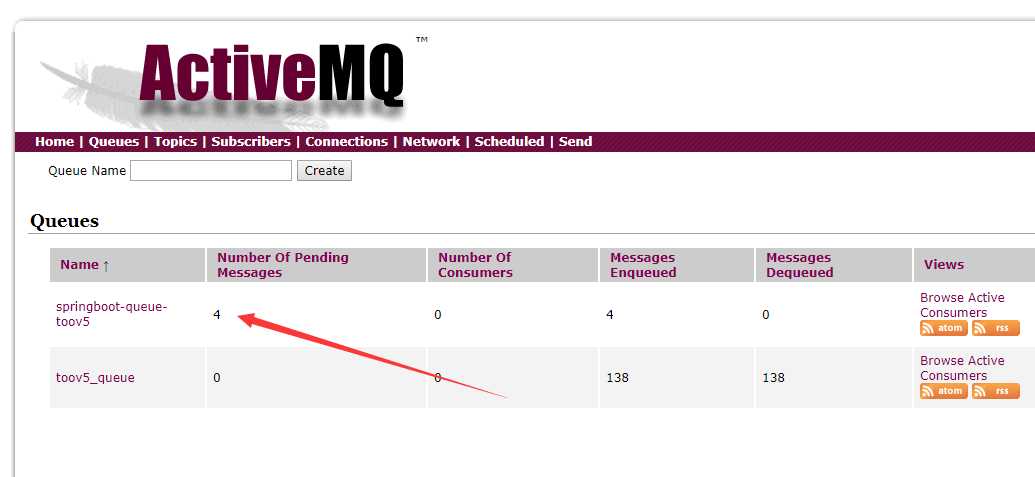
思路总结: queue 注入到springboot容器, 然后producer 去取出来 spring定时任务 5s定时写入消息
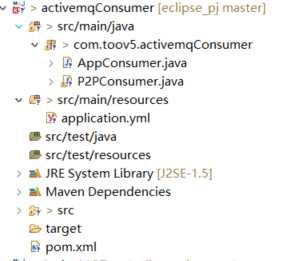
然后创建另外一个Consumer 的maven 项目:
pom:
<project xmlns="http://maven.apache.org/POM/4.0.0" xmlns:xsi="http://www.w3.org/2001/XMLSchema-instance" xsi:schemaLocation="http://maven.apache.org/POM/4.0.0 http://maven.apache.org/xsd/maven-4.0.0.xsd">
  <modelVersion>4.0.0</modelVersion>
  <groupId>com.springboot.activemqConsumer</groupId>
  <artifactId>activemqConsumer</artifactId>
  <version>0.0.1-SNAPSHOT</version>
  <parent>
		<groupId>org.springframework.boot</groupId>
		<artifactId>spring-boot-starter-parent</artifactId>
		<version>2.0.1.RELEASE</version>
	</parent>
	<!-- 管理依赖 -->
	<dependencyManagement>
		<dependencies>
			<dependency>
				<groupId>org.springframework.cloud</groupId>
				<artifactId>spring-cloud-dependencies</artifactId>
				<version>Finchley.M7</version>
				<type>pom</type>
				<scope>import</scope>
			</dependency>
		</dependencies>
	</dependencyManagement>
	<dependencies>
		<!-- SpringBoot整合Web组件 -->
		<dependency>
			<groupId>org.springframework.boot</groupId>
			<artifactId>spring-boot-starter-web</artifactId>
		</dependency>
		<!-- SpringBoot Activemq -->
		<dependency>
			<groupId>org.springframework.boot</groupId>
			<artifactId>spring-boot-starter-activemq</artifactId>
		</dependency>
	</dependencies>
	<!-- 注意: 这里必须要添加, 否者各种依赖有问题 -->
	<repositories>
		<repository>
			<id>spring-milestones</id>
			<name>Spring Milestones</name>
			<url>https://repo.spring.io/libs-milestone</url>
			<snapshots>
				<enabled>false</enabled>
			</snapshots>
		</repository>
	</repositories>
</project>
yml:
spring:
  activemq:
    broker-url: tcp://192.168.91.6:61616
    user: admin
    password: admin
my_queue: springboot-queue-toov5
server:
  port: 8080
consumer:
package com.toov5.activemqConsumer;

import org.springframework.jms.annotation.JmsListener;
import org.springframework.stereotype.Component;

@Component
public class P2PConsumer {

    @JmsListener(destination= "${my_queue}")    //用这个注解去监听 监听的队列
    public void receiver(String msg) {
        System.out.println("消费者成功获取到生产者的消息,msg"+msg);
    }


}
启动类:
package com.toov5.activemqConsumer;

import org.springframework.boot.SpringApplication;
import org.springframework.boot.autoconfigure.SpringBootApplication;

@SpringBootApplication
public class AppConsumer {

    public static void main(String[] args) {
        SpringApplication.run(AppConsumer.class, args);
    }

}
修改为两个不同的端口一起跑:

SpringBoot2.0之整合ActiveMQ(点对点模式)
原文:https://www.cnblogs.com/toov5/p/9937989.html