POST --> Boot Sequence --> Bootloader --> kernel + initramfs(initrd) -->rootfs --> /sbin/init
init:
CentOS 5: SysV init
CentOS 6: Upstart
CentOS 7: Systemd
Systemd:系统启动和服务器守护进程管理器,负责在系统启动或运行时,激活系统资源,服务器进程和其它进程
Systemd新特性:
核心概念:unit
unit表示不同类型的systemd对象,通过配置文件进行标识和配置;文件中主要包含了系统服务、监听socket、保存的系统快照以及其它与init相关的信息
配置文件:
/usr/lib/systemd/system:每个服务最主要的启动脚本设置,类似于之前的/etc/init.d//run/systemd/system:系统执行过程中所产生的服务脚本,比上面目录优先运行/etc/systemd/system:管理员建立的执行脚本,类似于/etc/rc.d/rcN.d/Sxx类的功能,比上面目录优先运行Systemctl –t help 查看unit类型
Service unit: 文件扩展名为.service, 用于定义系统服务Target unit: 文件扩展名为.target,用于模拟实现运行级别Device unit: .device, 用于定义内核识别的设备Mount unit: .mount, 定义文件系统挂载点Socket unit: .socket, 用于标识进程间通信用的socket文件,也可在系统启动时,延迟启动服务,实现按需启动Snapshot unit: .snapshot, 管理系统快照Swap unit: .swap, 用于标识swap设备Automount unit: .automount,文件系统的自动挂载点Path unit: .path,用于定义文件系统中的一个文件或目录使用,常用于当文件系统变化时,延迟激活服务,如:spool 目录关键特性:
不兼容:
在/etc/systemd/system下的unit文件是系统管理员和用户使用
在/usr/lib/systemd/system下的供发行版打包者使用
在unit文件中,以“#” 开头的行后面的内容会被认为是注释,相关布尔值,1、yes、on、true 都是开启,0、no、off、false 都是关闭,时间单位默认是秒,所以要用毫秒(ms)分钟(m)等须显式说明
注意:
对于新创建的unit文件,或者修改了的unit文件,要通知systemd重载此配置文件,而后可以选择重启
systemctldaemon-reload
CentOS 7: service unit
注意:能兼容早期的服务脚本
命令:
systemctl COMMAND name.service
| - | centOS6 | CentOS7 |
|---|---|---|
| 启动 | service name start | systemctl start name.service |
| 停止 | service name stop | systemctl stop name.service |
| 重启 | service name restart | systemctl restart name.service |
| 状态 | service name status | systemctl status name.service |
| 条件式重启(已启动才重启,否则不做操作) | service name condrestart | systemctl try-restart name.service |
| 重载或重启服务(先加载,再启动) | - | systemctl reload-or-restart name.service |
| 重载或条件式重启服务 | - | systemctl reload-or-try-restart name.service |
| 禁止自动和手动启动 | - | systemctl mask name.service |
| 取消禁止 | - | systemctl unmask name.service |
| - | centOS6 | CentOS7 |
|---|---|---|
| 查看某服务当前激活与否的状态 | - | systemctl is-active name.service |
| 查看所有已经激活的服务 | - | systemctl list-units --type |
| 查看所有服务 | - | systemctl list-units --type service --all |
| - | centOS6 | CentOS7 |
|---|---|---|
| 设定某服务开机自启 | chkconfig name on | systemctl enable name.service |
| 设定某服务开机禁止启动 | chkconfig name off | systemctl disable name.service |
| 查看所有服务的开机自启状态 | chkconfig --list | systemctl list-unit-files --type service |
| 用来列出该服务在哪些运行级别下启用和禁用 | chkconfig sshd –list | ls /etc/systemd/system/*.wants/sshd.service |
| 查看服务是否开机自启 | - | systemctl is-enabled name.service |
| - | centOS6 | CentOS7 |
|---|---|---|
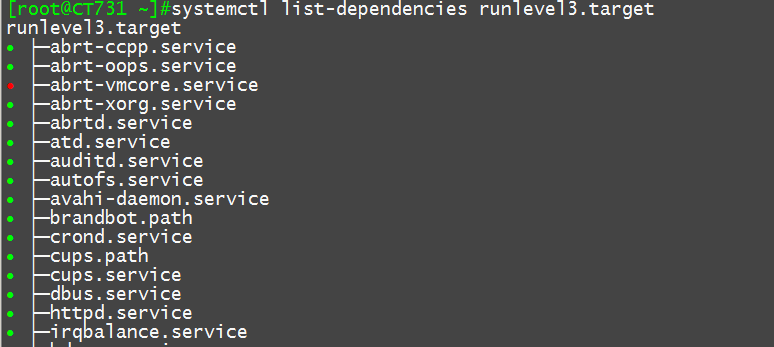
| 查看服务的依赖关系 | - | systemctl list-dependencies name.service |
| 杀掉进程 | - | systemctl kill unitname |
| 切换至紧急救援模式 | - | systemctl rescue |
| 切换至emergency模式 | - | systemctl emergency |
| 关机 | - | systemctlhalt、systemctlpoweroff |
| 重启 | - | systemctl reboot |
| 挂起 | - | systemctl suspend |
| 休眠 | - | systemctl hibernate |
| 休眠并挂起 | - | systemctlhybrid-sleep |
systemctl list-unit-files --type service --all #显示状态
显示所有单元状态
systemctl 或systemctl list-units
只显示服务单元的状态
systemctl --type=service
显示sshd服务单元
systemctl –l status sshd.service
验证sshd服务当前是否活动
systemctl is-active sshd
启动,停止和重启sshd服务
systemctl start sshd.service
systemctl stop sshd.service
systemctl restart sshd.service
重新加载配置
systemctl reload sshd.service
列出活动状态的所有服务单元
systemctl list-units --type=service
列出所有服务单元
systemctl list-units --type=service --all
查看服务单元的启用和禁用状态
systemctl list-unit-files --type=service
列出失败的服务
systemctl --failed --type=service
列出依赖的单元
systemctl list-dependencies sshd
验证sshd服务是否开机启动
systemctl is-enabled sshd
禁用network,使之不能自动启动,但手动可以
systemctl disable network
启用network
systemctl enable network
禁用network,使之不能手动或自动启动
systemctl mask network
启用network
systemctl unmask network
在centOS7上运行级别的含义已经和之前不同了,运行级别就是通过开启关闭不同的服务产生的效果,在从netOS7上,已然由.target来代替运行级别,我们可以称target为目标态,我们可以通过target定制更符合我们工作运行环境。
我们可以通过命令:ls /usr/lib/systemd/system/*.target查看我们的机器上有多少个target
"grub.cfg"140L,4397C written
[root@CT731 grub2]#ls /usr/lib/systemd/system/*.target
/usr/lib/systemd/system/anaconda.target
/usr/lib/systemd/system/basic.target
/usr/lib/systemd/system/bluetooth.target
/usr/lib/systemd/system/printer.target
...
/usr/lib/systemd/system/reboot.target
/usr/lib/systemd/system/rescue.target
/usr/lib/systemd/system/rpcbind.target
/usr/lib/systemd/system/runlevel0.target
/usr/lib/systemd/system/runlevel1.target
/usr/lib/systemd/system/runlevel2.target
...
/usr/lib/systemd/system/sleep.target
...
使用systemctl list-unit-files --type target --all可以查看所有目标态的状态,或者systemctl list-dependencies xxx.target命令查看目标态的依赖性。
在centOS7上所谓的目标态,其实就是由各种指定的服务和基础target组合而成的。
0 ==> runlevel0.target, poweroff.target
1 ==> runlevel1.target, rescue.target
2 ==> runlevel2.target, multi-user.target
3 ==> runlevel3.target, multi-user.target
4 ==> runlevel4.target, multi-user.target
5 ==> runlevel5.target, graphical.target
6 ==> runlevel6.target, reboot.target
在centOS6上,我们切换级别使用init,在centOS7上虽然也能使用,但是已经不再是原来的程序了,现在我们使用systemctlisolate name.target来切换target。
比如,我们想切换到字符界面,我们就可以使用systemctlisolate multi-user.target来进行切换。要想切换运行级别,在/lib/systemd/system/*.target文件中AllowIsolate=yes才可以。(修改文件需执行systemctldaemon-reload才能生效) 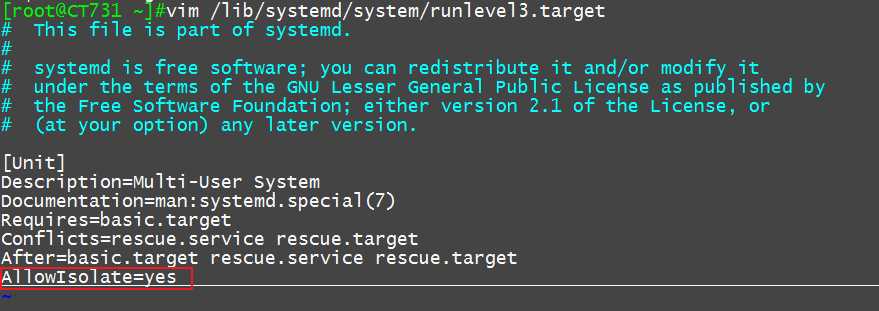
在centOS7上如何查看运行的目标态呢,使用命令systemctl get-default
使用命令systemctl set-default name.target来修改我们的目标态。
我们看一下我们的默认目标态究竟为何物。
[root@CT731 ~]#locate default.target
/etc/systemd/system/default.target
[root@CT731 ~]#ll /etc/systemd/system/default.target
lrwxrwxrwx.1 root root 36Aug2507:06/etc/systemd/system/default.target ->/lib/systemd/system/runlevel3.target
它其实就是创建了一个软链接到指定的target上去了
在centOS7中,文件系统损坏,先尝试自动修复,失败则进入emergency shell,提示用户修复
启动时任意键暂停启动 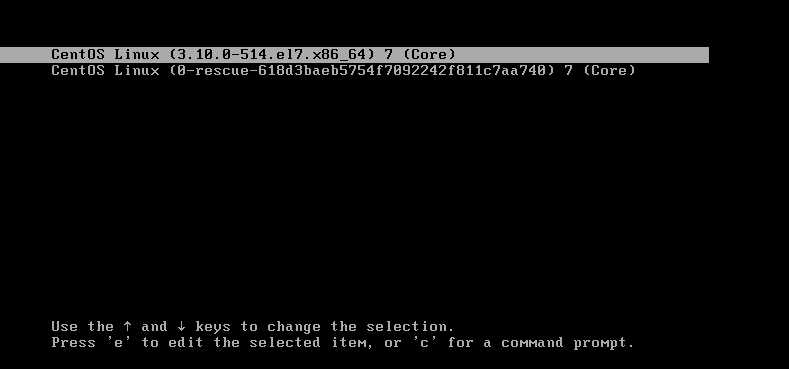
按e键进入编辑模式
将光标移动linux16开始的行,添加内核参数rd.break
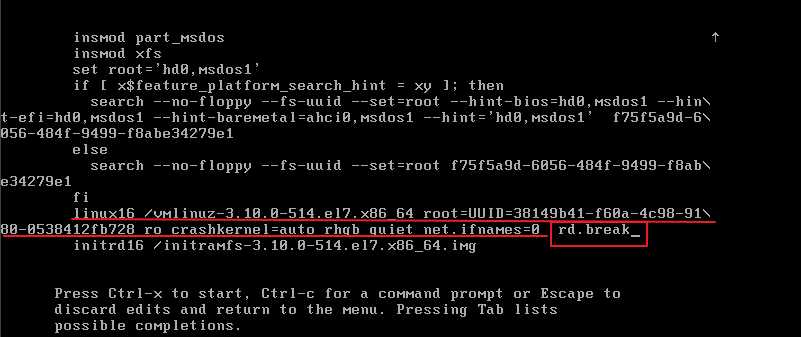
按ctrl-x启动,然后:
mount –o remount,rw /sysroot 
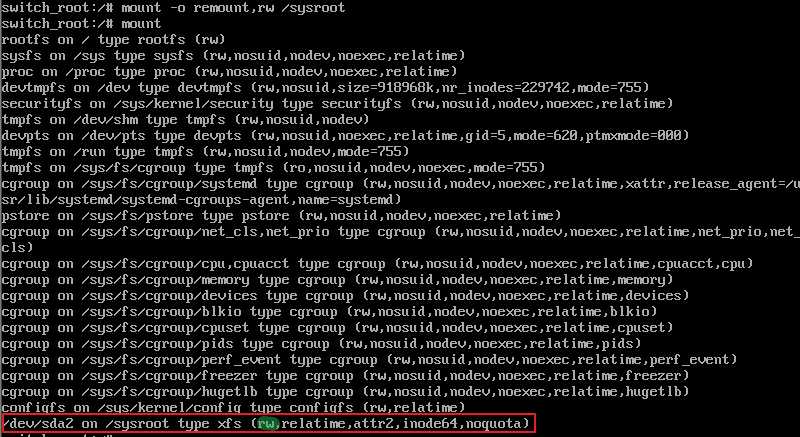
chroot /sysroot
passwd root 
touch /.autorelabel
exit
reboot 
然后可以使用设置的密码登录root
启动时任意键暂停启动(同方法1)
按e键进入编辑模式(同方法1)
将光标移动linux16开始的行,改为rw init=/sysroot/bin/sh 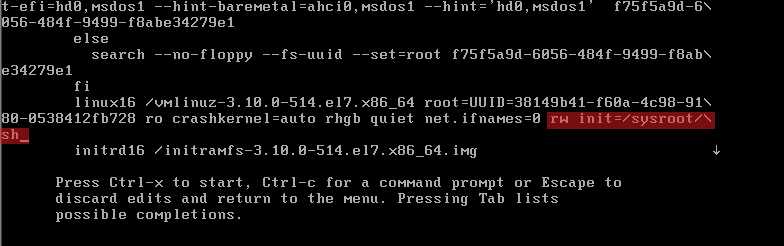
按ctrl-x启动
chroot /sysroot 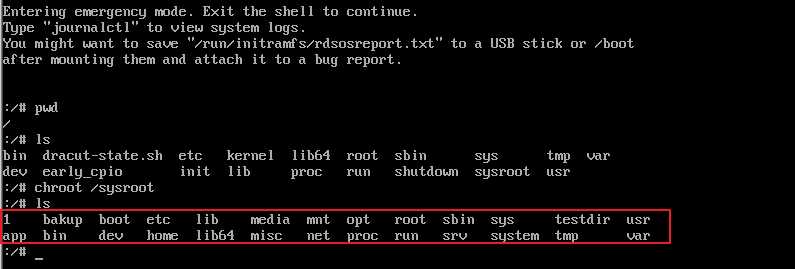
passwd root
touch /.autorelabel 
exit
reboot
最后,用新密码登录root
在centOS6上,我们的grub文件是/boot/grub/grub.conf
在centOS7上,文件改成/boot/grub2/grub.cfg了,但是功能还是大致一样的都是用于加载内核的,不过在centOS7上设置默认启动项发生了一些变化,假如我们现在有两个内核,我们需要改变默认启动应该如何做到呢?
首先,vim /etc/default/grub打开如下文件:
GRUB_TIMEOUT=5
GRUB_DISTRIBUTOR="$(sed ‘s, release .*$,,g‘ /etc/system-release)"
GRUB_DEFAULT=saved
GRUB_DISABLE_SUBMENU=true
GRUB_TERMINAL_OUTPUT="console"
GRUB_CMDLINE_LINUX="crashkernel=auto rhgb quiet net.ifnames=0"
GRUB_DISABLE_RECOVERY="true"
~
打开文件后,我们修改GRUB_DEFAULT的值,和centOS一样,0代表第一个内核,1代表第二个,以此类推。
我们在修改完成后,并没有立即生效,使用grub2-mkconfig -o /boot/grub2/grub.cfg命令来生成grub2.cfg文件,我们在下次启动的时候就会默认选择新的默认内核。
第一步:破坏硬盘的前446字节:
dd if=/dev/zero of=/dev/sda bs=1 count=446
[root@CT731 ~]#dd if=/dev/zero of=/dev/sda bs=1 count=446
446+0 records in
446+0 records out
446 bytes (446 B) copied,0.000758682 s,588 kB/s
[root@CT731 ~]#hexdump -C -n 512/dev/sda
0000000000000000000000000000000000000000|................|
*
000001b000000000000000000000000000008020|...............|
000001c021008335700500080000000040000035|!..5p.......@..5|
000001d0710583 fe ff ff 000840000000400600 fe |q.......@...@...|
000001e0 ff ff 83 fe ff ff 000880060000400600 fe |............@...|
000001f0 ff ff 05 fe ff ff 0008 c0 0c00 f8 3f0c55 aa |............?.U.|
00000200
第二步:重启计算机
由于我的虚拟机挂载了光盘,所以一重启就进入光盘启动的界面 
上面有三项,我们选择第三项进入troubleshooting
进入第三项后,点击第二项,进入救援模式的centos的系统 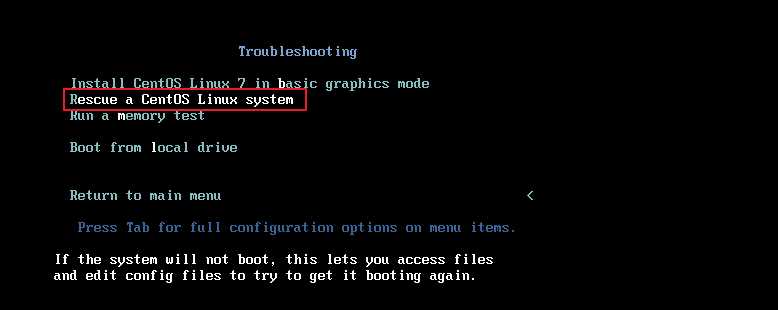
然后我们进入如下模式:
选择1,继续进行: 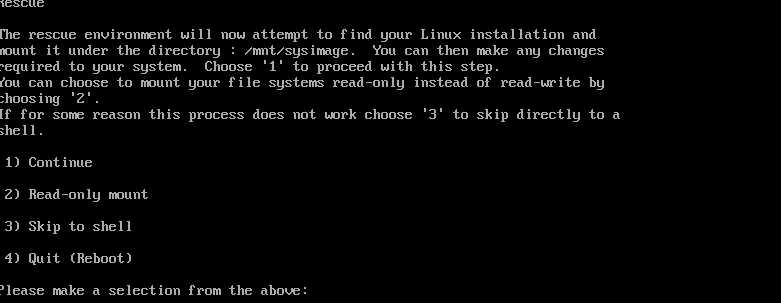
接下来,我们就会进入到一个shell模式中,不需要切根,进行系统修复: 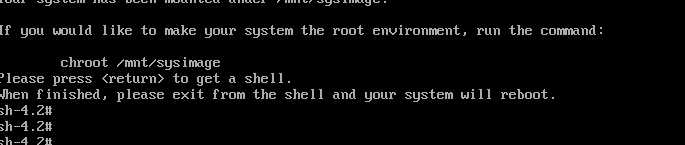
修复过程:
grub2-install --root-directory=/mnt/sysimage/ /dev/sda 
我们来查看一下:
hexdump -C -n 512 /dev/sda 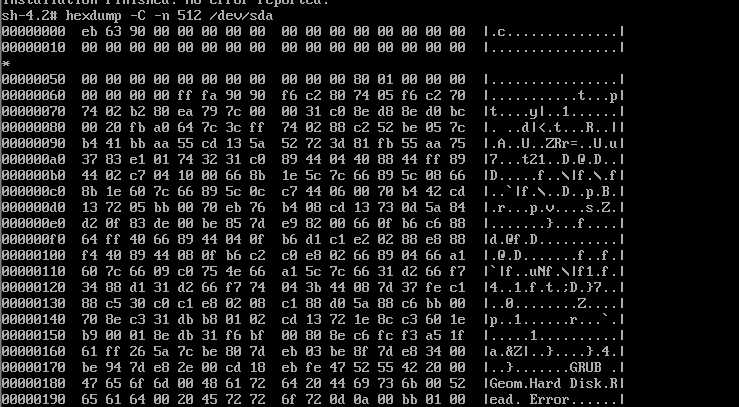
重启,修复完成。
第一步:删除grub2
rm -rf grub2
[root@CT731 boot]#rm -rf grub2
[root@CT731 boot]#ls
config-3.10.0-514.el7.x86_64
grub
initramfs-0-rescue-618d3baeb5754f7092242f811c7aa740.img
initramfs-3.10.0-514.el7.x86_64.img
initramfs-3.10.0-514.el7.x86_64kdump.img
initrd-plymouth.img
symvers-3.10.0-514.el7.x86_64.gz
System.map-3.10.0-514.el7.x86_64
vmlinuz-0-rescue-618d3baeb5754f7092242f811c7aa740
vmlinuz-3.10.0-514.el7.x86_64
第二步,重启计算机
进入如下界面: 
接下来,我们重启系统,按Esc,进入光盘救援模式:
选择第三项,进入光盘救援(前提是挂载光盘)
以下步骤到进入shell同实验一相同,不在过多演示; 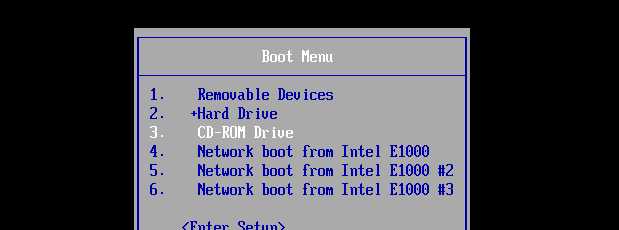
进入救援模式后:
第一步:切根 
然后执行命令
grub2-install 
下图中,我们可以看到在grub2文件夹中,还没有grub.cfg文件,接下来,我们需要生成: 
生成配置文件:
进入到grub2下,
grub2-mkconfig -o grub.cfg 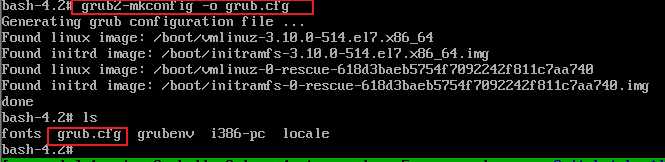
exit然后,
重启电脑: 
完成!
原文:http://www.cnblogs.com/duzhaoqi/p/7582404.html