swagger是一个管理接口的框架,通过注解的方式、网页的形式自动帮我们生成接口相关的信息,相比以前文档的方式撰写的接口,swagger更加便捷、高效,省力。
现在开始介绍集成的步骤:
1.去官网下载swagger
https://github.com/swagger-api/swagger-ui
2. 拷贝swagger UI
下载完成后,解压文件。在你项目的WEB-INF目录下,创建一个文件夹,命名为swagger(当然,你也可以用其他的名字命名),然后去刚才解压的文件中找到dist,
将dist文件夹里面的所有文件拷贝到swagger下;
3.创建swagger的配置文件
其实就是创建一个class,可放在任意包下,该类的作用是将swagger注入到spring容器中,代码如下:

package com.qthh.flyl.config;

import org.springframework.beans.factory.annotation.Autowired;
import org.springframework.context.annotation.Bean;
import org.springframework.context.annotation.Configuration;

import com.mangofactory.swagger.configuration.SpringSwaggerConfig;
import com.mangofactory.swagger.models.dto.ApiInfo;
import com.mangofactory.swagger.plugin.EnableSwagger;
import com.mangofactory.swagger.plugin.SwaggerSpringMvcPlugin;

/**
 * swagger配置
 *
 * @author 晴天很嗨
 *
 */
@Configuration
@EnableSwagger
public class SwaggerConfig {

    private SpringSwaggerConfig springSwaggerConfig;

    @Autowired
    public void setSpringSwaggerConfig(SpringSwaggerConfig springSwaggerConfig) {
        this.springSwaggerConfig = springSwaggerConfig;
    }

    @Bean
    public SwaggerSpringMvcPlugin customImplementation() {
        return new SwaggerSpringMvcPlugin(this.springSwaggerConfig).apiInfo(apiInfo()).includePatterns(".*?");
    }

    private ApiInfo apiInfo() {
        ApiInfo apiInfo = new ApiInfo("My Apps API Title", "My Apps API Description", "My Apps API terms of service",
                "My Apps API Contact Email", "My Apps API Licence Type", "My Apps API License URL");
        return apiInfo;
    }

}
4.配置静态资源
由于是spring框架,静态资源是被拦截,为了被外界访问到,需要配置如下:
<!-- 配置静态资源 -->
<mvc:resources mapping="/swagger/**" location="/WEB-INF/swagger/"/>
这里的配置是根据你第二步创建的文件夹名称来的,可以根据个人喜好修改。
5.修改index.html
找到swagger下的index.html,打开并找到如下代码
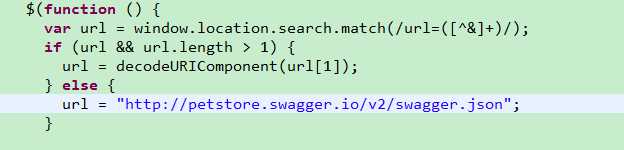
这里的url = "http://192.168.1.200/flyl-api/api-docs"表示:swagger读取的数据来源,默认是官网的,你得修改成你自己的,修改后如下:
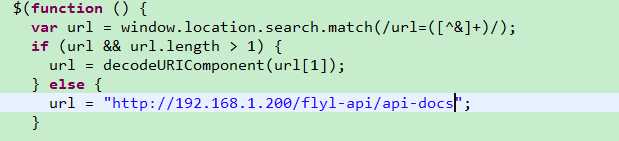
url路径命名方式:主机+端口+项目名称+"api-docs"
到这里,这个swagger配置已经完成。具体的使用,和springMVC一样,也是用注解的方式,下面给个案例,大家一看便会明白 :
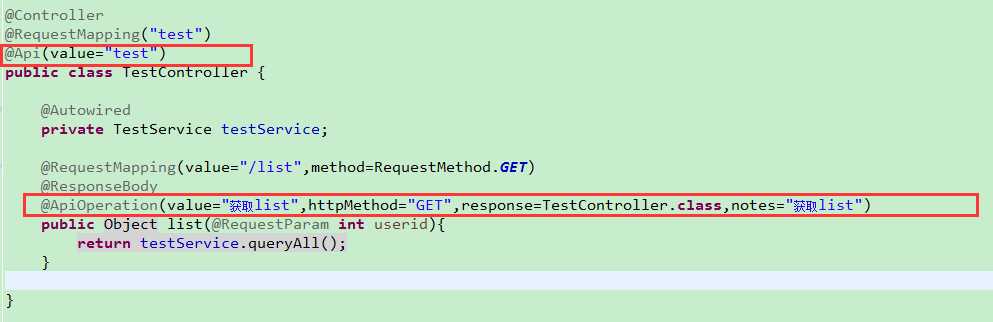
一个是类级别的注解 ,一个是方法级别的注解,用法都类似,现在,我们就可以将程序运行起来,访问index这个页面
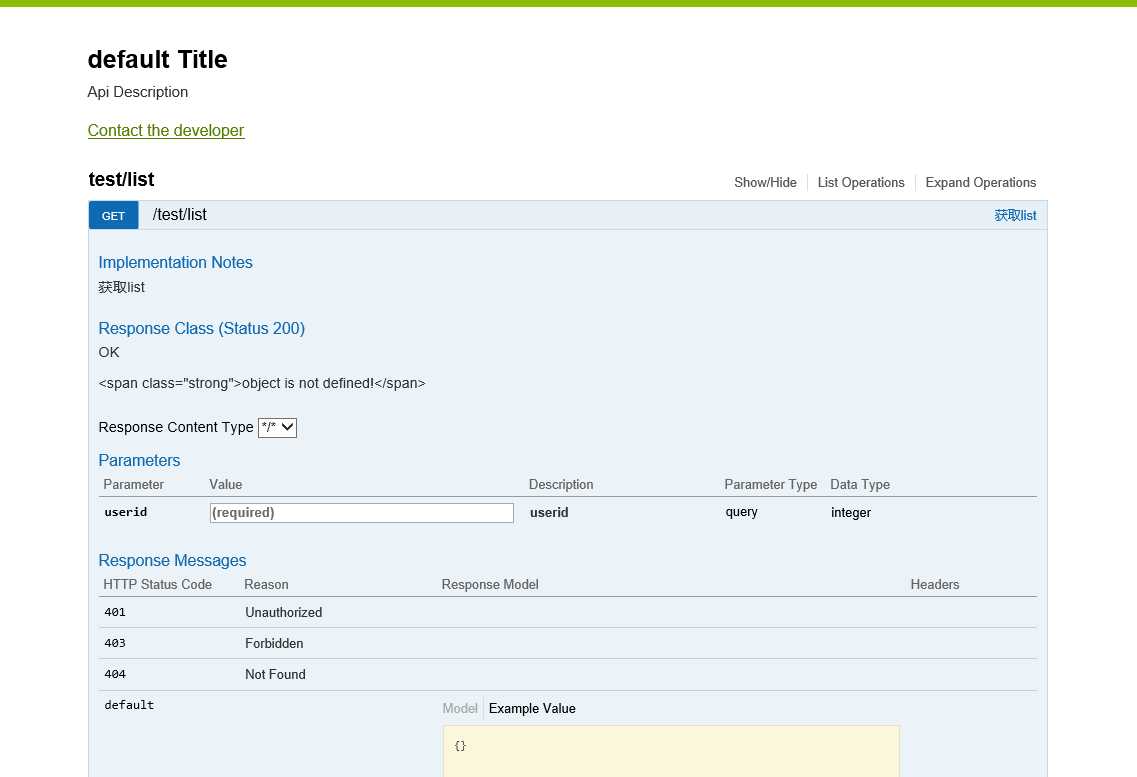
访问方式:主机+端口+项目名称+资源资源的映射+inde.html
所以我的访问路径是:http://192.168.1.200/flyl-api/swagger/index.html,访问结果如图:
(邮箱:514529013@qq.com)
原文:http://www.cnblogs.com/qthh/p/6516069.html
