这个视频Youtube没有字幕着实蛋疼,本人英语很渣,几乎听不懂,里面有很多文档没讲的重要信息(文档讲的东西太少了)。
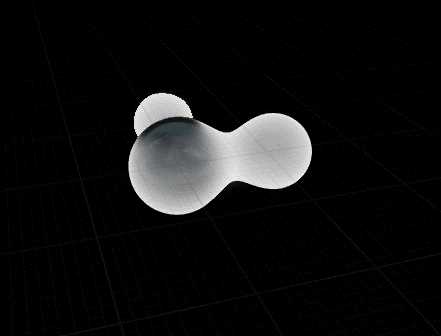
不过学习过后你可以解锁好几个姿势。这个视频主要是教你做DistanceField来写Shader,以下是最终效果:
一开始需要通过 r.ShaderDevelopmentMode 1,r.DumpShaderDebugInfo 1开启着色器开发模式(不过本人没感觉有什么用,可能到了用RHI写HLSL会比较有用)
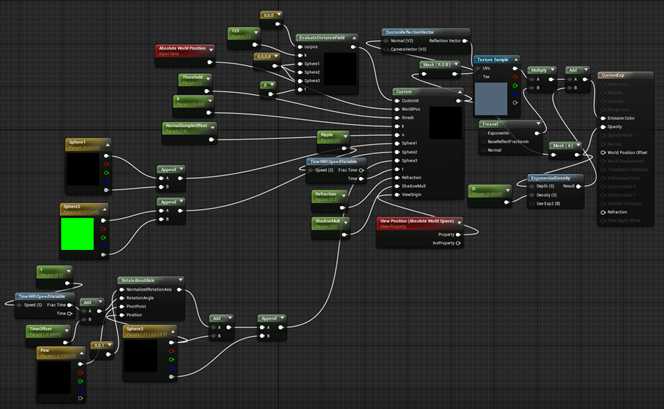
为了方便之后的各位,本人在此贴上视频以及材质节点:
第一段代码:
float3 CamVec=normalize(WorldPos-View.ViewOrigin);
float3 curpos=WorldPos;
float3 normal=0;

int maxsteps=16;
float curdist,accum=0;
float minstepsize=0.01;
int i=0;
while(i<maxsteps)
{
	curdist=CustomExpression0(Parameters,curpos,k,Spere1,Spere2,Spere3,t);
	if(curdist<thresh)
	{
		return float4(1.0,1.0,1.0,1.0);
	}
	curpos+=CamVec*max(minstepsize,curdist);
	minstepsize+=0.02;
	i++;
}
return 0;
第二个CustomNode,于37:08贴出代码
//evaluate the distance
float s1=distance(Sphere1.xyz,curpos)-Sphere1.w;
float s2=distance(Sphere2.xyz,curpos)-Sphere2.w;
float s3=distance(Sphere3.xyz,curpos)-Sphere3.w;

float dot1=dot(normalize(curpos-Sphere1.xyz),float3(0.707,0.707,0))-1;
float dot2=sin(dot1*2+(t*2))*1.5;
dot2+=sin(dot1*24+(t*8))*0.07;
s1-=dot2;

float h=saturate(0.5+0.5*(s2-s1)/k);
s2=lerp(s2,s1,h)-k*h*(1.0-h);

h=saturate(0.5+0.5(s3-s2)/k);
float curdf=lerp(s3,s2,h)-k*h(1.0-h);

return curdf;
33:20 查看HLSL代码中的 GetMaterialEmissiveRaw,发现这个函数写了连接到自发光上的所有节点信息,也就说把之前的节点都转化为代码了。
50:00为止的完整代码(之前的代码为了方便演示,把法线以为密度部分分离,以下是最后以后的代码):
//metaballs simple
float3 CamVec=normalize(WorldPos-ViewOrigin);
float3 curpos=WorldPos;
float3 normal=0;

int maxsteps=64;
float curdist,accum=0;
float minstepsize=0.01;
int i=0;
while(i<maxsteps)
{
	curdist=CustomExpression0(Parameters,curpos,k,Sphere1,Sphere2,Sphere3,t);
	if(curdist<thresh)
	{

		curpos+=CamVec*curdist;
		normal.x=CustomExpression0(Parameters,curpos+float3(1,0,0)*o,k,Sphere1,Sphere2,Sphere3,t);
		normal.y=CustomExpression0(Parameters,curpos+float3(0,1,0)*o,k,Sphere1,Sphere2,Sphere3,t);
		normal.z=CustomExpression0(Parameters,curpos+float3(0,0,1)*o,k,Sphere1,Sphere2,Sphere3,t);
		normal=normalize(normal);
		CamVec=lerp(CamVec,-normal,Refraction);

		int j=0;
		while(j<16)
		{
			curdist=CustomExpression0(Parameters,curpos,k,Sphere1,Sphere2,Sphere3,t);
			if(curdist<ShadowMult)
			{
				curdist=max(0,curdist);
				accum+=ShadowMult-curdist;
			}
			curpos+=CamVec*10;
			j++;
		}
		return float4(normal,accum);
	}
	curpos+=CamVec*max(minstepsize,curdist);
	minstepsize+=0.02;
	i++;
}
return 0;
以下是最终的材质节点连线:
50:00之后演示了最终在Demo中用的部分代码(这个我没测试过):
float3 startpos=curpos
float3 accum=0;
float3 normal=0;

int i=0;
	float curdist =CustomExpression2(Parameters,curpos,k,sphere1,sphere2,sphere3,sphere4.t);
	accum-=curdist*TraceVec;
	curpos-=TraceVec*curdist;

	curdist=CustomExpression2(Parameters,curpos,k,sphere1,sphere2,sphere3,sphere4.t);
	accum-=curdist*TraceVec;
	curpos-=TraceVec*curdist;

	curdist=CustomExpression2(Parameters,curpos,k,sphere1,sphere2,sphere3,sphere4.t);
	accum-=curdist*TraceVec;
	curpos-=TraceVec*curdist;

return startpos+accum;
最后传入WorldPositionOffset,可以做出一个球体融合效果。
1:00:00 演示了获取各种屏幕属性
https://docs.unrealengine.com/latest/INT/API/Runtime/Engine/FViewUniformShaderParameters/index.html
在CustomNode中输入View.ExposureScale;当然还有别的几个UniformShader条目,可以得到的属性还挺多。
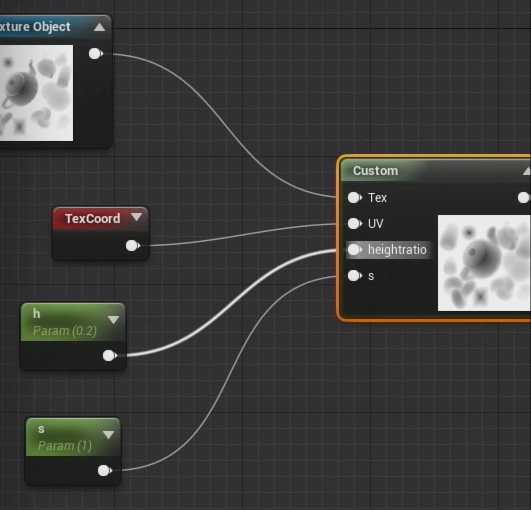
1:08:50 Height to DF,一个高度图转Distance Field代码(也没测试过,图片用的是引擎里的,可以通过展开EngineContent搜索Texture找到):
heightratio=min(0.2,heightratio);
float 2 texsize=0;
float levels=0;
Tex.GetDimensions(0,texsize.x,texsize.y,levels);
texsize.x=min(texsize.x,256*s);
texsize.y=min(texsize.y,256*s);

float searchlength=max(texsize.x,texsize.y)*heightratio;
float mindist=1;

float3 startpos=float3(UV.x,UV.y,1);
float3 sampledpos=0;
for(int i=-searchlength;i<=searchlength;i++)
{
	for(int j=-searchlength;j<=searchlength;j++)
	{
		sampledpos.xy=UV+float2(i,j)/texsize;
		float texatray=Tex.SampleLevel(TexSampler,sampledpos.xy,0);
		sampledpos.z=lerp(1,1-texatray,heightratio);
		mindist=min(mindist,length(startpos-sampledpos));
	}
}
return mindist/heightratio;
最后推荐了这个网站
http://www.iquilezles.org/www/articles/distfunctions/distfunctions.htm
里面介绍了几个基本形状的距离计算公式
How to use the Custom Material node and create Metaballs 官方视频学习笔记
原文:http://www.cnblogs.com/blueroses/p/6391995.html