之前讲过使用UIBezierPath在UIView的drawRect中绘图, 今天我们讲下另外一种方式: CAShaperLayer
先说说使用CAShapeLayer的优点: GPU执行, GPU执行, GPU执行
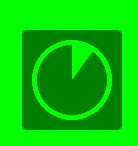
比如我们要画这样一个形状,

按照之前的思路是创建一个UIView子类, 用UIBezierPath画一个外围的不闭合圆弧, 在画中间点圆
代码量不是很多弹也不少, 那假如用CAShapeLayer实现时怎么样子的呢?
我们先上代码:
#import "ViewController.h"

@interface ViewController ()

@end

@implementation ViewController

- (void)viewDidLoad {

    [super viewDidLoad];

    //定义一个CAShapeLayer
    CAShapeLayer *myShapeLayer = ({

        //初始化一个实例对象
        CAShapeLayer *circle = [CAShapeLayer layer];

        circle.bounds        = CGRectMake(0, 0, 100, 100);  //设置大小
        circle.position      = self.view.center;            //设置中心位置
        circle.path          =         [UIBezierPath bezierPathWithOvalInRect:CGRectMake(0, 0, 100, 100)].CGPath; //设置绘制路径
        circle.strokeColor   = [UIColor redColor].CGColor;      //设置划线颜色
        circle.fillColor     = [UIColor yellowColor].CGColor;   //设置填充颜色
        circle.lineWidth     = 10;          //设置线宽
        circle.lineCap       = @"round";    //设置线头形状
        circle.strokeEnd     = 0.75;        //设置轮廓结束位置

        circle;
    });

    //以subLayer的形式添加给self.view
    [self.view.layer addSublayer:myShapeLayer];
}

@end
你没看错, 就是这么简单 甚至不用创建UIView子类
我们讲下几个重要属性:
path
可以看到,这里用的是UIBezierPath生成一个path,然后取他的CGPath来获取路径的。他是什么呢?
是一层对CGPath的封装,他更符合OC面向对象的语法风格。这都不是重点。重点是这里有一个初学者经常会犯的错误,
同学们在绘制曲线的时候经常会以layer在父图层中的相对位置去绘制曲线,这是错的!!!
应该以layer自身的坐标系划线。别不当回事,你错的时候就知道咋回事了??
另外,如下图所示,整个圆形UIBezierPath其实是分为多个子路径绘制的
strokeEnd
是轮廓终点的属性,取值范围[0,1]。代表轮廓终点在整条路径的百分比处,相应的还有strokeStart属性。
不过你应该思考的是:
首先,哪个是所谓的终点?靠上的那个点是终点。那为什么0.75是在那个位置呢?请记住,在iOS中,以x轴正方向(即水平向右)为0度,顺时针旋转一周为360度。
下面我们再使用CAShapeLayer绘制一些特殊的形状
比如hud这个, 我们之前用UIBezierPath在UIView的DrawRect中画画过, 相对比较简单
我们用CAShapeLayer事实看。
思路:
一个圆角正方形 + 一个空心圆 + 里面的圆弧
上代码, 重要方法都有注解
    CAShapeLayer *layer = ({

        CGRect rect = CGRectMake(0, 0, 100, 100);

        //创建矩形圆角正方形路径
        UIBezierPath * rectP   = [UIBezierPath bezierPathWithRoundedRect:rect cornerRadius:5];

        //创建圆路径
        UIBezierPath * circleP = [UIBezierPath bezierPathWithOvalInRect:CGRectMake(10, 10, 80, 80)];

        //内部弧路径
        UIBezierPath * interP  = [UIBezierPath bezierPathWithArcCenter:CGPointMake(50, 50)
                                                                radius:35
                                                            startAngle:1.5 * M_PI
                                                              endAngle:1.7 * M_PI
                                                             clockwise:NO];
        [interP addLineToPoint:CGPointMake(50, 50)];
        [interP closePath];

        //合体
        [rectP appendPath:circleP];
        [rectP appendPath:interP];

        CAShapeLayer * layer = [CAShapeLayer layer];
        layer.bounds         = CGRectMake(0, 0, 100, 100);
        layer.position       = self.view.center;
        layer.path           = rectP.CGPath;
        layer.fillColor      = [UIColor colorWithWhite:0 alpha:0.5].CGColor;
        layer.fillRule       = kCAFillRuleEvenOdd;  //重点, 填充规则

        layer;
    });

    [self.view.layer addSublayer:layer];
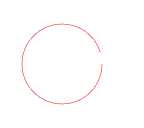
下面我们再画这样一个圆形进度条
直接上代码
#import "ViewController.h"

@interface ViewController ()

@property (nonatomic, assign)  CGFloat  end;
@property (nonatomic, strong)  CAShapeLayer *mylayer;
@property (nonatomic, strong)  CADisplayLink *displayLink;
@end

@implementation ViewController

- (void)viewDidLoad {

    [super viewDidLoad];

    self.mylayer = ({

        //创建圆路径
        UIBezierPath * circleP = [UIBezierPath bezierPathWithOvalInRect:CGRectMake(10, 10, 80, 80)];


        CAShapeLayer * layer = [CAShapeLayer layer];
        layer.bounds         = CGRectMake(0, 0, 100, 100);
        layer.position       = self.view.center;
        layer.path           = circleP.CGPath;
        layer.strokeColor    = [[UIColor redColor] colorWithAlphaComponent:0.5].CGColor;
        layer.lineWidth      = 1;
        layer.strokeStart    = 0;
        layer.strokeEnd      = 0;
        layer.fillColor      = [UIColor clearColor].CGColor;
        layer.fillRule       = kCAFillRuleEvenOdd;

        layer;
    });

    [self.view.layer addSublayer:self.mylayer];

    self.displayLink = [CADisplayLink displayLinkWithTarget:self selector:@selector(changeEnd)];
    [self.displayLink addToRunLoop:[NSRunLoop currentRunLoop] forMode:NSRunLoopCommonModes];

}

- (void)changeEnd {

    self.end = self.end + 0.01;
    self.mylayer.strokeEnd = self.end;
    if (self.end == 1) {

        [self.displayLink invalidate];
    }
}

@end
原文:http://www.cnblogs.com/zhouxihi/p/6273796.html