由于项目年后要进行组件化,考虑到如果公司内部实现一些私有的组件,不对外公开,而又想在不同项目中使用,该怎么办呢?
使用Cocoapods制作私有库就完美的解决了这个问题。下图就是使用私有库带给我们的好处:
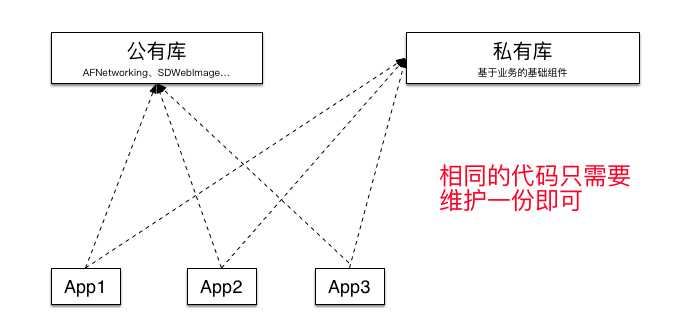
Cocoapods是如何实现查找第三方库呢?如下图:
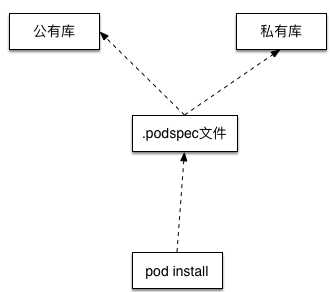
从图中,可以看到通过.podspec可以找到我们想要的第三方库,那么.spec是什么呢?如下:
Pod::Spec.new do |s|
s.name = "JSPatchtest"
s.version = "0.0.1"
s.summary = "yoowei 测试利用SVN创建私用库"
s.description = <<-DESC
yoowei 测试利用SVN创建私用库
DESC
s.homepage = "https://www.baidu.com"
s.license = "MIT"
s.author = { "yoowei" => "yoowei@126.com" }
s.platform = :ios, "7.0"
s.source = { :svn => "https://yoowei@yoowei.svn.net:443/svn/yoowei/ios/3.0/branches/JSPatchtest",:tag => "0.0.1"}
s.source_files = ‘yoowei/**/*‘
end
至此,我们明白了查找到第三方库背后的原理。但是,具体如何进行搜索的呢?
先解释一个概念,什么是Spec Repo?它是所有的Pods的一个索引,也就是一个容器(集合),所有公开的Pods都在这个里面。实际上就是一个Git仓库remote端,当你使用了Cocoapods,这个仓库会被clone到本地的~/.cocoapods/repos目录下,进入到这个文件下可以看到master文件夹,就是官方的Spec Repo了。当你pod search的时候就在master这个文件下面查找的。
但是问题来了,我们公司用的是SVN ,网上的资料介绍的绝大多数是基于git的 ,怎么办?
查找资料发现:
#
# Specify the location from where the source should be retrieved.
# Supports git, hg, bzr, svn and HTTP.
#
结果是明确的,支持SVN制作私有库,那么接下来就是不断的踩坑,终于成功了,记录下来备忘,如果能够帮到别人更好。
至于需要SVN账号密码,在接下来的步骤里面会有设计。
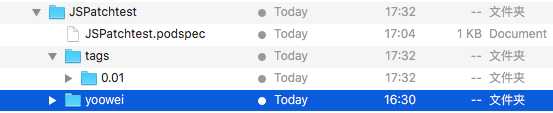
1、我利用JSPatch作为自己的私有库的组件,进项测试,建立如下的目录结构,并提前将JSPatchtest上传到我们SVN服务器

SVN上面的文件结构(如下)

2、把svn上面对应的JSPatchtest代码check out到本地,cd到JSPatchtest该目录下,使用pod命令创建一个podspec文件。
$ pod spec create JSPatchtest
具体终端操作如下:
$ cd /Users/galahad/Desktop/yoowei
$ svn co https://yoowei@yoowei.svn.net:443/svn/yoowei/ios/3.0/branches/JSPatchtest
A JSPatchtest/yoowei
A JSPatchtest/yoowei/JPEngine.h
A JSPatchtest/yoowei/JSPatch.js
A JSPatchtest/yoowei/JPEngine.m
Checked out revision 41541.
$ cd /Users/galahad/Desktop/yoowei/JSPatchtest
$ pod spec create JSPatchtest
Specification created at JSPatchtest.podspec

3、打开JSPatchtest.podspec文件,进行修改(不明白的可以先查资料了解)。然后将文件提交到SVN服务器
Pod::Spec.new do |s|
s.name = "JSPatchtest"
s.version = "0.0.1"
s.summary = "yoowei 测试利用SVN创建私用库"
s.description = <<-DESC
yoowei 测试利用SVN创建私用库
DESC
s.homepage = "https://www.baidu.com"
s.license = "MIT"
s.author = { "yoowei" => "yoowei@126.com" }
s.platform = :ios, "7.0"
s.source = { :svn => "https://yoowei@yoowei.svn.net:443/svn/yoowei/ios/3.0/branches/JSPatchtest"}
s.source_files = ‘yoowei/**/*‘
end
当我们用的svn时候,
s.source = { :svn => "https://yoowei@yoowei.svn.net:443/svn/yoowei/ios/3.0/branches/JSPatchtest"}
细心的你应该发现默认的时候是有一个tags存在的,现在先删掉,后面会叙述。
s.source_files = "yoowei", "yoowei/**/*"
4、使用
刚巧下载了一个LXMySelf的demo,就在这里面试一下
podfile文件描述如下:
target ‘LXMySelf‘ do
pod ‘AFNetworking‘
pod ‘Masonry‘
pod ‘UITableView+FDTemplateLayoutCell‘
pod ‘MJRefresh‘
pod ‘MJExtension‘
pod ‘MBProgressHUD‘
pod ‘SDWebImage‘
pod ‘YYCache‘
pod ‘SDCycleScrollView‘
pod ‘JSPatchtest‘, :svn => ‘https://yoowei@yoowei.svn.net:443/svn/yoowei/ios/3.0/branches/JSPatchtest‘
end
注意如果是首次的话,会让你输入SVN权限密码的。(由于刚操作了一遍了,密码已经输入过了)
$ cd /Users/galahad/Desktop/yoowei/LXSelfProject-master
$ pod install
Analyzing dependencies
Pre-downloading: `JSPatchtest` from `https://yoowei@yoowei.svn.net:443/svn/yoowei/ios/3.0/branches/JSPatchtest`
Downloading dependencies
Using AFNetworking (3.1.0)
Installing JSPatchtest 0.0.1 (was 0.0.1)
Using MBProgressHUD (1.0.0)
Using MJExtension (3.0.13)
Using MJRefresh (3.1.12)
Using Masonry (1.0.1)
Using SDCycleScrollView (1.65)
Using SDWebImage (3.8.1)
Using UITableView+FDTemplateLayoutCell (1.4)
Using YYCache (1.0.3)
Generating Pods project
Integrating client project
Sending stats
Pod installation complete! There are 10 dependencies from the Podfile and 10 total pods installed.
检查一下,安装成功。
5、补充tag设置
设置tag其实还是很简单的,我这里使用的是cornrstone管理svn代码。需要在JSPatchtest目录下新建一个tags文件夹,我采用的是本地创建好,然后上传到SVN。

SVN目录结构如下,选中yoowei文件夹右击 Tag ,填写tag和选择tags的位置,之后创建tags.

创建完tags之后的SVN目录结构。
6、再试
podfile文件描述如下:
target ‘LXMySelf‘ do
pod ‘AFNetworking‘
pod ‘Masonry‘
pod ‘UITableView+FDTemplateLayoutCell‘
pod ‘MJRefresh‘
pod ‘MJExtension‘
pod ‘MBProgressHUD‘
pod ‘SDWebImage‘
pod ‘YYCache‘
pod ‘SDCycleScrollView‘
pod ‘JSPatchtest‘, :svn => ‘https://yoowei@yoowei.svn.net:443/svn/yoowei/ios/3.0/branches/JSPatchtest‘,:tag =>‘0.0.1‘
end
终端操作:
$ pod install
Analyzing dependencies
Pre-downloading: `JSPatchtest` from `https://yoowei@yoowei.svn.net:443/svn/yoowei/ios/3.0/branches/JSPatchtest`, tag `0.0.1`
Downloading dependencies
Using AFNetworking (3.1.0)
Installing JSPatchtest 0.0.1 (was 0.0.1)
Using MBProgressHUD (1.0.0)
Using MJExtension (3.0.13)
Using MJRefresh (3.1.12)
Using Masonry (1.0.1)
Using SDCycleScrollView (1.65)
Using SDWebImage (3.8.1)
Using UITableView+FDTemplateLayoutCell (1.4)
Using YYCache (1.0.3)
Generating Pods project
Integrating client project
Sending stats
Pod installation complete! There are 10 dependencies from the Podfile and 10 total pods installed.
检查安装成功
疑问1?
当tag版本未改变,修改了本地代码,pod install能否更新成功?
如果不能,是否需要将pod file文件中引用该库注释先删除,再添加执行两次pod install?大家可以尝试一下。
疑问2?
如果我们自己的组件里面,
s.dependency ‘ AFNetworking‘, "~> 3.0.0"
应该在工程文件podfile地方需要先pod AFNetworking。
如果有其他的问题的话,日后慢慢改正。
下次会将踩坑过程中遇到的问题整理出来,今天由于待会有事,暂时到此为止。
利用Cocoapods、SVN 创建私有库实现方案(yoowei)
原文:http://www.cnblogs.com/richard-youth/p/6266101.html